
Wednesday, February 29, 2012
Monochromatic colored card
As I have previously mentioned, I am not a pink person, I am more of a beige on beige kinda girl. This next card is right up my alley as it is a cafe au lait colored card. The background paper is by Tim Holtz. The ruled paper is by Authentique, as are the words. I used an "ek" punch to get that torn notebook look on the left side. The stamp is by Stampotique done with StazOn Brown Timber ink, the crown is a die by Tim Holtz, and the little golden pearls are by Queen and Co. I wanted a masculine looking card and I feel I achieved that. The finished card measures 5" x 7".
 I agree with the sentiment: "happiness is a choice you make". I think we are all just about as happy as we choose to be. See ya tomorrow.
Tuesday, February 28, 2012
Quote the raven...nevermore
Here is another little Edgar Allen Poe project. I stamped the literary crow (stamp by Lost Coast) onto a piece of cardboard with Archival Black ink, used clear embossing powder and hit it with my heat gun. I cut out the crow and glued the phrase (Alpha Stamps collage sheet) across his eyes. Using StazOn Timber Brown ink I stamped the pen set from Stampers Anonymous, Tim Holtz Visual Artistry Collection across the bottom of the 5"x7" beige card stock. I die cut the star out of some old book paper that has been reinforced with gesso on the back side. I took a heart from Tim's grunge board collection and inked it with the Timber Brown ink and then heat embossed it with clear powder I glued the hearts together and placed it a little off center. Then I glued the red rhinestone heart by Nicole Crafts in the center to represent Poe's work called "The Telltale Heart". After positioning the bird on the pen "fence", I cut some of my favorite phrases from the collage sheet and glued them randomly around the card. Poe's stories are a bit scary but his poetry has always appealed to me.


Monday, February 27, 2012
Edgar Allen Poe
I am currently working on several different projects all involving the theme of "Poe". I plan on submitting them to a publication in about a week or so. This project involved a lot of drying time but I finally finished it. Poe is King, of course, he has the hat with the hole in the top to prove it. I used Tim Holtz Grungeboard that is pre-cut in the shape of a heart and has texture. I rubbed a Timber Brown StazOn ink pad over the surface of the heart and then dusted it with embossing powder and heat set it. The crown is the same grungeboard product with a touch of Claudine Hellmuth's red acrylic paint. I found the red key hole at an antique store in Boston and attached a wing (found at the Brimfield Fair ages ago) made of copper and also a grungeboard wing painted Ranger's Fired Brick red. The image of Poe is from a digi collage sheet sold by Alpha Stamps. I love the way you can buy the collages in the middle of the night and usually have them the next morning to use. Wonderful. The little dangling factor at the bottom includes a tiny key from Alpha Stamps, a Tim Holtz pearl and another Brimfield treasure, a tiny heart. I put Poe's name on the heart and encased it in Glossy Accents. Annabelle Lee is in the key hole, also encased in Ranger's Glossy Accents, so you can just barely see her.
 It turned out to be a wall hanging or an ornament of some kind that measures 5" wide by 8 " long including the chain. I have one more project to share with you tomorrow using the Poe theme.

Sunday, February 26, 2012
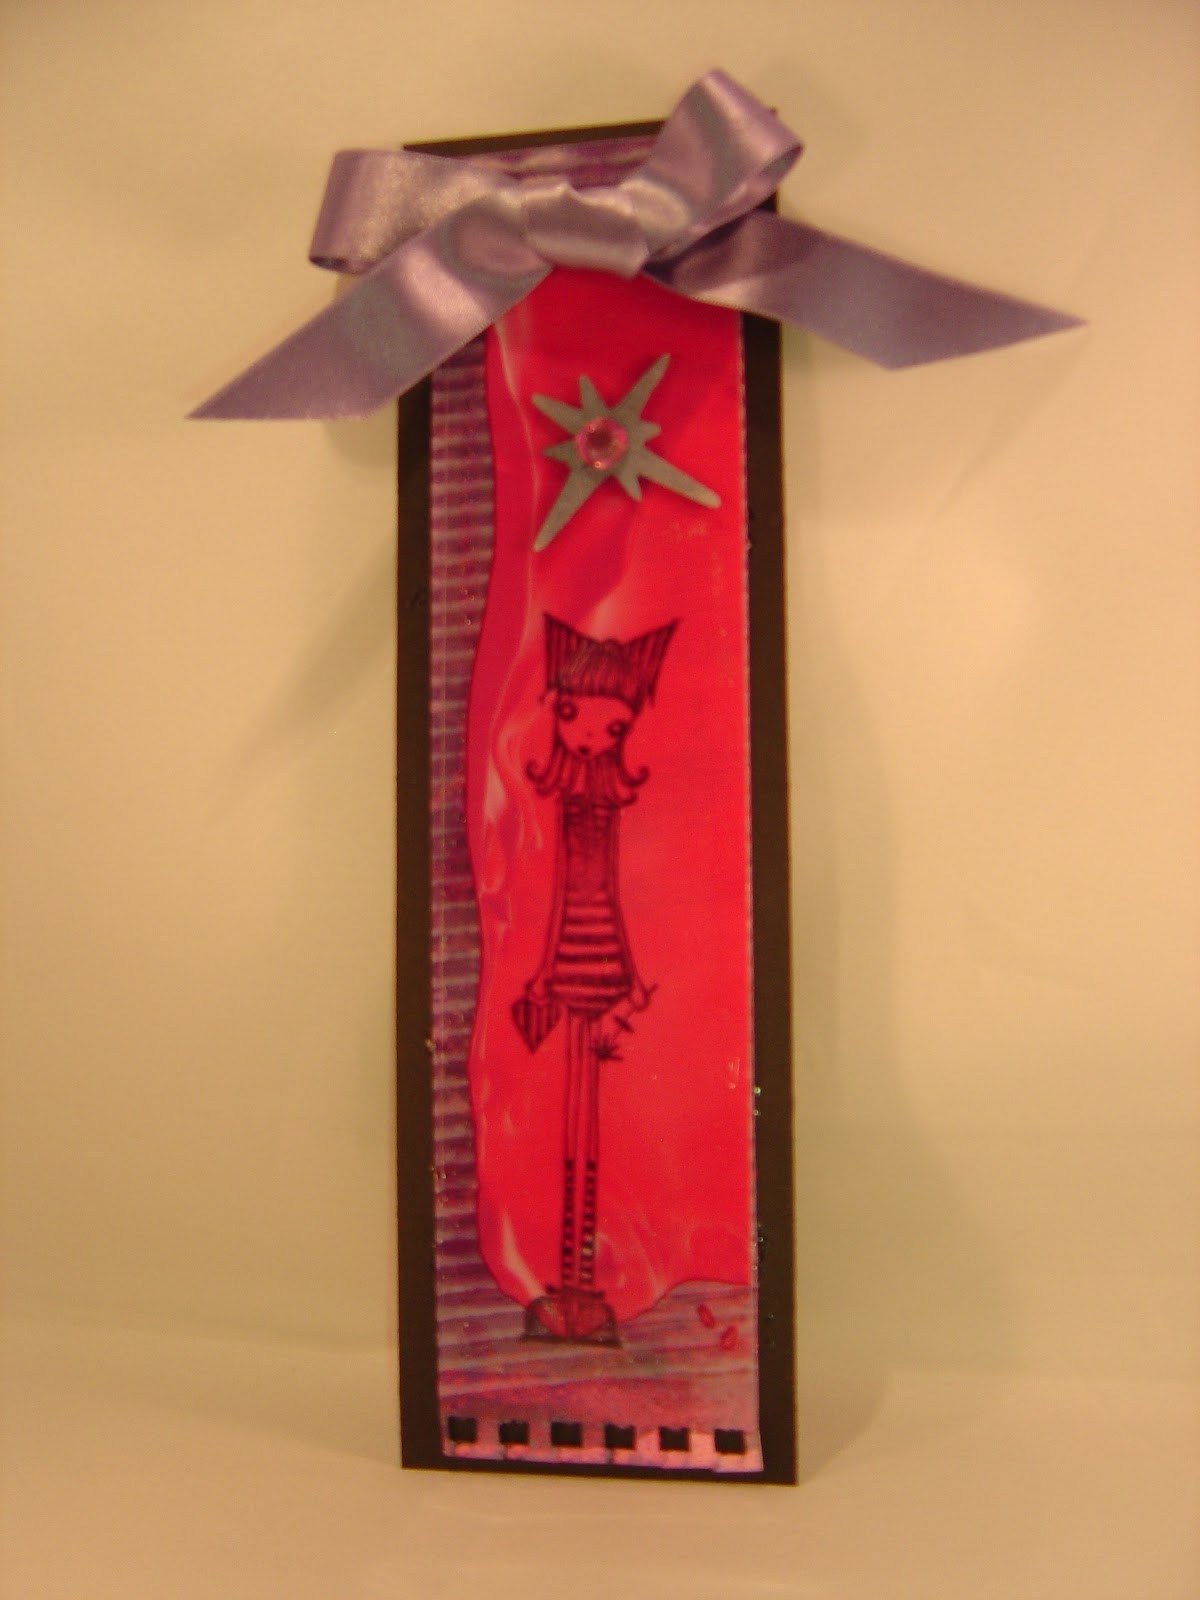
Purple Haze
I still have so many partially finished purple, pink and black things that I made for the challenge. I entered the tag but do like this little book mark.
 I painted purple acrylic paint onto some watercolor paper, then put it through the crimper to give it some ridges. The torn edge is on the bottom with a piece of plastic over it. The stamped image is "the girl with the heart purse" by Stampotique using Black StazOn Ink. I glued the panel onto a piece of black card stock and tied a satin light purple ribbon at the top. Then I added the star burst in Grungeboard with a little sparkle on it. Now all she needs is a new home in a really good book!
Saturday, February 25, 2012
Weekly Challenge #59:: Mardi Gras
After having said I'm not big on purple, my studio seems awash with purples and pinks. Go figure. There is a challenge this week on the Zentangle website "I am the Diva". The challenge is to use the Mardi Gras theme to create a tile or another piece of ZIA (Zentangle Inspired Art). The traditional colors of Mardi Gras are purple, green and gold. Rather than go with a bead theme I decided to do a mask with hair tangled all around the face. The face has the colors purple and green done with chalks and watercolor pencils. If you look closely you can see that there are tiny bursts of metallic gold all around her. The ZIA measures 8.5" x 11.5".
 The whole process took me about 2 hours to complete. Written on the side of her neck is the phrase "Laissez les bon temps rouler" (Let the good times roll"). In the left corner it asks "who are you?" Have a great weekend. Thanks for stopping by to take a peak.

Friday, February 24, 2012
Stampotique Challenge: SDC49:: Purple, Pink with Black
It's that time again! Stampotique's challenge for us is to use only their stamps with a color scheme of purple, pink and black. I want to begin by saying that purple and pink are not my colors. I am more of a beige kind of girl so anything other than that is a real stretch for me. I started by painting some purple acrylic paint on a piece of watercolor paper and then layered some bright pink onto the paper. Cut it in the shape of a tag measuring 7" x 3 1/2". To begin with I tore off the bottom of the tag and rubbed some of Ranger's Black Soot ink on the bottom, dipped it in embossing powder and hit it with my heat tool. I found a piece of plastic that had some pink splashed paint design on it and glued that onto the right side of the tag. I stamped my new girl "Angel" on the left side and glued some Prima flowers as a bouquet with 3 black rhinestones. I don't have tons of Stampotique stamps at this point so I had to improvise a little for the phrase. I used my Dymo Organizer Xpress to print out the phrase "she decided to spread her wings a bit!" I tied a torn piece of pink cloth into a bow along with a piece of black ribbon. There are three little bells attached to the top. Aren't those supposed to ring when an angel gets their wings? (According to George in "It's a Wonderful Life".)
So here is my submission:
 I hope you like it! See ya tomorrow.
So here is my submission:

Wednesday, February 22, 2012
Naughty or Nice?
Are you feeling naughty or nice today? Always good to give fair warning. Today the ATC chunky mood block is done Wizard of Oz style using Graphic 45 paper, of course. Lots of ribbons and some little feet ala Tim Holtz.
 |
So what's it gonna be.....naughty  Here are a couple of side views.   |
Tuesday, February 21, 2012
Simon Says Stamp; London, Paris, NYC
Here is a third Muse. This one is for Art. What better city to place her in than Paris! I am also entering this one in the Simon Says Challenge since it needs to focus on either Paris, New York or London. Here she is:
 She is made from the same naked doll template from Stampington as the others, then I enhanced her with recycled bits from old cards and Jolene peel and stick items. The "art" stamp is from IndigoBlu and the Eiffel Tower is from Lmt'd Edition Rubberstamps. All inks are from Ranger. The piece measures 7 1/4" x 7 1/4".

Monday, February 20, 2012
Still Amused
This time I created Muse #2: Music. The name of that Muse is Ecterpe. Try saying that three times real fast. OK just try saying it once. Not a name that will catch on any time soon, it just doesn't roll off the tongue easily. Here's my starting point:
 And here is my finished girl in all her musical glory!


I used lots of Tim Holtz product today. Grunge Board, Ranger inks, Tim Holtz dies and dry embossing folder. I matted the image on black card stock and mounted it on an old piece of sheet music glued to a
7 1/2" x 7 1/2" piece of card board. Go have a great creative day! I am sure your Muse would want you to. I hope you are all having a nice day off. See ya tomorrow.
Sunday, February 19, 2012
For your aMUSEment only
So many people talk about their artistic "muse" lately. Maybe they always have talked about it but then I am relatively new to any kind of art. I have only been doing my "art" for the past 6 years or so. The only kind of art I did before that was looking at it in a museum (there is that "muse" word again) or doing little art projects with Holly for our a"muse"ment. I can see already that I'm running this one into the ground way too fast. I digress.
Stampington posted a challenge in their last magazine of a doll type figure completely unadorned, a lady in waiting, waiting for a stamp, some distressing and whatever else we can all think up to do to it. She reminded me of the Goddess stamp they released last year, only larger. I immediately thought of the "muses" that so many talk about. A little research showed me that there were 9 Muses, all daughters of Zeus, each sister goddess in Greek mythology acting as the inspiration for a different type of art, poetry, song or science. The ones most of us have seen grace theaters in the form of the comedy mask and the tragedy mask. "An artistic guiding genius" seems to describe it best. A source of inspiration. Isn't that what the Internet and all the on-line classes are all about? Anyway, I made my first MUSE today using that plain doll figure. I thought I would start with the writer's muse. I believe her name is Calliope, her symbol is a book. This is my starting figure from Stampington's template:
 This plain jane is just screaming for little ink and bling. I traced and cut the figure out of 100 year old French book paper. I decided she really needed a mermaid tail, a crown and a veil of Mica. This is how she looks now.
 The entire piece measures 7 1/4" x 7 1/4". No book symbol, just book paper. Looking at her makes me want to write something! I think I'll do a whole series, probably not nine. Not unless my muse inspires me.
Stampington posted a challenge in their last magazine of a doll type figure completely unadorned, a lady in waiting, waiting for a stamp, some distressing and whatever else we can all think up to do to it. She reminded me of the Goddess stamp they released last year, only larger. I immediately thought of the "muses" that so many talk about. A little research showed me that there were 9 Muses, all daughters of Zeus, each sister goddess in Greek mythology acting as the inspiration for a different type of art, poetry, song or science. The ones most of us have seen grace theaters in the form of the comedy mask and the tragedy mask. "An artistic guiding genius" seems to describe it best. A source of inspiration. Isn't that what the Internet and all the on-line classes are all about? Anyway, I made my first MUSE today using that plain doll figure. I thought I would start with the writer's muse. I believe her name is Calliope, her symbol is a book. This is my starting figure from Stampington's template:


Saturday, February 18, 2012
The Bolton Common
I finally got the go ahead from the taste tester, Joe. This is some Mexican comfort food called Chilaquiles that is pretty simple yet versatile. It can be a side dish or if you ask me it would be wonderful as a substitute for Nachos. Just use it as the base and pile all kinds of yummy ingredients on top of it. Like what? ( you might ask) How about a dollop of guacamole, some salad, meat, salsa, beans, etc. Anything that reminds you of Nachos. Yum. Joe had it for dinner tonight with pork carnitas on the side and a nice green salad. He just told me he is also having it for breakfast tomorrow with an egg and salsa on the top. Oh, my. That does sound good. I thank his sister, Debbie, for this delicious and easy recipe! Here is my monthly contribution to our local newspaper.

The Mixing Bowl
By Renee Zarate
Mexican Comfort Food
My mother-in-law is an awesome cook. When she was a younger woman, she is now in her 80’s; she made her own tortillas every day for her family. After going to all that trouble you can be sure none would be going to waste. Not so many years ago if you wanted tortilla chips you had to make them yourself out of some of those left over corn tortillas. If my mother-in-law wasn’t making chips she would often make a quick Mexican side dish called Chilaquiles. Most of us don’t make out own tortillas now a days. Today if we want tortilla chips we can just go to any store and buy a bag. That’s what makes this dish so great. My sister-in-law, Debbie, is also a great cook and knows when to take a shortcut. She makes this simplified version of Chilaquiles that can be put together in just a few minutes. Served alongside some roasted chicken, a little salad and you’ve got a wonderful, flavorful meal. Family tested and Mother-in-law approved. Believe me that is saying something!
Chilaquiles
Preheat the oven to 350 degrees
One 16 ounce bag of corn tortilla chips, regular flavor
One 28 ounce can of Old El Paso Red Enchilada Sauce
One whole onion, chopped
1 teaspoon garlic powder
4 to 6 cups of cheddar cheese, grated
Grease a 13”x9” casserole dish. Sauté the chopped onion in a little oil until softened. Remove from the heat and pour the Enchilada sauce over the onions. Stir in the garlic powder. Pour the bag of chips into a large mixing bowl. Pour the enchilada sauce over the chips and toss until all the chips are coated. Cover the bottom of the casserole dish with a third of the chip mixture, then top with a third of the grated cheese. Repeat two more times ending with cheese on the top. Bake in a 350 degree oven for about 20 minutes.

Friday, February 17, 2012
Creative Card using Scraps
I saw an idea for a card today using ribbon scraps as an accent. I have a box full of ribbons scraps and an even bigger box full of paper scraps. This is what I came up with. The only stamp I used is my favorite crackle stamp by Indigoblu. I used Fired Brick ink by Ranger and stamped it on the red paper. Dusted some embossing powder over it and applied heat with my tool. All of the other elements are just glued to a plain, blank 5"x7" piece of cream colored card stock.
 I hope you like it, I do.

Thursday, February 16, 2012
Time well spent
I worked on my recipe for the Bolton Common today. I have 3 different ideas ranging from appetizers to side dishes to main dish. When in doubt I just run it past my official taster, Joe, aka my husband. So I will share that another day, he is on his third taste test.
In the meantime I made a couple of tags to share with you. The first one is made from a Stampotique stamp called Glimmering Hope.
 I stamped her on old book paper and sewed her onto a tag that had been colored with acrylic paints. I added a few scrabble tiles to spell out my sentiment. Then I tied a few ribbons on the top and it is ready to go. The next tag I made has a bird theme.
 I used an old map as the background paper. The bird is stamped on cork as is the nest. I used some old paint chips to make the eggs. Tied some ribbon on the top and there it is!
In the meantime I made a couple of tags to share with you. The first one is made from a Stampotique stamp called Glimmering Hope.


Wednesday, February 15, 2012
Tangled Hair
I thought it would be fun to do some Zentangled Inspired Art using rubber stamps. Since I really cannot draw I use stamps to make the faces and then I just tangle the hair all around. The woman's face is a stamp made by JudiKins. I stamped the face on a piece of 8 1/2" x 11 1/2" white card stock and did the tangles with Micron pens 01, 05 & 08. A touch of chalk for color and there it is, a little something for my hairdresser, Liz.
 And what is a gift without a little card to go with it?

 |
| This is a Paula Best stamp called Lg. Features |
Tuesday, February 14, 2012
Holly's Feeling Moody
My daughter, Holly, saw the mood boxes on my blog and she decided she needs one, too. Holly has and has always had two moods, nice and nicer! I have never in all her 29 years seen her lose her temper or get angry. She is known at work as "the good Holly". I suspect there is another Holly that works there.....enough said. I made the "good Holly" a mood box from Dina Wakley's Lonely Girl stamp and the Grunge circles stamp. I made the feet out of chunks of staples that are glued together with Ranger's Glossy Accents and then glued some old Scrabble letters on the bottom with Holly's initials:: HNA. Now she has her own mood box, just in case one day she wants to change her mood! :-)


 Holly is the nicest person I know. She is the kind of person I have always wanted to be! She does look like a "freakin' people person".


Sunday, February 12, 2012
SDC 48: CASE-Stampotique Stamps Only
It is Stampotique Challenge time again! This time we are CASE-ing one of the Stampotique designers. That stands for Copy and Steal Everything. Sounds easy, huh. It is harder than you think. I love all of their designer's work so it was really difficult to choose who to try and imitate. I chose Jane Wetzel. This is a copy of the piece I was imitating from her blog: http://anythingbutplainjane.blogspot.com/2012/02/pretty-party-dress-for-valentines-day.html

I hope Jane likes my copycat version. I made a 5"x7" card. I used Stampotique's Marcie stamp and Basic Grey's new paper called "Kissing Booth".
 So what are you creating this weekend?
I hope Jane likes my copycat version. I made a 5"x7" card. I used Stampotique's Marcie stamp and Basic Grey's new paper called "Kissing Booth".

Saturday, February 11, 2012
Cole and Old Navy
My step daughter, Lisette, sent me an email that I would love to share. The beautiful boy in this ad is our grandson (#2), Cole. This was his first modeling gig. Lisette said she was happy the clown face finally came in handy!
 Is that kid cute or what?

Friday, February 10, 2012
Exciting news today
While looking over my emails today I noticed one of my favorite newsletters called "Creative Impulse" was there. Many times they will show 2 or 3 different covers for one of their upcoming publications and the readers get to choose which one they like the best. I was shocked and amazed to see my work using the amazing Dina Wakley's grunge girl stamp on Cover C! Really, I almost fell out of my chair. Just to be nominated for me is a huge thrill, I'll probably hyperventilate if mine is chosen. (I'll keep a brown bag handy just in case.) So if you would like to take a look at it here is the link. It is the April 2012 issue of The Stampers' Sampler.
http://www.stampington.com/newsletters.html
http://www.stampington.com/newsletters.html
Thursday, February 9, 2012
Black/White Zen-Mandala
I wondered what my mandala Zentangle would look like if I did it on a 12" piece of black card stock with a white Gelly Roll pen. It really doesn't take as long as you would think to do one of these. It took me a few hours max. I considered it my morning stretch while I had my cup of coffee. Just a few minutes here and there during the day and Voila! it was done. Try it yourself, don't over think it, just one stroke at a time, as Rick and Maria (the inventors of Zentangle) like to say. You will notice that with each small rotation you get a different perspective of the wheel.
Kind of like life.
 It is not perfect but then neither am I and that's OK. Hope you will try it, it is very relaxing and fun.
Kind of like life.
 |
| Now rotate the wheel slightly and you get a different look. |
 |
| Look a little closer.... |

Tuesday, February 7, 2012
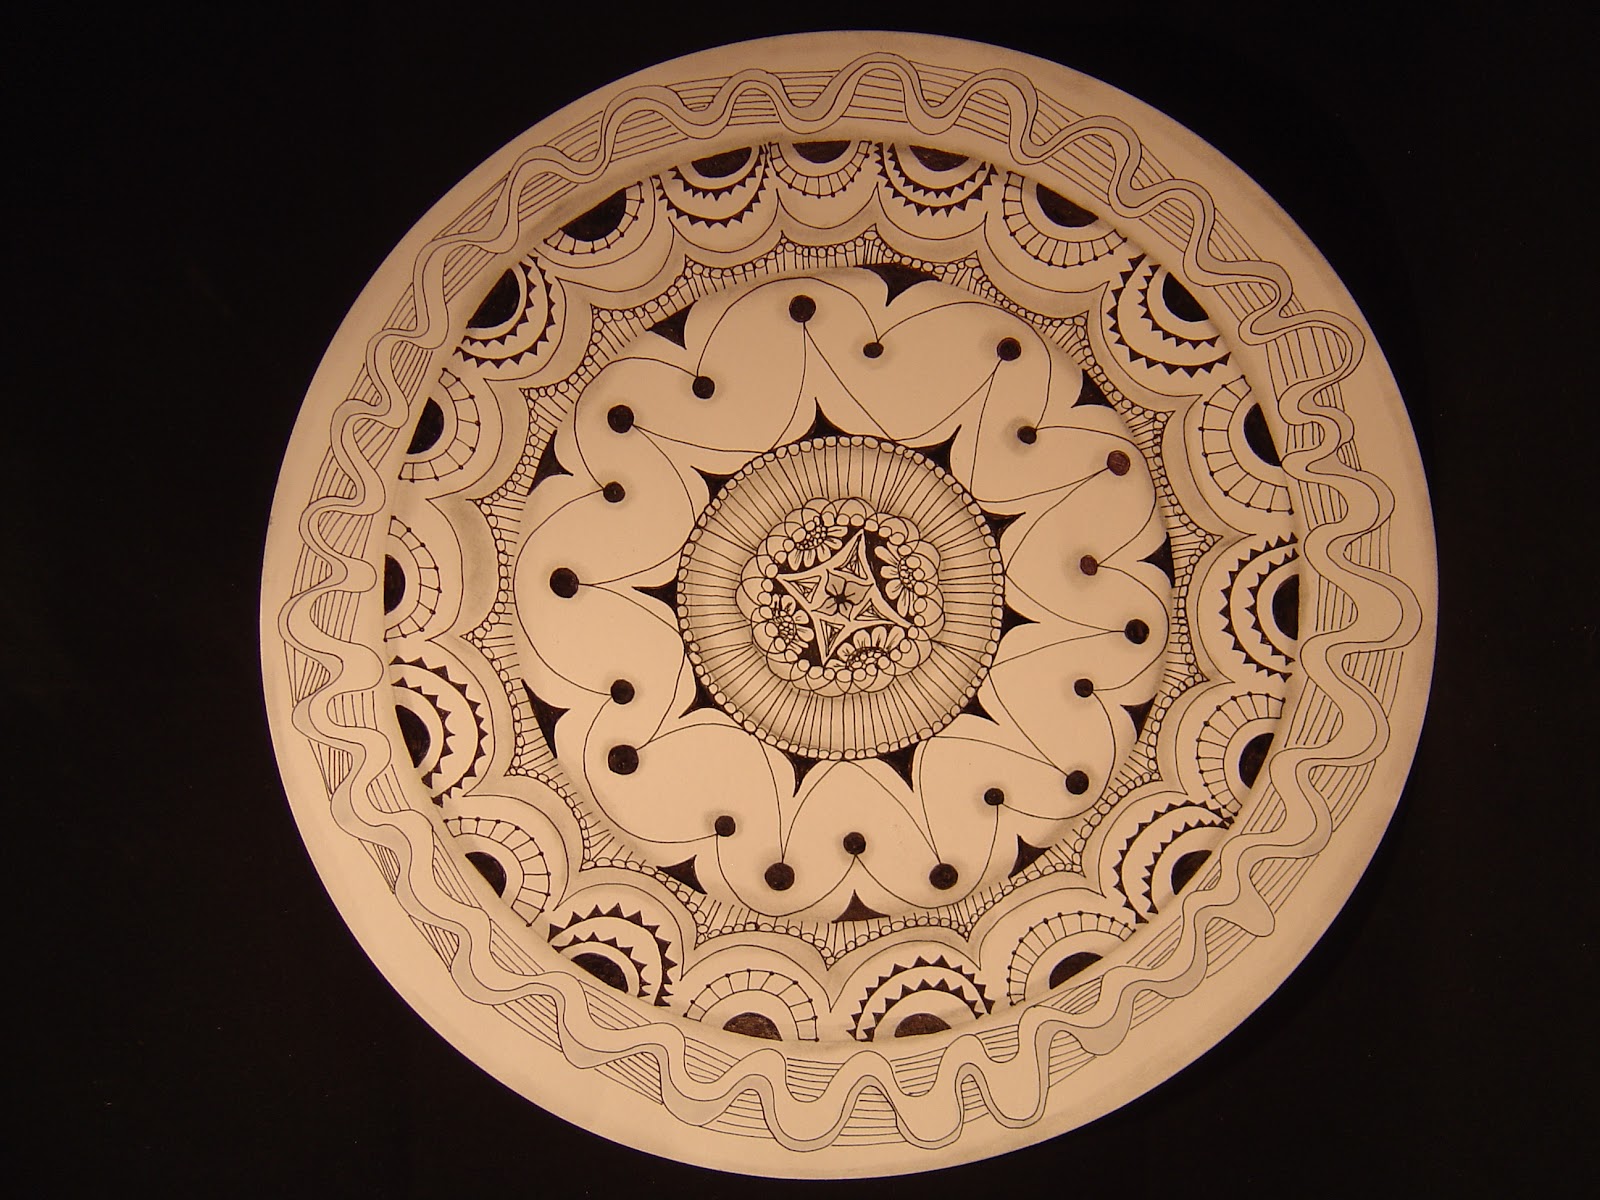
A Zentangle Inspired Mandala
Recently I met an artist in an online class, Jenny Doh's class that I mentioned in an earlier post, that makes mandalas and teaches others to do so also. I thought it would be fun to do a large circular mandala Zentangle style. I used a piece of 12" white cardstock that had been cut in a circle and a Micron 01 pen. I added a little color to the outside edge with Copics, did a little shading with a pencil and smeared it a bit. Here is my Mandala Inspired Zentangle.
 My thanks to Linda Wiggen Kraft for her inspiration!
Monday, February 6, 2012
Some more pages from the Sketchbook Project book
 |
| Graphic 45 "Le Cirque" paper & Stampotique stamps |
 |
| Time is of the essence in Wonderland. Stamps by Stampington. |
 |
| Young Marie Antoinette in the aperture and lots of talk about cake. |
 |
| Her therapy was FASHION. One might ask, "so how's that working for you?" |
 |
| This is the back of my little book. Alors, c'est fini! |
Saturday, February 4, 2012
The Sketchbook Project-Part 2
I thought I would share a couple more pages from my Sketchbook "The Writing on the Walls".
 My steam punk lady is a piece of clip art printed off from my computer on plain computer paper and transferred onto a strip of packing tape. After I put it on the packing tape I soak it in water and rub off the paper. This leaves only the translucent inky image. When I have just the image I am free to color the eyes, etc. with chalks or copics. I use Ranger's Glossy Accents to glue the tape securely to the paper because it dries clear. There is an aperture where you see the butterfly and when you turn the page this is what you see:


Nothing like a little Graphic 45, a Tim Holtz rubber stamp and Zentangle thrown in all together. I'll share some more with you tomorrow. Have a great Saturday!
Friday, February 3, 2012
The Art House Sketchbook Project
Have you heard about the Sketchbook Project? The folks at the Brooklyn Art Library have invited artists of all kinds (a mixed media artist's dream) to participate in this project. Each year they show a list of themes on their website. You choose a theme and send them a small contribution. In turn, they send you a small sketchbook that you can do anything with so long as it stays within the suggested measurements. You can take it apart, remove pages, paint it, you don't even have to follow your theme if you choose not to, so anything goes, do whatever you like. It just can't have a lot of ephemera attached to it that could fall off and oh yeah, it can't smell bad. I think that's fair. It even has your name and a small bar code on the back so you could actually find an artist's book if you wanted to. Last year I believe about 5,000 artists participated. After you work your magic on the book, you must mail it back to the Library, the deadline is Jan 31 if you want to be in the show. This project becomes a traveling art journal show that goes all over the country. When the tour is complete it is permanently housed in the the Brooklyn Art Library. I decided to participate a little late in the game and most of the themes were no longer available so the one I chose is "The Writing on the Walls". It just screams "Mene, mene, tekel and parsin" doesn't it? (Daniel 5: 25) I used a lot of stamps, gesso and other art products. I struggled with my end result but learned a valuable lesson for next year...sign up earlier. I would like to share my cover and the first two pages with you. This is actually my first official Art Journal. It was really fun to do, I might even do others.
 |
| Front cover |
 |
| Back cover |
 |
| The first two pages |
Thursday, February 2, 2012
SDC: Altered Items, Stampotique Stamps Only
Ah, it is challenge time again at Stampotique. It is always a challenge for me to use just one stamp line so I appreciate the opportunity to stretch my creative muscles. I have quite a few blank chunky ATC blocks so I will be altering a 3 1/2" x 2 1/2" block of wood. I used the little girl image called "Marcie". This is a mood block. It is always easy to see what the owner's mood is that day. Happy Day Marcie is on the front, Bad Day phrase is on the back. You can easily give "Fair Warning" by just turning your sweet looking block to show your mood for the day. : ) The side panels proclaim her normal sweet nature. The feet are made from miniature wooden thread spools spritzed with Pink Cadillac Glimmer Mist by Tattered Angels, the paper is a new release called "Kissing Booth" from Basic Grey. On top is a "crystal knob" (translated plastic) and the pearls are from Queen & Co. Just tie some matching ribbons on the top and we have a modern day Mood Ring!


Wednesday, February 1, 2012
Homework Part 2
I'm still following my wonderful class on-line with Jenny Doh. I shared our homework assignment yesterday and would like to share part 2 of the homework for this week with you also. Yesterday we had to make something that we felt came naturally for us. The assignment for today is to tear up the first homework project and make something else. Takes nerves of steel but here goes. Just say "bye, bye" to Alice....she disappeared on a piece of transfer tape (note to self, make a copy of the original for transfer tape attempts). So now we have the Mad Hatter as our focal point. I made a card, another thing that comes naturally to me.
 I cut a hole in both the Tim Holtz key paper and the 5x7" card and centered the mad hatter in that circle. I tore a piece of blue paper for the right side and glued 3 roses (Tim Holtz trimmings) and a lovely key from Alpha Stamps. When you look inside you will see it is a PARTY invitation of some sort!
 There he is, the Mad Hatter, the only survivor of the homework assignment. He is of course the stamp from Stampington's Alice in Wonderland collection. Our Mad Hatter has been firmly placed with his watch on a blue paint chip. Now if we only could have that party..........


Subscribe to:
Posts (Atom)