Showing posts with label Take It Make It Challenge. Show all posts

Friday, February 13, 2015

Craft Stampers Challenge Continues::Stenciling!

This month the Take It Make It Challenge is a fun and easy one....just use stencils in your work along with some stamping.  I decided to do a tag that incorporates a stencil, gel medium and some heavy embossing powder.

I started by stamping one of Dyan Reaveley's "Strength" girls on a tag and a scrap piece of paper.  I trimmed out the image on the scrap paper to serve as a mask.

The mask will protect the stamped image as I only want to stencil around it as a background effect.


Next I place my Dreamweaver stencil over the tag and applied an ample amount of IMAGINE Crafts new Turquoise Iridescent Creative Medium paste through the stencil with a palette knife.  While the paste was still wet, I sprinkled Ultra Thick Embossing Enamel powder over the paste and melted it with my heat tool.  Now I have an iridescent dimensional effect on the tag.


I wanted to add background color to this so I colored some Gelatos on top of the stenciling and blended them with a baby wipe.


I colored in the image with Copic and Memento markers; then inked the edges with StazOn Gothic Purple ink.  I hit some of the high points of the stenciling with the ink pad to drag the purple color throughout the tag. I was in a Diva mood so I stamped the word, cut it out and inked the edges with the purple pad and glued it over her eyes.


To add a little bling I sprayed Sheer Shimmer Spritz in Gold and let it pool in the cracks of the stenciling.  The buttons were colored to match with StazOn Studio Glaze and more Gold Sheer Shimmer was sprayed on them.  When the buttons were dry they were glued on top of the pink ribbon tied to the top.
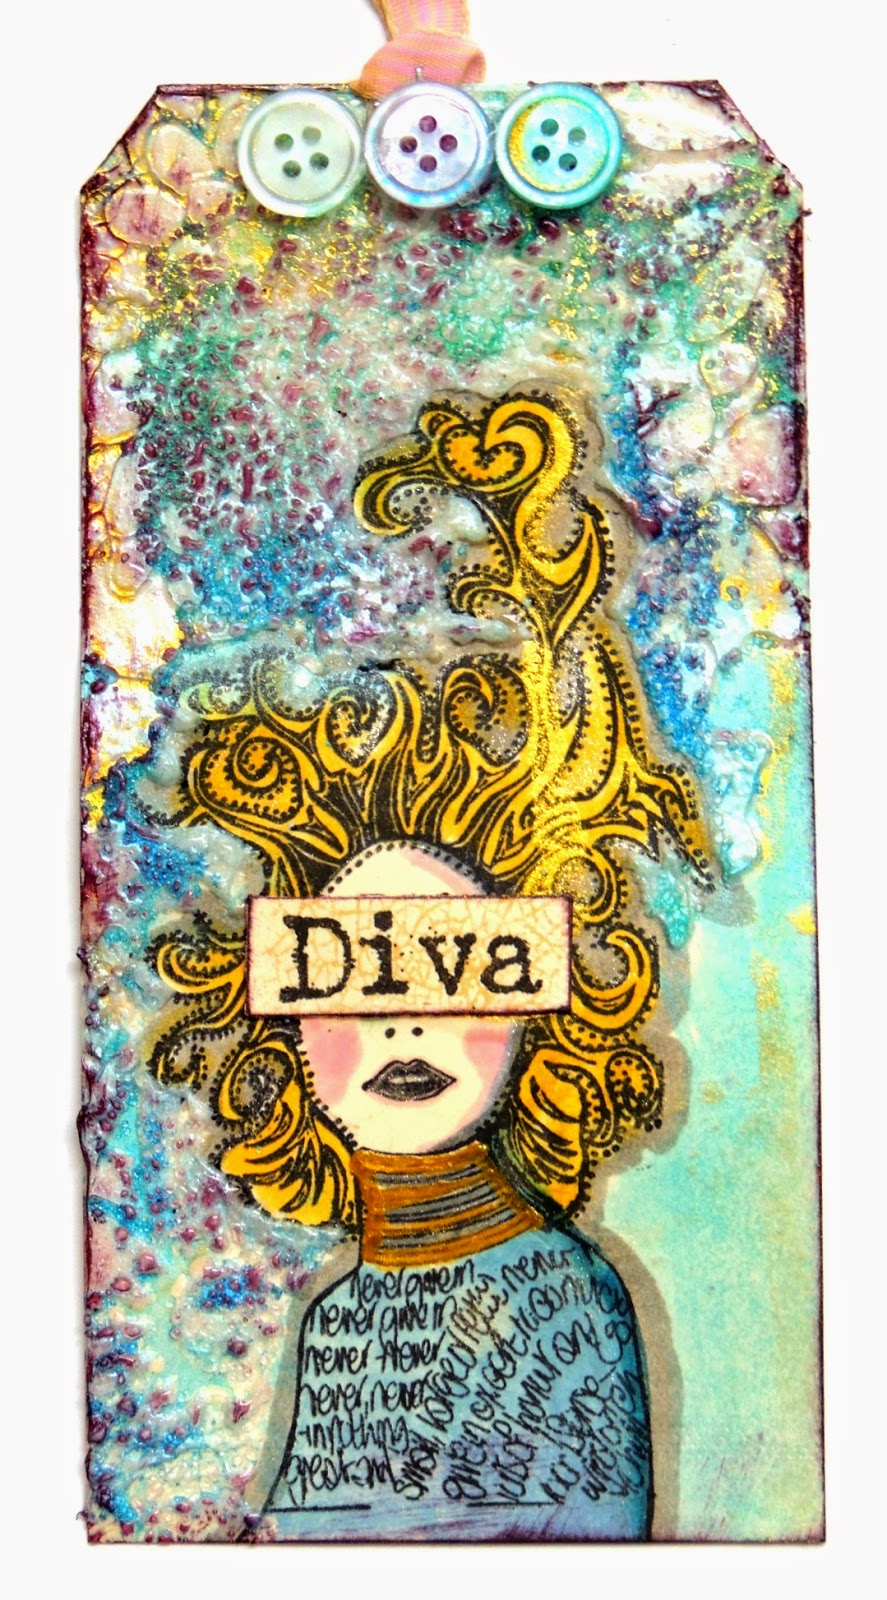

This is just another example of different ways to use a stencil.  Just be sure and wash your stencils immediately after using products like gesso and gel mediums otherwise the intricate designs could become blocked.  I hope you will join in the fun at the Craft Stampers Take It Make It Challenge this month, there are prizes to be won and a chance to be published in the CS magazine!

Take care ~ hugs, Renee xx

Friday, September 5, 2014

CS Challenge for September::Stamping on Tissue Paper

This month's challenge from the Crafter Stamper magazine is Stamping on Tissue paper.  My project involves both tracing an image on the tissue paper and then stamping on it later.  I wanted to try the technique in my pursuit of drawing faces so I traced a photograph that I have of my daughter.  The portrait became an art journal for her.  If you'd like to see how this evolved you can read the tutorial below.


This did start out as an experiment.  I wanted to do a portrait based on a traced image from a photo.  Here is the photo I used.


I placed a piece of tissue paper on top of the photo and lightly traced it with an Aquaellable Stabilo pencil.


After the image was traced I used Pan Pastels to color it in.  Keep in mind these will be blended later.


After the colors were blended to my satisfaction I cut out the image and glued it onto a piece of what I call "junk paper".  I do most of my work on a sheet of 140# water color paper.  These papers sit in a pile when they are covered with paint, ink and stamping.  They don't look like much until I unify the colors with a stencil and some white gesso.  In this case I did additional stamping of some Dina Wakley grungy hearts and then glued the image onto the paper with Mod Podge.  I purposely scrunched the tissue paper so it wouldn't look perfectly smooth.


I sewed some additional texture onto the page with my sewing machine and let some of the threads dangle.  I also made some lines with a credit card and some black gesso.


When this was dry I folded it in half and simply sewed it together with some pages in the middle for my daughter, Holland, to draw on.  There are 6 pages inside with gesso on them, primed and ready to go.


Now I added the stamping on top of the tissue paper.

The outside of the art journal


More stamping on top of the tissue paper with StazOn Jet Black permanent ink and stamps from Dina Wakley and Stampers Anonymous.  Now the journal is finished, it just needs some artwork inside.


The back of the journal


I hope you will rise to the challenge this month at the Craft Stamper website.  It is easy to upload your projects and there are some really nice prizes to win!  I'll post another stamped tissue paper project next week in case you can stop by.  As always, thanks for the visit.  Please leave a comment if you have time I'd love to hear from you.  Hugs~ Renee xx

Friday, August 1, 2014

Favorite Techniques for Take It Make It Challenge

For the Take It Make It Challenge this month we were asked to choose our favorite technique featured in the Craft Stamper magazine over the course of this year.  My favorite technique is the embossing powder resist.  It always takes me back to when I first began rubber stamping and is usually my go-to technique for backgrounds.  This technique, along with others, was featured in the August 2014 issue by Anna-Karin Evaldsson.  I decided to make a card featuring this technique in the background with one of Dyan Reaveley's girls glued on top of it.  Here is my card, a short tutorial will follow.


I began with a piece of 140# water color paper.  I use this type of paper quite often since I'm going to soak it with inks and distress it in other ways so I need a piece of paper that can stand up to this kind of treatment without falling apart.  I cut the paper to measure 5" by 7" so it will fit on the face of a blank white card.  I stamped my image, a Stampers Anonymous post card stamp, with embossing ink and followed it with Detail White embossing powder.  Then I watched the powder melt under the heat of my heat gun.


When the melted powder had cooled I sprayed Dylusions Spray Inks in different colors all over the paper.  For this I used Calypso Teal, Cut Grass and Lemon Zest.  I blotted this with a paper towel roll, allowed it to dry and then did a ghosting effect with Dina Wakley's word stencil and a spritz of water.  When this was completely dry I started gluing on my image and words.


I stamped Pondering Petunia on a separate piece of lovely (translates "pricey") Hot Press Finish 140# water color paper using StazOn Jet Black ink.  I stamped the word phrase from Dyan's Dylusions "Say It How It Is" on the same sheet of  water color paper and then trimmed them out.


I wanted to give her funky hair so I turned the octopus from Dyan's "Under the Sea" collection upside down, stamped it and then trimmed off the part that didn't fit on her head.  Since I had such lovely paper to work on I decided to use my DERWENT watercolour pencils.  They don't get out to play near often enough and they were perfect for this little lady; the colors stayed very intense.


I used the pencils to color the word phrase, too, and then cut it into sections to break it up and spread it out on the page.  I glued everything in place with a strong adhesive, Beacon 3-in-1 works well for me when using heavy papers.


After I inked the edges of the panel with Jet Black ink I adhered it to a blank white 5" by 7" card.

That was my favorite technique from the recent Craft Stamper magazine.  How about you?  Don't forget that this is an ongoing challenge on the Take It Make It Challenge site.  Show us your favorite technique and enter the challenge with the opportunity to win prizes and the possibility of  your work being displayed in an upcoming issue of the Craft Stamper magazine.  I hope to see your project there!  Have a great weekend. ~ Hugs~ Renee xxx

Friday, June 13, 2014

Craft Stamper Magazine Take It Make It Challenge~Bleach Blocking Technique

Have you entered your project yet at the CS Take It Make It Challenge?  You still have plenty of time.  You don't even have to use real bleach, water will do.  I did another project using the bleach blocking technique.  Here is the finished project, it'll be followed by a short tutorial showing you how simple it is!


I started out by cutting my own tag out of 140 lb water color paper.  (I ran out of tags.)  I applied three colors of Distress Ink to the tag with an applicator.  I used Shabby Shutters, Shaded Lilac and Dusty Concord.


Next I used a cosmetic sponge and the applicator to remove color by dipping them in water and then lifting off some of the ink.


Once I was satisfied with the effect I started stamping Dina Wakley's new stamps, little wonky birds and some phrases.  I used StazOn permanent ink to do this.  I cut the top corners at an angle and punched a hole in the center to make it look like a tag.


At this point I was disappointed in the way it looked so I decided I had nothing to lose.  I stamped Dyan Reaveley's leaves in black ink around the birds.  Then I decided to bring out my new Dina Wakley Acrylic paints and just play.  I stamped the leaves and painted them green.  Then I mixed other colors with a new product I bought this weekend called Whipped Spackle by Faber Castell, it is like a whipped gesso.  Very light and fun.


 You can really glob on the paint with the spackle.  It allows you to see the brush strokes too.  Next I added a little green ink around the leaves with a Memento Pear Tart pen.  A tiny bit of PICO irRESISTible on the eyes in a silver color followed by a drop of white pen for a catch light.  Then I distress the edges with StazOn Midnight Blue and tied some ribbons at the top through the punched hole and there we have it.


I hope you will enter the Challenge.  I've had more fun with this technique than I thought I would.  Be sure and link your creation so we can all see it.  Thanks for stopping by.  Talk to you soon ~ Renee xxx

Friday, June 6, 2014

Craft Stamper Take It Make It June Challenge~'Bleach' Blocking

For the month of June the Take It Make It Challenge is Bleach Blocking.  Do not fear....it does not involve real bleach.  Whew!  Personally I am a disaster any time a bottle of bleach is involved.  This is done with inks and water so no one gets hurt.  I decided to do my blocking work on a piece of watercolor paper and then make a set of cards from that paper.  This is my first finished project, if you'd like to see how it was done I've provided a tutorial.


Here is the technique for the challenge:
'Bleach' Blocking 

Technique: Simple background technique using just water and Distress ink. Create a background using Distress inks, then 'take off' blocks of the ink using a wet (and clean!) blending tool. As the water will remove the ink, it looks bleached out, hence the name of the technique. This is just a background technique, so don't forget to add in the stamping element of the challenge as well!

I started with a large sheet of 140 lb watercolor paper.  I sprayed some Dylusions in blues and greens on the paper, more water, then let the colors run together.


Per the instructions I used a cosmetic sponge to remove the ink with water.  I flicked some droplets on the sheet for added texture.


I applied a little of Rangers Distress Ink in the Wild Honey color to the paper.  Allowed it to dry.  Then I cut a piece to make a card measuring 5" by 7" and started to stamp Dyan Reaveley's leaves on it.  I stamped more of the leaves on a scrap piece of the paper and cut them out to layer them on top of the stamping.  I pulled a piece out of my stash that had the rabbit from Alice in Wonderland stamped on it and that became my focal point.


I took an old credit card and dipped it in white paint to draw the vertical and horizontal lines on the panel.  A bit of white marker on the leaves and then I glued them to the card with pop dots for dimension.  The tiny rhinestone heart gives it a tiny pop of color.  Then the panel is attached to a blank white card.

I have enough to do another card similar to this which I'll show you at the half way point of the Craft Stamper Take It Make It Challenge.  I hope you can go to the website and join in for this month's challenge.  Don't forget that there are prizes to be won.

Thanks for stopping by.  Take care, talk to you soon ~ Renee