If you have some time today you can pop on over to the IMAGINE Crafts/Tsukineko blog and see a piece of mail art that I created using their products and a little Zen Doodling with a Micron pen. Here's the link and a sneak peek.
I hope you like it. Warm wishes to you all ~ hugs ~Renee
Renee Zarate's Bolton House is still in New England but Renee herself has moved on to South Carolina. The days are a little different now, no garden to take care of means more studio time. Dealing with snow and blizzards will be a thing of the past but there will be new challenges. Challenges like...how will we ever carry these two chairs and this huge umbrella down to the beach? Stay tuned.
Showing posts with label mail art. Show all posts
Friday, November 27, 2015
Monday, April 21, 2014
Boston Marathon 2013 Reflections
Today is the day of the Boston Marathon. I'm sure everyone here in New England could tell you where they were last year when this event took place. Our grandchildren and their keepers were on one of the last flights to leave Boston that afternoon and I was trying to recuperate from their delightful visit. My husband was driving home from the airport and wondered about all the emergency vehicles going into the city. Our neighbor was concerned because her girls were supposed to be around the finish line with their friends (they decided to go to the Mall instead, thank goodness!). The sadness after the incident still lingers a year later. A few weeks after the incident I still felt a deep sadness that I finally put down on a piece of Mail Art. Later I mailed it into Stampington magazine and they published it in the Mail Call section of one of their magazines. So in remembrance of that day I thought I would share it again.
It is a beautiful sunny day today and I plan on going outside to do a little more clean up in my garden. I'm so grateful for the warm weather. Take care, I'll be back tomorrow with a posting on Artistcellar stencils. I have had a lot of fun playing around with those versatile stencils, can't wait to share it with you. Hugs to you all ~ Renee
Friday, May 10, 2013
"Boston Strong" Mail Art
I think all of us here is Mass. have been deeply affected by the Marathon bombing attack. As the stories unfold it really just breaks your heart. I did a piece of mail art just to get it off my mind. The whole thing kept making me think of that song Eric Clapton sang about 20 years ago called "Tears in Heaven". I wrote the lyrics on a large mailing envelope then applied gesso over them so only bits and pieces of the words are visible. I stamped a large face image on the right side, colored her in with chalks and did some Zentangles for her dress.
How about you? Does creating some form of art help you to express your emotions?
Well, the weather here today has cleared up and it looks like a perfect Spring day! Enjoy the weekend. Thanks so much for stopping by to visit. I'll talk to you soon.
Sunday, April 14, 2013
AIRs Project of Choice::Mail Art
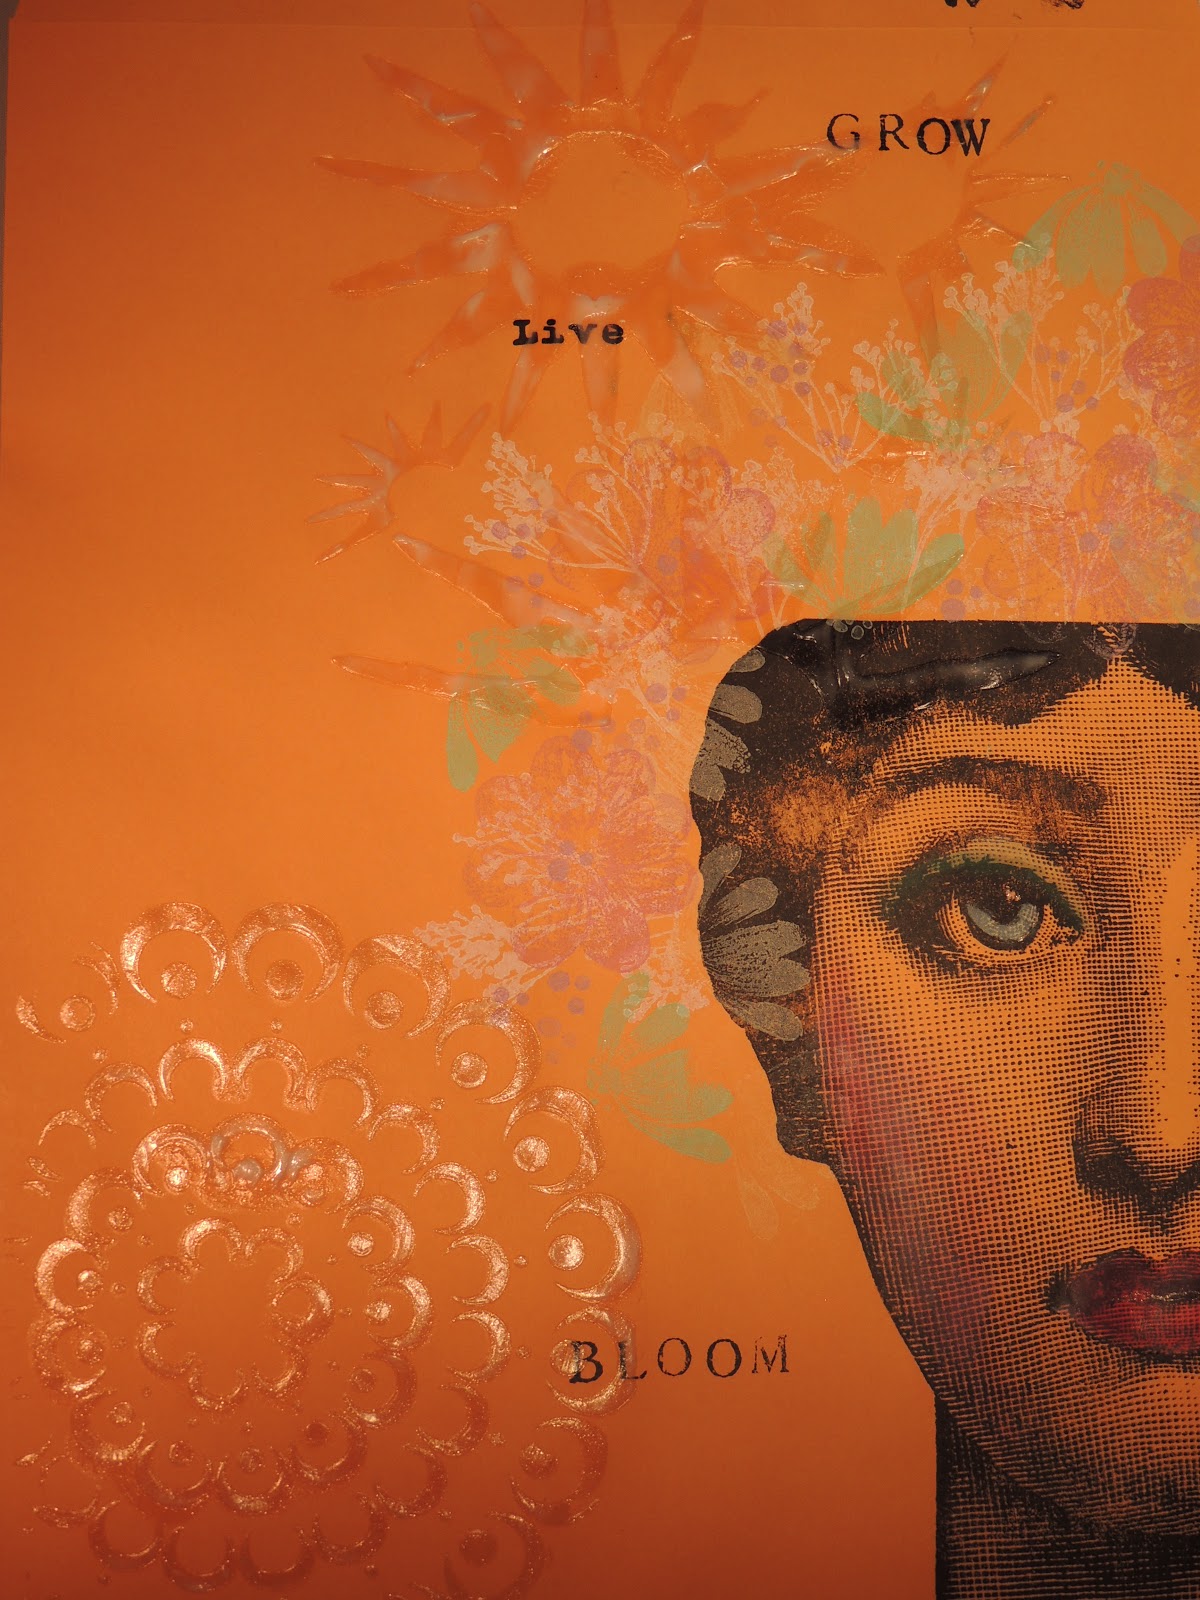
As an Artist in Residence with Imagine Crafts/Tsukineko my favorite monthly challenge is the "Project of Choice". This is when I get the opportunity to use my favorite products that I've received for this month any way that I want to. I love to make Mail Art, even if pieces like this one don't actually go through the mail. Since it has so much dimension and ephemera added to it I'm sure it would get caught in the machinery. But that's OK, sometimes you do have to hand deliver items that can be placed in a large envelope like this one. This envelope is a plain craft colored one that measures 9" by 12" and can be purchased at any office supply store. When I get done stamping it, applying gesso, ink, Creative Medium, etc. this is what it looks like.
These are the products I started with for this project.
The first thing I do when designing a piece of mail art is to use a stamp that fits with the size of the envelope. Since I don't want my image to be floating around or look too small, I used my large Victorian lady stamp that I've had for years. She is inked up with Black StazOn ink and I use a brayer on the reverse side to make sure that I get a good imprint.
Using flower stamps by Penny Black and others I stamped flowers randomly around her head. I also colored in her eyes with the Versa Magic Aquatic Splash chalk ink and her lips and cheeks with Versa Magic Pink Petunia. The Brushstix made by Imagine Crafts make it simple to apply just the right amount of ink to tiny areas like this. Next I stamped some text randomly around the envelope.
I decided the title of this piece is "The Gardener" since it is Spring and I can't stop thinking about planting flowers.
I applied Imagine Crafts Creative Medium in the Shimmer and Clear using stencils by Julie Fei-Fan Balzer and Dina Wakley. You can really see the texture and lacy detail of the stencil up close.
Before I add my ATCs to the envelope I wanted to apply some gesso through a stencil by Julie Fei-Fan Balzer. It leaves kind of honeycomb effect. The gesso needs to thoroughly dry before adding any ephemera to the project.
When the gesso is dry I added some flowers that had been cut with my old Sizzix dies. The paper used for the flowers is also leftover from a Masterboard made for another project using all the inks and sprays that coordinate with each other, this way all of the colors I'm using still compliment each other but not in a "matchy" way. I found a stamped bee in my stash, the stamp is by Stampotique. It was easy to color it with same chalk inks using a Brushstix. Then I adhered the ATCs with some foam pop dots
.
The final touch was to ink or distress the edges with the Versa Magic Spring Pansy Chalk ink using an Imagine Crafts Ink Blusher sponge. I applied a few dabs of Goosebumps to her lips to make them shine. Finally I raided my stash for some Queen & Co self adhesive white pearls to put in the center of a few flowers and she looks complete.
This is a great way to share your art with others by hand delivering it. It is also a good way to use or trade some of your ATCs that need to go to a new home. I invite you to give Mail Art a try, like art journaling there is no right or wrong. Here is a list of the products I used to make this.
The first thing I do when designing a piece of mail art is to use a stamp that fits with the size of the envelope. Since I don't want my image to be floating around or look too small, I used my large Victorian lady stamp that I've had for years. She is inked up with Black StazOn ink and I use a brayer on the reverse side to make sure that I get a good imprint.
I decided the title of this piece is "The Gardener" since it is Spring and I can't stop thinking about planting flowers.
I applied Imagine Crafts Creative Medium in the Shimmer and Clear using stencils by Julie Fei-Fan Balzer and Dina Wakley. You can really see the texture and lacy detail of the stencil up close.
I had some leftovers from a Master Board that I had made with these spring colors so I cut the paper into ATC size, 3 1/2" by 2 1/2" and stamped some images on the cards with Black StazOn ink. I later inked the edges of the cards with Versa Magic Spring Pansy Chalk ink. I applied pop dots to the backs of these cards and set them aside for later.
.
The final touch was to ink or distress the edges with the Versa Magic Spring Pansy Chalk ink using an Imagine Crafts Ink Blusher sponge. I applied a few dabs of Goosebumps to her lips to make them shine. Finally I raided my stash for some Queen & Co self adhesive white pearls to put in the center of a few flowers and she looks complete.
This is a great way to share your art with others by hand delivering it. It is also a good way to use or trade some of your ATCs that need to go to a new home. I invite you to give Mail Art a try, like art journaling there is no right or wrong. Here is a list of the products I used to make this.
Products
Black StazOn ink
Tsukineko Versa Magic Chalk Inks: Spring Pansy, Aquatic Splash, Pink Petunia, Thatched Straw, Aloe Vera and Mango Madness
Tsukineko StazOn Opaque Cotton White ink
Gesso
Creative Medium Clear and Shimmer Artist's Medium by Imagine Crafts
Imagine Crafts Goosebumps with a top dauber
Master Board paper scraps from project shown on April 3, 2013
One 9" by 12" craft colored envelope
Glue Pop Dots
Tools
Brayer
Imagine Crafts Ink Blushers
Imagine Crafts Brushstix
Sizzix Flower Dies
Heat Gun
Stencils
Flower Stamps
Face Stamp
StazOn All Purpose Cleaner
Monday, June 11, 2012
Mail Art
I submit quite a bit of work to different magazines (The Stampers'Sampler, Take Ten and a couple of others). Sometimes I like to package up work that is done using one particular stamp line and is going to one particular magazine. My latest art "crush" is anything by Dyan Reaveley. I love her stamps, her spray inks, her style...... So I am preparing a few cards to send off to The Stampers' Sampler using her stamps and I thought I would put them in this large envelope. It won't actually go through the mail in the traditional way. I will put all of my projects in a larger postal box and send it off. That is why the postage is faux postage stamps and they are already canceled, in case you noticed.
The envelope is a kraft colored one made from recycled materials. It measures 10 1/2" by 14 3/4". I used Dyan's stamps: Dependable Dotty, Talllulah Tripp and the border stamp in the Further Around the Edge collection. I like the way the heads and bodies are interchangeable and wings can be added, etc. The hanging hearts instead of hair is a Stampotique stamp turned upside down. The faux Postage Set is by Lost Coast Designs. I liked using my Tim Holtz Distress Markers to color things in and I used Distress Inks to shade the edges of the envelope (Fired Brick, Wild Honey and Rusty Hinge). The little bit of twinkle is from my Clear Star Gelly Roll pen.
Tuesday, January 24, 2012
Happy Dance!
It is always a thrill to have your work chosen for publication in ANY Stampington magazine! I even get really excited if my work is in any of their ads. : ) I just received my copy of the February/March 2012 issue of The Stampers' Sampler in the mail. I have tried to "curb my enthusiasm". Joe thought someone had died the first time I was published. I couldn't speak, I just kept crying and pointing to the magazine. Another time I was at Barnes and Noble when I saw the magazine and kept showing complete strangers my work. But, as I said before, it is always a thrill and a privilege to have the folks as Stampington like my work enough to put it in a magazine. They were nice enough to show a box I made using the fabulous Dina Wakley grunge style stamps. I made the box to hold other projects that I had sent them. They gave me a two page spread in the Artists-On-Call section demonstrating the use of Kristen Robinson's lovely stamp line called "Love Lines". So I am doing a happy dance today!
Subscribe to:
Posts (Atom)