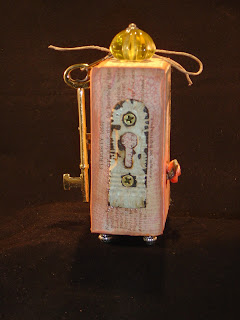
First I start with a wooden block cut to measure 3 1/2" by 2 1/2", the more distressed looking the better the block.
Then I paint the block with whatever color I like, in this case I like "My Studio" Acrylic Paints in 72710 Light Pink and 72702 Ivory. I mixed them together and gave the block a couple of coats last night and allowed them to dry all night. If there are any rough edges you don't like just take a little sandpaper to them. You may at this point decide what papers you might want to use or stamps. I decided to first stamp the block with a crackled look using IndigoBlu crackle stamp. My inks were Ranger's Distress Inks, Worn Lipstick for the crackled part. Then to distress it a little bit more I used Ranger's Distress Ink in Tea Dye and a little bit more of the Worn Lipstick applied to the edges with Tim Holtz's applicators called Inkssentials. That tool helps me to control how much ink I apply. Now the block looks like this:
I heat dry all the stamping at this point so the crackle is very pronounced and now I'm ready to apply my papers, stamping and ephemera. I started by stamping some butterflies called "Papillon" made by Stampers Anonymous, Tim Holtz Collection. I used the large butterfly stamp and the small one, for the side panel. I found that Ranger's Brushed Corduroy ink showed up nicely, especially after I applied embossing powder and heat set it with my trusty heat tool. I liked the effect so much I decided to stamp the "curiosity" phrase on the other side panel from a different Stampers Anonymous collection called "Visual Artistry", also a part of Tim Holtz's Collection.
The phrase side looked a little lonely so I attached an antique keyhole that I picked up at a metal salvage store in Boston. The man that works there has been doing this for the past 50 years and he had some really cool things.
I also added little bead feet with Glossy Accents and a picture of Marie Antoinette, from a collage sheet by Alpha Stamps. Young Marie is in her "hunting costume" which I am sure she only used for photo ops. She just didn't strike me as much of a huntress. The text next to Marie is torn from an old French "up-cycled" book. I gave Marie a little orange satin flower on her jacket and topped the whole thing off with a knob from 7 Gypsies, some waxed twine and a couple of keys. I hope that explains my process. I love these chunky ATCs! This is my first "tutorial" so I hope you will bear with me until I get the process down. Any constructive criticism is welcomed. : )
Thanks for visiting and taking a look around!


Oooh, this is so awesome.my mind goes wild with all the amazing things you can do with these, LOVE yours and the details, especially the cool key! I would've never thought to heat dry...thanks for sharing your process!
ReplyDelete~Scarlett
Thanks,Scarlett, such a nice compliment. : )
DeleteThese are so cute Renee!!!!! I'm wondering what should go on Gianna's shelf next!
ReplyDeleteThanks Niki! This can be our next art project we do together with Gianna.
Delete