Monday, April 29, 2013

Playing with Tags

I love playing with Craft Tags.  They seem to be the perfect size and blank surface to practice techniques on.  Not to mention the fact that they can be very useful for quick gifts or just to slap on the face of a blank card.    For these tags I used Rangers #8 in the Kraft color.
All the cards were colored with Copics, Memento Markers and Distress Markers.  There are some spots where I added gesso with stencils and outlined things with my Faber-Castell PITT artist pen in white 101.  Love that pen!


I hope you're having a creative day!  Thanks for stopping by, if you have time please leave a comment.  I love hearing from you.  Have a great day, talk to you soon.

Tuesday, April 23, 2013

Art Journal Calendar Pages for August

I'll be teaching at Ink About It in Westford, MA on Saturday, May 4th from 10am to 1pm.  The Art Journal Calendar class is all the way up to August 2013.  Since Dina Wakley is coming to visit us and teach in May,  I couldn't seem to get her off my mind and the calendar is a reflection of that.  Here's to Dina Style!


I hope you like it!  Yes, there is one extra day of the squares for the days of the month but hey, who couldn't use a little extra journaling room, right?  Thanks so much for stopping by to visit my blog.  It is cold and damp here today, perfect hot tea weather.  Talk to you soon,  take care.

Monday, April 22, 2013

Ten Minute Cards with a "Spring" theme

All of us are so pressed for time it seems.  I like to try to create some kind of art everyday and the ten minute card seems to be my answer to that challenge.  John at Tsukineko/Imagine Crafts sent me a box of Tsukineko's Versa Magic chalk inks and all kinds of wonderful sprays to use on my AIRs (Artists in Residence) projects for the month of April.  These chalk inks have a lovely, soft matte look when they dry.  You can heat emboss them with a clear powder if you want a shiny look to them.  I chose to keep the matte look except for one flower on each card.  The phrases at the top are inked with black StazOn ink and heat embossed with the clear powder. 
You could do several cards at one time, one right after the other, just keep inking up your stamp after each stamping.
First I stamped the Penny Black stamp with VersaMagic Aloe Vera green ink, using just the stems of the flowers and masking off the rest.  After heat drying the green ink I stamped the flower portion of the stamp.  I used Spring Pansy ink for this one.


I added a self adhesive dragonfly from K & Co for a little added interest and sponged the bottom portion of the card with some additional Aloe Vera ink.  Next I used Versa Magic chalk ink in the Aquatic Splash, which is a beautiful shade of blue.


On this one I stamped the phrase "Just a Note" and decided I liked it so much I would do one more with this phrase.  Here it is stamped  in Pink Petunia.


I did one more in a delicious Mango Madness color, which is either a bright yellow or a light orange color.  Very rich.


It is always great to have some all occasion type cards on hand and these really fit the bill.  They would also make a lovely hostess gift, packaged together and tied up with a nice piece of ribbon.

Products Used
Cream Colored Card stock/Blank Cards
Tsukineko Versa Magic Chalk Inks in Aquatic Splash, Pink Petunia, Mango Madness  & Spring Pansy colors
StazOn Black Ink
Clear Embossing Powder
Self Adhesive Dragonfly by K & Co

Tools
Heat Gun
Stamps by Penny Black, Hampton Art & Rubber Stampede

Thanks so much for stopping by to visit my blog, I really appreciate it!  If you have time please leave a comment.  Take care and have a great day!


Sunday, April 21, 2013

Guess who has a card on the cover?


400 More Ideas for Handmade Cards (Formerly Catch Up Issue) Volume 17

I am doing the happy dance around my studio right now but it's always more fun when I share my happiness with others!  I was delighted to see one of my cards (the goddess one) on the cover of Stampington's new magazine 400 More Ideas.  I'm sending out a BIG thank you to Stampington, I am very grateful that they show any of my work but this is a real thrill for me.


Saturday, April 20, 2013

Dina Style

I purchased Dina Wakley's new book recently "Art Journal FREEDOM" and it has been interesting to try work to my way through it.  I was recently interviewed by a magazine that asked me how I learned to do what it is that I do.  I told them I read books, like Dina's, and watch YouTube videos on anything I'm interested in doing.  I always think I'm doing EXACTLY what the artist is doing but at some point my work goes off on a tangent and I'm usually shocked to see that my piece barely resembles the work I'm trying so hard to emulate.  That is exactly what happened here.  This is my point of view using Dina's Gel Medium Resist on page 86 of her book.  I have an image and a tag like hers and that is about it.  Oh well!  The work other artists share is supposed to be for inspiration.  So this is what Dina Wakley inspired me to do today.  Thank you Dina!

I invite you to get out there and get inspired!  Have a great weekend and as always I thank you for stopping by.  Talk to you soon.

Hey everyone!  In response to Annie's comment/request, this is the page I used for my inspiration and a photo of the cover of Dina's new book.


Have a great weekend.  

Friday, April 19, 2013

Craft Stamper Magazine Make it, Take it Challenge

Finally, life is getting back to normal after the grandchildrens visit.  I thought I'd make a Zetti style card to enter in the Craft Stamper magazine challenge of "Ripping and Tearing Technique".  There is not a whole lot of ripping and tearing going on here but that is beside the point, right?  I used a Zettiology stamp for the girls image and a Stampotique phrase.  It is stamped on a piece of left over watercolor paper that had some stenciling on it with water based inks.  I mounted the panel on TORN/RIPPED green card stock, distressed the edges and glued that panel to some orange patterned paper.  The entire unit is glued to a 5" by 6 3/4" blank white card.  The green and white bakers twine with a bow has a tiny green rhinestone attached to it.  I edged the entire card with Versa Magic Aloe Vera green ink from Tsukineko.

Nice to be back in my studio!  Thanks for stopping by and visiting my blog, I always appreciate any comments you have time to leave.  Have a great day!

Thursday, April 18, 2013

Art Journal Calendar Page for July 2013

This is the art journal calendar page that I taught last Saturday at Ink About It in Westford, MA.  I love Dyan Reaveley's new stamps with an "Under the Sea" theme.  We used her spray inks to get the background color:  Vibrant Turquoise, London Blue, Fresh Lime, Calypso Teal and Lemon Zest.  We did a few sprays of White Linen and a little of Imagine Crafts Fireworks! spray in the Bahama Blue color at the end to give it a little sparkle.  I will show you the end result and then a few of the up close pieces.
I wasn't sure where to put the area to write in so I added a flap that had the calendar on the front.


This was glued on to the right side of the pages, underneath with a strong adhesive.  I cut the edge with a wavy ruler and decorated the paper to match the 2 page spread.  Here's how it looks attached and open for journaling.

The areas that look white-ish are stenciled areas that I used small amounts of gesso pushed through a stencil.  Hope you like it, we had a lot of fun on Saturday re-creating it each person with their own style!
Thanks for stopping by.  Love to read any comments you might have the time and inclination to leave!  Talk to you soon.

Monday, April 15, 2013

Boston, you are in my thoughts and prayers

We had just put our family on a Jet Blue plane leaving Boston's Logan Airport for San Francisco when we noticed on the drive home all of the police activity in the city.  It was such a beautiful day to have it marred with such senseless tragedy.  Our thoughts and prayers are with those who suffered the terrible loss and injury to their loved ones. 

Sunday, April 14, 2013

AIRs Project of Choice::Mail Art

As an Artist in Residence with Imagine Crafts/Tsukineko my favorite monthly challenge is the "Project of Choice".  This is when I get the opportunity to use my favorite products that I've received for this month any way that I want to.  I love to make Mail Art, even if pieces like this one don't actually go through the mail.  Since it has so much dimension and ephemera added to it I'm sure it would get caught in the machinery.  But that's OK, sometimes you do have to hand deliver  items that can be placed in a large envelope like this one.  This envelope is a plain craft colored one that measures 9" by 12" and can be purchased at any office supply store.  When I get done stamping it, applying gesso, ink, Creative Medium, etc. this is what it looks like.


These are the products I started with for this project.

The first thing I do when designing  a piece of mail art is to use a stamp that fits with the size of the envelope.  Since I don't want my image to be floating around or look too small, I used my large Victorian lady stamp that I've had for years.  She is inked up with Black StazOn ink and I use a brayer on the reverse side to make sure that I get a good imprint.


Using flower stamps by Penny Black and others I stamped flowers randomly around her head.  I also colored in her eyes with the Versa Magic Aquatic Splash chalk ink and her lips and cheeks with Versa Magic Pink Petunia.  The Brushstix made by Imagine Crafts make it simple to apply just the right amount of ink to tiny areas like this.  Next I stamped some text randomly around the envelope.
I decided the title of this piece is "The Gardener" since it is Spring and I can't stop thinking about planting flowers. 

I applied Imagine Crafts Creative Medium in the Shimmer and Clear using stencils by Julie Fei-Fan Balzer and Dina Wakley.  You can really see the texture and lacy detail of the stencil up close.

I had some leftovers from a Master Board that I had made with these spring colors so I cut the paper into ATC size, 3 1/2" by 2 1/2" and stamped some images on the cards with Black StazOn ink.  I later inked the edges of the cards with Versa Magic Spring Pansy Chalk ink.  I applied pop dots to the backs of these cards and set them aside for later.


Before I add my ATCs to the envelope I wanted to apply some gesso through a stencil by Julie Fei-Fan Balzer.  It leaves kind of honeycomb effect.  The gesso needs to thoroughly dry before adding any ephemera to the project.


When the gesso is dry I added some flowers that had been cut with my old Sizzix dies.  The paper used for the flowers is also leftover from a Masterboard made for another project using all the inks and sprays that coordinate with each other, this way all of the colors I'm using still compliment each other but not in a "matchy" way.  I found a stamped bee in my stash, the stamp is by Stampotique.  It was easy to color it with same chalk inks using a Brushstix.  Then I adhered the ATCs with some foam pop dots
.
The final touch was to ink or distress the edges with the Versa Magic Spring Pansy Chalk ink using an Imagine Crafts Ink Blusher sponge.  I applied a few dabs of Goosebumps to her lips to make them shine.  Finally  I raided my stash for some Queen & Co self adhesive white pearls to put in the center of a few flowers and she looks complete.

This is a great way to share your art with others by hand delivering it.  It is also a good way to use or trade some of your ATCs that need to go to a new home.  I invite you to give Mail Art a try, like art journaling there is no right or wrong.  Here is a list of the products I used to make this.


Products

Black StazOn ink
Tsukineko Versa Magic Chalk Inks:  Spring Pansy, Aquatic Splash, Pink Petunia, Thatched Straw, Aloe Vera and Mango Madness
Tsukineko StazOn Opaque Cotton White ink
Gesso
Creative Medium Clear and Shimmer Artist's Medium by Imagine Crafts
Imagine Crafts Goosebumps with a top dauber
Master Board paper scraps from project shown on April 3, 2013
One 9" by 12" craft colored envelope
Glue Pop Dots

Tools

Brayer
Imagine Crafts Ink Blushers
Imagine Crafts Brushstix
Sizzix Flower Dies
Heat Gun
Stencils
Flower Stamps
Face Stamp
StazOn All Purpose Cleaner


Friday, April 12, 2013

Busy Week

Wow, this has been the busiest week I have had in ages.  I apologize for going AWOL but I have had visitors this week.  My two grandsons (and their keepers) have been here since last Saturday.  I had classes the day they arrived with Seth Apter at Ink About It in Westford, MA, so Grandpa had to entertain everyone until I got home at night.  Here is a taste of what we learned with the incredible Seth about book making.


Then, of course, once the grand kids got a look at Nene's studio the art bug bit them!  We have been in the craft room every day for hours.  We've made pirate golden embossed, jewel studded keys and canvas paintings.  Cards, gelli plate papers, stenciling, books to stick the keys in......the list goes on.  Very fun.  Very messy!
Six year old, almost seven, Caden was focused on his canvas work which took 3 days to complete with drying time.  By Thursday it was time to get together with some other kids, other than grandma.  My friends here were more than happy to oblige.  There is this really cool place in a town nearby where the kids can do some crafting and we don't have to clean up the mess.


Three year old, almost four, Cole preferred doing his art in this amazing craft shop where an elderly (I might add a tad cranky) man makes wooden toys that the kids put together and paint.  They don't get to start on ANYTHING until the smocks go on.  He was hilarious, the kids didn't mind his crabbiness at all.  They can only have one drop of paint at a time but he has no problem arming them with hammers and screwdrivers!
First  the kids were all over the large workroom (I have lots of friends with small kids) then they suddenly all went to the same table to paint their wooden treasures.

By the end of the day Cole had a pirate ship and Caden had made a treasure box to keep his golden keys in, with a snake.  Being the good grandma that I am, not to mention that hours of crafting had left me too tired to make dinner, I drove the boys through McDonald's for a "nutritious" dinner.  I asked them what kind of Happy Meal they wanted and Caden said he had never had one so he didn't know.........oops, my bad.  So, we had a lovely hamburger dinner with MILK, that way it wasn't totally bad, a nice swim in the big Jacuzzi tub in the master bath, clean PJs and a story.  Then this grandma collapsed and went to bed.  The other adults in the house can do the rest!
We did manage to get the garden all cleaned up on the one absolutely, sunny, beautiful day we had this week.  All in all it has been a really fun week.  I have forgotten what it is like to have little ones in the house.  It has been a good reminder.  Tomorrow I'll be teaching two classes at Ink About It, Sunday night we're having a big Turkey dinner with our family and our extended family here (translation MORE kids in the house) and next week I should be back on schedule.

Thanks for taking the time to stop by, you know I appreciate your visits.  I'll be posting a nice tutorial on the 14th, pop in if you have time, until then take care and have a wonderful weekend!


Wednesday, April 3, 2013

AIRs Artist Challenge/ATCs


This is one of those LONG postings that require a beverage of your choice suited to your time zone and a snack.  I decided to make a Master Board using all the wonderful products recently sent to me by John at Imagine Crafts/Tsukineko for the April AIRs projects.  As "Artists in Residence" we have three project assignments every month, one of them being a challenge to use all of the products in the box.  Fun, fun, fun!  When you make a Master Board or the equivalent of your own custom designed background paper, that task is really simplified since anything goes.  Take a look at my product choices!

Here's my finished project.


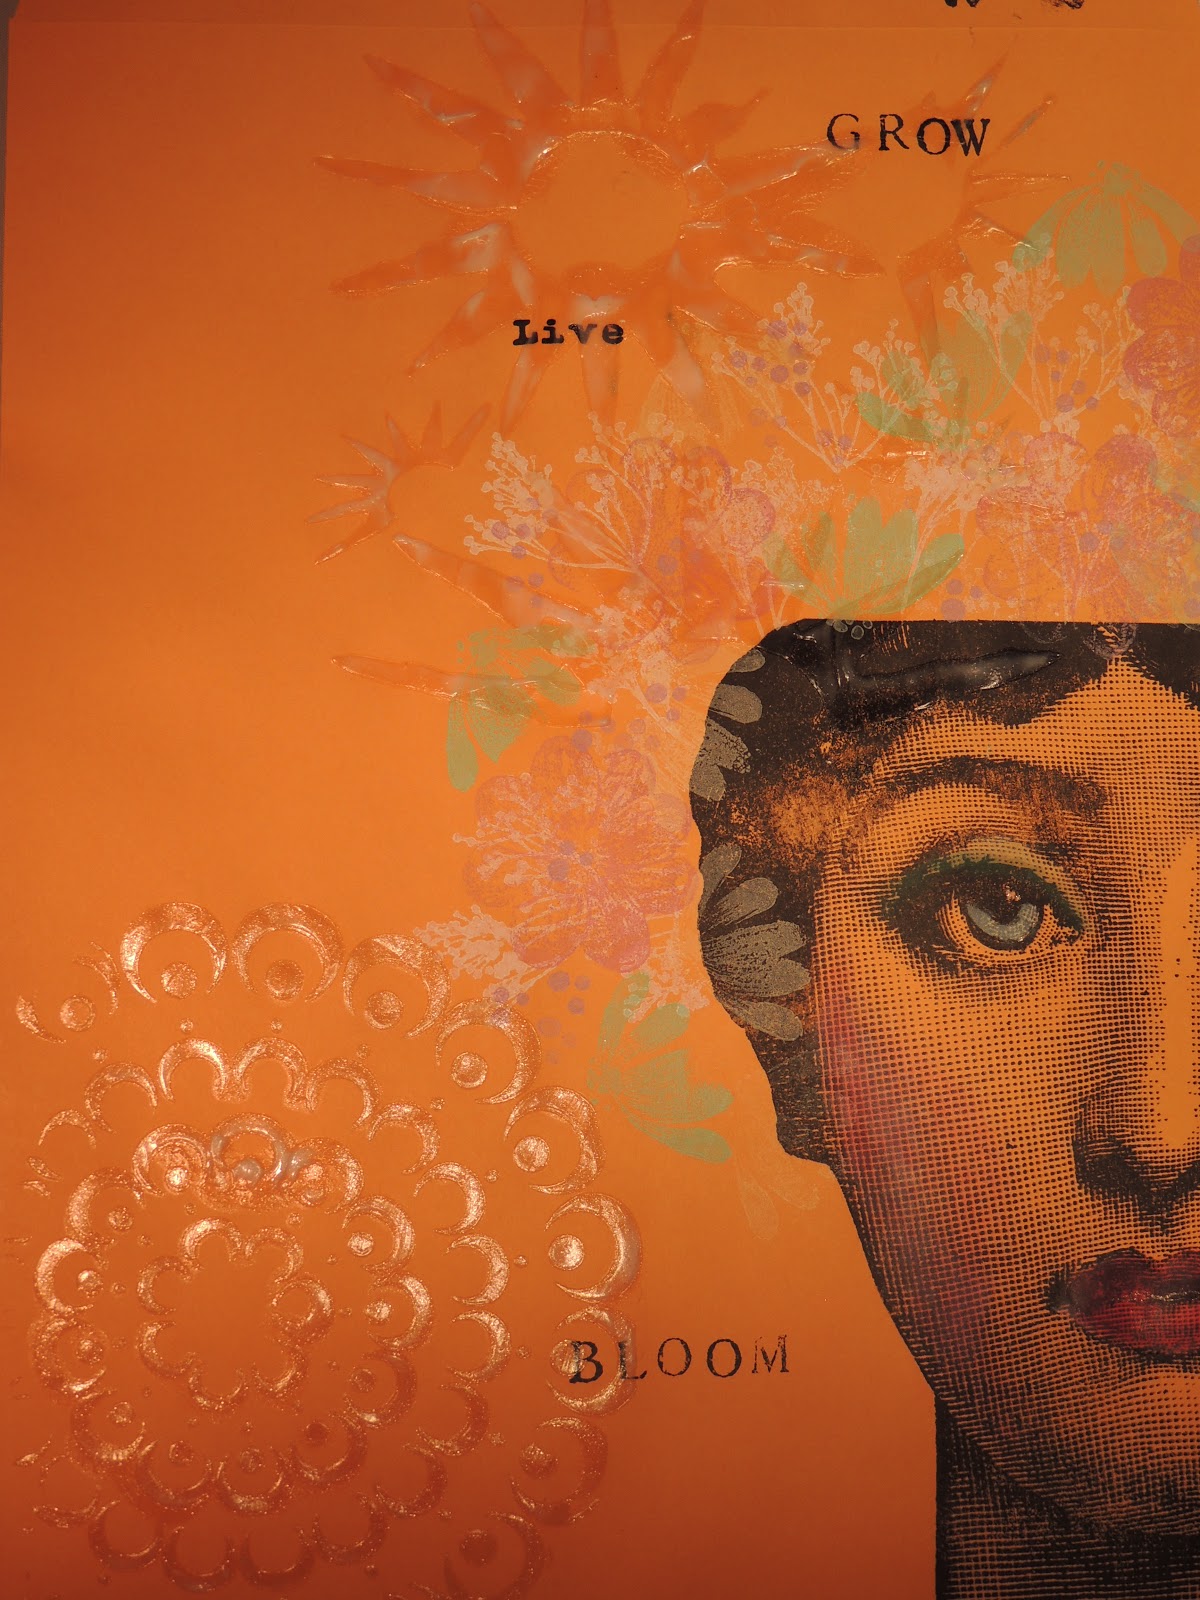
I started with a 12" by 12" piece of Strathmore Acrylic paper with a linen finish (246 lb paper).  I pulled out several stencils from my collection and started building my layers of color and texture on the blank piece of paper.  I decided that a lot of stenciling would come into play with the chalk inks, Fireworks! sprays and my Imagine Crafts Ink Blusher sponges which I use for stenciling.  After I get done with all the colors on the paper I will make sure it is dry and before cutting it up to make multiple ATCs and a little book for them to fit into.  My theme for the book is "Don't Forget to Give Yourself a Hug" and it is based on a cast of characters from Stampotique who look like they could use a hug.  The first color I apply is Angel Pink Fireworks! spray, followed quickly with Lulu Lavender and Summer Sky Fireworks! sprays.


For that lovely dark blue color, almost purple, I use Imagine Crafts Paris Dusk Fireworks! spray which is sprayed through a lacy stencil.  Dry with the heat gun.  I arranged several other stencils on the paper and sprayed water lightly through them, then I carefully lifted off the stencils.  I blotted off the water by rolling a paper towel roll over the paper, this is a ghosting technique that lifts off some of the inks and leaves light colored impressions from the stencils.  I took the lid off of the Paris Dusk Fireworks! spray ink bottle and used the pump attachment to fling some splatters of the ink across the page. 

Now to make my own stamp with recycled  materials.  In the box was a product called "Tack 'n Peel Cling Sheet".  Since I am first and foremost a rubber stamper I have a lot of flat stamps that usually need to be mounted on some type of rubber foam backing.  I do like to make my own stamps out of "found" items, like bubble wrap, whenever I can.  This can get messy and I generally throw the bubble wrap away after the first use since it moves around and gets all over the place.  I decided to make my own "bubble wrap" stamp with my Tack 'n Peel cling sheet.  (You could also use rubber bands, toothpicks, etc., whatever you want to attach to the sticky mat for your own unique look.)

I attached some bubble wrap to my TsukinekoTack 'n Peel cling sheet that had been mounted on an acrylic block, inked it up with all of my spring colored Versa Magic Chalk Inks and got some really nice textured stamping on my page.  It's like getting a FREE stamp.  After using it I just pulled it off the Tack 'n Peel and tossed the bubble wrap.  I can reuse the Tack 'n Peel over and over, I just rinse off any residual ink or bits of paper that might get on it.  I run it under the tap and rinse off anything I don't want to stick to it, no soap required, just water.  It is really great to use with those unmounted stamps that I never got around to attaching the foam sticky stuff to.  It can be cut to any size you desire and you don't have scissors covered with gunk when you're done.

I also used the Imagine Crafts Creative Medium with stencils to top off all the inky goodness on my page.  Now I have a lot of texture and color.  When I applied Imagine Crafts Goosebumps I got some additional sheen here and there.  There is a tremendous amount of color, shine and texture, bumpy & smooth stuff, going on here!


 I make sure this page is really dry before I start cutting it up, in addition to drying everything between each layer I usually dry it a little more at the end with my heat gun.  I'm going to use this for the base of  ATCs (Artist Trading Cards) and a card or two.  For the ATCs I need to cut my pieces to measure 2 1/2" by 3 1/2", the standard measurement.  Each of them with be matted on a piece of black card stock that will measure 2 3/4" by 3 3/4".  All of my characters and phrases will be Stampotique images with the exception of the stamped image on the cover of the little book.


After making all of the ATCs that I wanted for the project I made an accordion style book to hold them in.  I cut this from the same type of paper that I used for the other parts of the project, Strathmore Acrylic paper with a linen finish (246 lb paper).   This strip measures 4 inches high by 24" long.  I just folded the paper every three inches, sharpening the fold with a bone folder and then added to the book by gluing extensions onto it until I had enough for all of my cards, which ended up being eight ATCs.

The front and back covers measure 3 1/2 inches by 4 1/2" each and the front cover has an additional ATC adhered to it.


I continued to stencil on the accordion book strip with inks and sprays until it looked like this, just in case there were any bare spots on the front side and in addition to that, now the back is ready for me to add any more ATCs in the future that might be a part of this grouping.

Using a strong adhesive I attached all of the ATCs first, then the covers and finally cut a yard and half of grape and white bakers twine to keep it closed by wrapping it around and then tying it in a loose bow.  Here is a close up of the first four.


 This is a close up photo of the second four ATCs.  I still have this much room on the back to add more at a later date.


The finished line up of my cast of odd characters.

When I'm done looking at them or if I ever give them away I'll  just fold up the little book and tie it up with twine to keep it closed.


Next time you go crazy making ATCs that you can't bear to trade or give away think about making a small but durable         3 1/2" by 4 1/2" accordion book and keeping them for yourself.....for a while at least!  Here is a list of all the products and tools I used on this project.

Products
Tsukineko's Versa Magic Chalk Inks:  Spring Pansy, Thatched Straw, Mango Madness, Aquatic Splash, Aloe Vera & Pink Petunia
Imagine Crafts Ink Blusher Sponge Applicators
Imagine Crafts Goosebumps
Imagine Crafts Creative Medium Vintage, Clear and Shimmer
Tsukineko Black StazOn Ink
Tsukineko StazOn Cleaner
Imagine Crafts Fireworks! Spray Inks:  Angel Pink, Summer Sky, Lulu Lavender, Paris Dusk
Tsukineko Tack 'n Peel Cling Sheet
Bakers Twine
Clear Embossing Powder
Black Card Stock
Adhesive
Paper Cutter
Tsukineko StazOn Opaque Ivory Black & Cotton White Inkers
Tsukineko Memento Markers


Tools
Rubber Stamps by Stampotique, Dina Wakley & Magenta
Clear stamps
Old Credit Card
Bubble Wrap
acrylic block
Stencils by Julie Fei-Fan Balzer & Michaels
Imagine Craft Ink Blushers/sponge applicators
Heat Gun
Bone Folder
Ruler

My thanks to Imagine Crafts/Tsukineko for sending me products that I can challenge myself with and then share with all of you.  My thanks to everyone who stopped by to visit my blog and to take a look at my little book!  I hope you'll make your own Master Boards and have fun cutting up your very own uniquely decorated paper to make fun projects.  Have a great day, I'll talk to you soon!