Showing posts with label washi tape. Show all posts

Thursday, June 15, 2017

A Tangerine Master Board Becomes an All Occasion Card~ an AIRs Project


Like most crafters I have a stash of cards that can be used at a moment’s notice. When I make master boards I generally make a few cards or ATCs with whatever remains after I complete the main project and into my emergency reserve they go.  Our color challenge for the AIRs design team at Imagine Crafts this month was “Tangerine”, a cheerful color of summer, so I decided to make a master board combining all the different shades of orange that I have on hand. Objects in nature are never a single flat color but generally an eye pleasing combination of multiple shades of one color, including tangerines. This card has a nice masculine feel to it but can also has a feminine side to it with the addition of some paper flowers in the upper corner.

Skill: All levels
Time: 1 hour

Directions

Step one:  Create a monochromatic master board using different shades of orange.  Spray water on a piece of Mixed Media paper, this one measures 11” by 14”.  Lay a stencil or a piece of laser cut paper on top of the wet paper and with a large dauber begin pouncing different colors of orange inks through the design.  Keep blending the colors through the stencil, spraying more water during the process if necessary. The wet paper can be blotted off onto another piece of Mixed Media paper which almost has the same effect as a Gelli Plate design. The stencil can also be wiped off with a baby wipe onto the paper so that none of the ink goes to waste; this creates additional self-designed papers to be used later. Dry the paper with a heat tool.


Step two: Cut a piece of the master board measuring 2 ½” by 3 ½” (standard ATC size). Decorate with a bird die cut that also came from the master board paper, Washi tape and stamp a sentiment, heat emboss with clear embossing powder.


Step three: Mat panel on black, gray and orange cardstock.


Step four: Mat the entire panel onto black cardstock and then mount onto patterned paper.


Step five: Glue the finished panel onto a blank white card. Color a few paper flowers with ink, spritzing water on them then blotting with a paper towel until the desired color is achieved. When the flowers are dry attach them to the upper corner of the card with a strong adhesive.


Here is the list of supplies that I used:


Supply List
Imagine Supplies
StazOn-Jet Black
Memento Luxe-Morocco
Brilliance-Pearlescent Rust
VersaMagic-Mango, Persimmon
Radiant Neon-Electric Orange
Memento Marker-Teal Zeal for eye color
Clear Embossing Powder
Large dauber

Other supplies
Stamps-Sizzix Bird Talk
Die-Sizzix Alterations “Bird Talk”, Big Kick machine
Washi Tape-Idea-ology Sketchbook
11” by 14” Strathmore 140 lb. Mixed Media paper
Cardstock-black, gray, orange, laser cut paper
White blank card measuring 6 ½” by 5”
Heat tool
Baby wipes
Paper towels

Thanks for stopping by today, I always appreciate your visits.  Why not leave a comment so I know you were here?  Have a great day, hugs ~ Renee


Thursday, June 8, 2017

A Summer Loving Calendar Page


Summer is right around the corner and a wonderful time to be creative. This mixed media calendar can be placed on a bulletin board or if you like to art journal it can be a project created right inside your journal as a two page spread. This project incorporates all kinds of techniques and textures then there’s the added fun of writing each day’s activities in the small woven calendar boxes. If you do one for each month of the year and then bind them together it makes a wonderful, reflective diary to look back on later.  You can find a supply list on the Imagine Craft Blog today.


Skill: Intermediate to Advanced
Time: 2-3 hours

Directions:

Step one: Prepare the background paper.  The substrate for this particular calendar is an 11” by 14” piece of Strathmore 140# Mixed Media paper that had been used to blot off ink from a stencil used in a previous project. The technique is similar to using a Gelli Plate, allowing previous projects to blot off the ink rather than wasting it.  At the top of the paper apply Memento Luxe Teal Zeal ink onto the paper, spray with Bahama Blue Fireworks! Craft Spray, spray water on top of that and allow the colors to blend together.  Apply additional sprays of water and let the inks run down the paper. Use a heat tool to set the color and dry the excess. Next apply Memento Luxe Morocco ink to the bottom of the paper with a large dauber. Deepen the color by applying Radiant Neon Electric Orange on top of the Morocco ink.  Spritz with water, allow the inks to mingle together, blot slightly with a paper towel, dry completely with a heat tool. For the last layer of color apply Memento Luxe Dandelion to the center part of the page, spray with water and allow the color to blend and run. Dry.


Step two: Use removable alphabet and number stencils for the date and season. Place the words and numbers where desired, use gesso or a texture paste to get the most out of the stenciled words. For this project the Graphite texture paste is reminiscent of a paved road. Very carefully lift the stenciling pieces straight up and wash them thoroughly to remove all of the paste. Allow the texture paste to dry thoroughly so as to avoid smearing it.


Step three: Die cut the butterflies from coordinating patterned paper, set aside. Stamp the Julie Nutting dolls with StazOn Jet Black ink, color them in with Memento Markers, and cut them out.


Step four: Make the woven mat for the calendar days by cutting 5 strips of paper, in this case a piece of a master board from another project, to measure 1” by 7 ¼”. These strips will be woven across. Then cut 7 strips of the same paper to measure 1” by 5 ¾”, these strips will be woven down. It helps to cut a piece of scrap paper and use a tape runner to stick the tops of the strips down. It not only makes for a more solid piece for the actual calendar but keeps the strips of paper from shifting while being woven together. Adhesive tape can be applied on the backside along the way while weaving to hold the pieces down flat. When finished weaving determine the days of the week and the number of days in the month so the calendar is accurate for each month.


Step 5: Using a strong adhesive, adhere the woven calendar.  Add some Washi tape here and there; glue the butterflies across the top on with On Point Glue. Add some butterflies to the skirt and shoes of the doll on the right.  Glue the stamped dolls down on either side of the calendar.  Ink the edges of the mixed media paper with Brilliance Pearlescent Rust ink.  Stamp the days of the week, if desired, at the top of the calendar.


I'm also submitting this to the Craft Stamper Magazine "Take It Make It June Challenge" which is Anything Goes.

Thanks so much for stopping by!  Be sure and follow the link to the Imagine Craft blog for additional information and inspiration. Just tell them I sent you.  Have fun creating! Hugs- Renee


Saturday, May 27, 2017

AIRs " Fly" Tag Using Imagine Crafts Products


Shipping tags are a wonderful substrate for mixed media art. They are small, the paper is durable and when completed they fit nicely into an art journal or can be used in place of a card. This tag showcases not only texture and color but also techniques such as embossing, masking off areas when stamping, mixing inks, using foils, coloring ribbon with inks, just to name a few. A mixed media tag is a great excuse to break into all those stockpiled, precious products since a tag requires only a small amount of each product.


Skill: All Levels
Time: one hour or less


Instructions:

Step one:  Mask off the head portion of the image to be used, Washi tape can be used for this, ink up the stamp with StazOn Jet Black permanent ink and stamp image onto the shipping tag.


Step two: Stamp swirls with Paris Dusk ink then stamp again in the same area using Rose Bud ink. Dry with a heat tool. Fill a water pen with Fireworks! New Sprout and color dress with the water pen.  Stamp the word “Fly” with Delicata Black Shimmer ink; this can be embossed with Clear Embossing powder melted with a heat tool. Add highlights on the heart, arms and legs of stamped image and dots on the swirls with a Memento Marker pen in Rose Bud color; silver foil can be randomly added onto portions of the tag.


Step three: Spray two pieces of ribbon with Fireworks! Craft spray.  One ribbon will be sprayed with Lilac Posies and the other with New Sprout, additional water can be sprayed onto the ribbons to achieve the desired color. Blot with a paper towel, coil up the ribbons separately and allow them to dry. When dry the ends can be trimmed, they will be richly wrinkled. Tear faces off of the Washi tape and place on tag. Lay lines of Washi tape on a scrap piece of card stock, die cut into a butterfly shape, adhere some silver foil to the butterflies.


Step four: Ink edges of tag, tie the dried colored ribbons on the top, and staple the butterflies into place.


Supply List
Imagine Products:
StazOn ink – Jet Black
Delicata – Black Shimmer
Memento Dew Drop ink – Rose Bud, Paris Dusk
Fireworks! Craft Spray – Lilac Posies, New Sprout
Memento Marker – Rose Bud
Embossing Powder – Clear
Craft Mat

Other supplies:
Manila Shipping Tag
Stamps – Mela by Stampotique, word “Fly” by Stampotique; Joy Clair Hugs & Smiles
Washi Tape – Jane Davenport
Prima – Silver foil and Glue stick; water pen
White ribbon
Sizzix – Butterfly die
Card stock
Heat tool
Big Kick Die Cutting Machine
Paper towels

Check out the Imagine Crafts blog today for this and other design team creations!
Thanks for stopping by ~ hugs ~ Renee

Monday, April 17, 2017

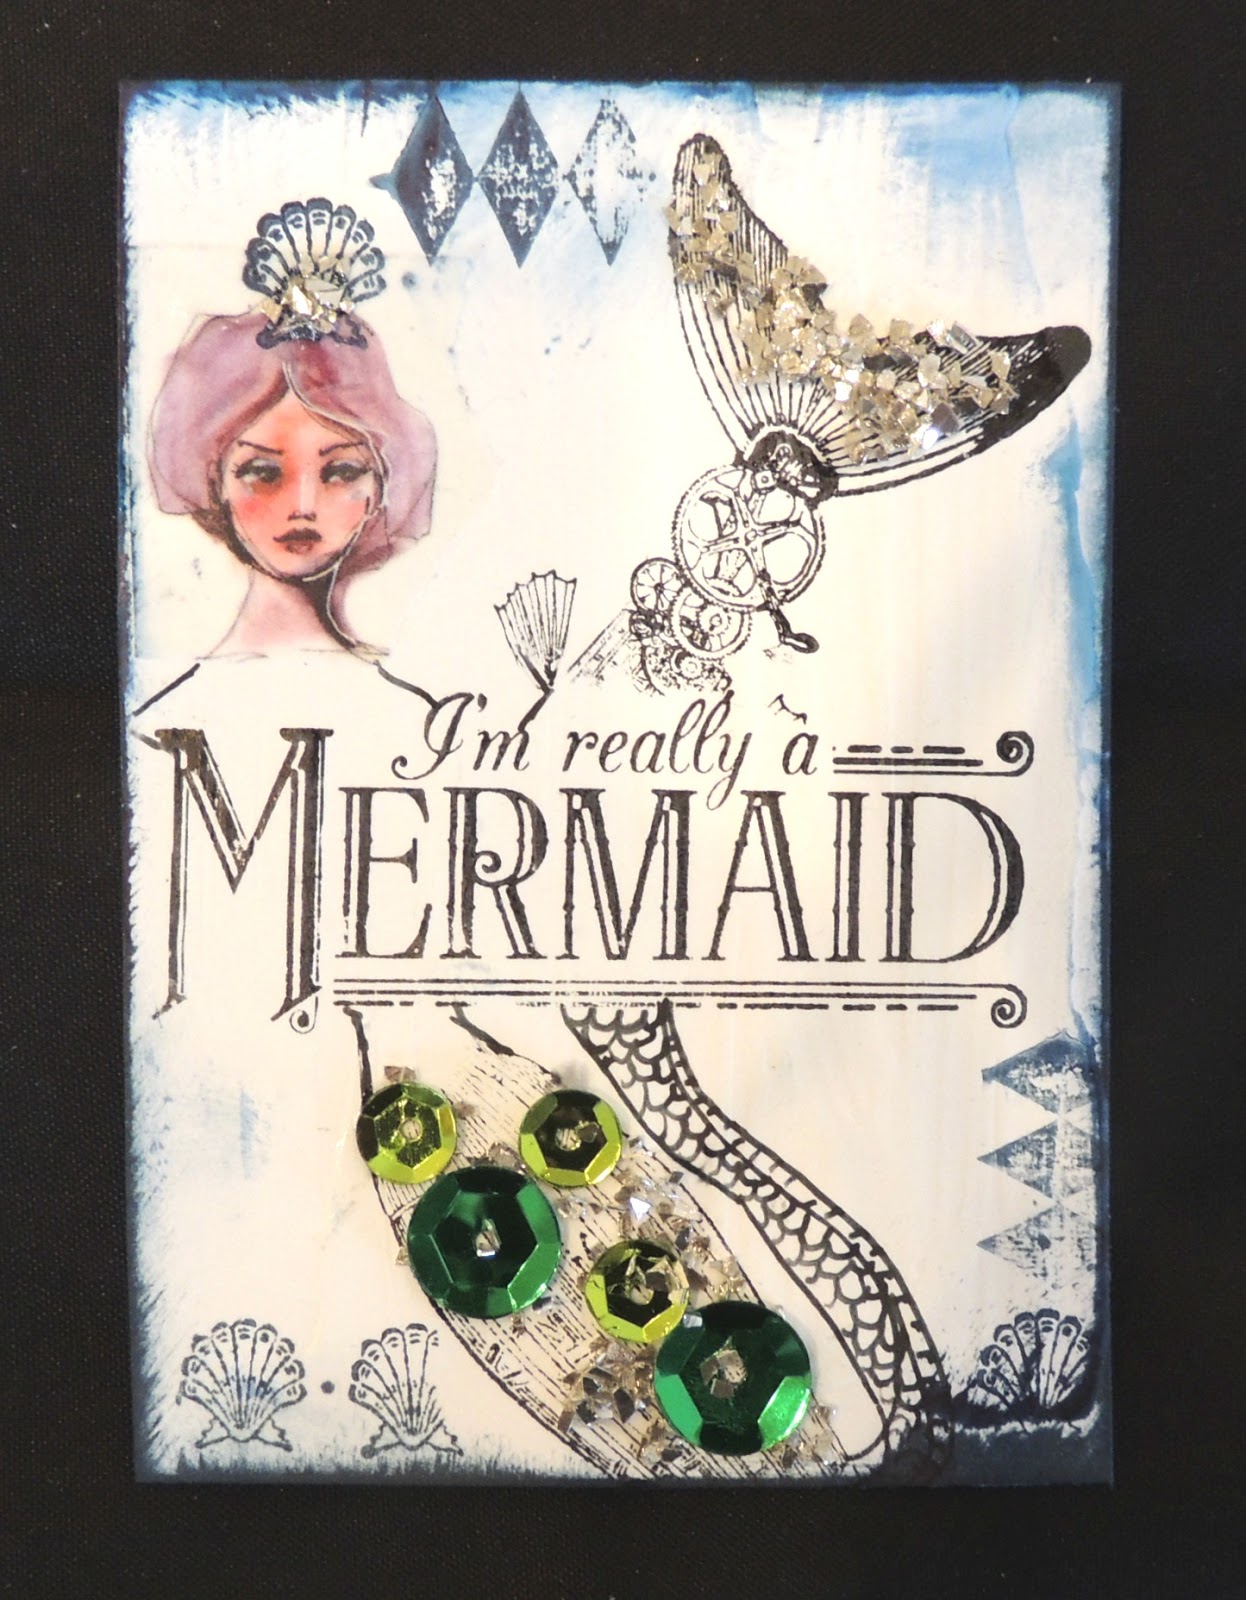
A chunky ATC featuring Mermaids!

With an AIRs theme challenge like "bigger is better" I had to really put on my thinking cap.  Who doesn't love ATCs?  I thought a "bigger/better" ATC would be a Chunky ATC.  In order to create this type of Artist Trading Card I used a block of wood that measures 2 1/2" by 3 1/2" and is 1 1/2" wide.  When it's decorated and has tiny feet on it, it becomes the perfect little shelf decoration or paper weight.  Most of you know by now what a major art crush I have on Jane Davenport's supplies; this project demonstrates a fun use for her washi tape featuring, what else, mermaids!


Description:

ATCs, Artist Trading Cards, have been around for a few years now. They traditionally measure 2 ½” by    3 ½”, they can be collaged, stamped, matted, left plain, attached to greeting cards or put into albums. They’re quick and fun to make but you might wonder what other uses are there for this tiny work of art or are they only to trade with fellow artists? There are times when you love an ATC so much you can’t bear to trade it, you just want to look at it yourself and not share it with others. We don’t have to hide them away in an album, we can keep them on display by making them bigger and better, turning them into a free standing CHUNKY ATC. It’s very satisfying to create an ATC with whatever subject matter you choose; many times the subject matter is determined by a new set of stamps or paper. When you’re happy with the ATC mount it on a wooden block, add ephemera and four delicate feet. Now you can look at your favorite one on a shelf or turn it around to change the view with a second ATC.

Skill: All levels
Time: 2 hours or more, it depends on the artist


Instructions:

Step 1: Buy or cut a wooden block that measures 2 ½” by 3 ½” by 1 ½”.


Step 2: Decide the placement of the handle on top and the clock key on the side, make a hole to insert these items, remove, they will be glued on later.  Paint the wooden block any color desired; when dry apply a thin coat of white gesso, dry.

Step 3: Make two ATCs using stamps, ink, Washi tape, whatever scraps are on hand.  Make the ATCs on gessoed water color paper cut to measure 2 ½” by 3 ½”.  When the stamped images are dry, adhere to the wooden block. The faces on these ATCs are made from Washi Tape.  Ink the edges of the ATCs using a Jumbo Dauber.


Step 4: Glue feet onto the bottom of the block, these feet can be beads or small wooden embellishments.  Apply On Point Glue to the feet and then dip each one in glitter or micro beads.  Attach the knob on the top of the block, keys to the sides; decorate the ATC images with sequins and glitter.  Tie twine and baker’s twine to the handle/knob on the top.


Supply List
Imagine Supplies
StazOn ink –St. Valentine, Jet Black and Midnight Blue
Memento Luxe – Bahama Blue, Nautical Blue
On Point Glue
Jumbo Dauber
Craft Mat

Other Supplies
Stamps – Diamond Pattern, Clam Shell design, Phrase and Mermaid tail ALL by Graphic 45
Prima - Foil, Glitter, Micro beads, Foil Glue Stick, Metal Ephemera
Idea-ology - handle
Michael’s - Baker’s twine, brown twine, sequins, white gesso, watercolor paper
Paper Trimmer
Strong adhesive
Jane Davenport Mermaid Washi Tape
G45 “Voyage beneath the Sea” Collection paper
Wooden block measuring 3 ½” by 2 ½”by 1 ½”
Dark blue acrylic paint by Americana
Paint brush

If you pop on over to the Imagine Blog you can find other great examples of projects by many different and unique artists.  We can all use a little inspiration from others, it keeps our work fresh when we discover new ways to use products that are languishing on the shelves of our studio spaces.

Thanks for stopping by!  Hugs ~ Renee


Friday, June 7, 2013

An All Occasion Card with Avery Elle Stamps

I used Avery Elle Stamps ( Bright Day and To The Point Collections) and some scraps to make this quick all occasion card.  I stamped some of the images on Kraft colored paper and cut them out.  I also used some washi tape to give it a contrasting color.


Have a great weekend!  I hope you have time to be creative and have some fun.  Take care~Renee

Friday, November 23, 2012

Art Journal Pages

I've been quietly busy with my art journal this week.  There are so many techniques to try out, I just. can't. stop.  The one I completed today is called "It's not easy being a Princess".  This poor little girl had to kiss a lot of frogs to find herself a Prince.

The images are by Hidden Vintage Studios at DeviatScrap.com, it is their "Tangled Up" download.  I did the tangles on her blank dress myself this time.  The crown is also theirs.  Washi tape and a Tim Holtz stamp are also on the page.  I've been having a problem with my Google account but hope to have it remedied by next week.  I'm trying to add more storage space for photos but I can't get them to take my money!  I wish we all had problems like that.  People want to give us money but noooooo we won't take it.  I'm sure they'll fix it by next week.  In the meantime.......Have a great weekend!