Tuesday, June 24, 2014

Stenciling on canvas

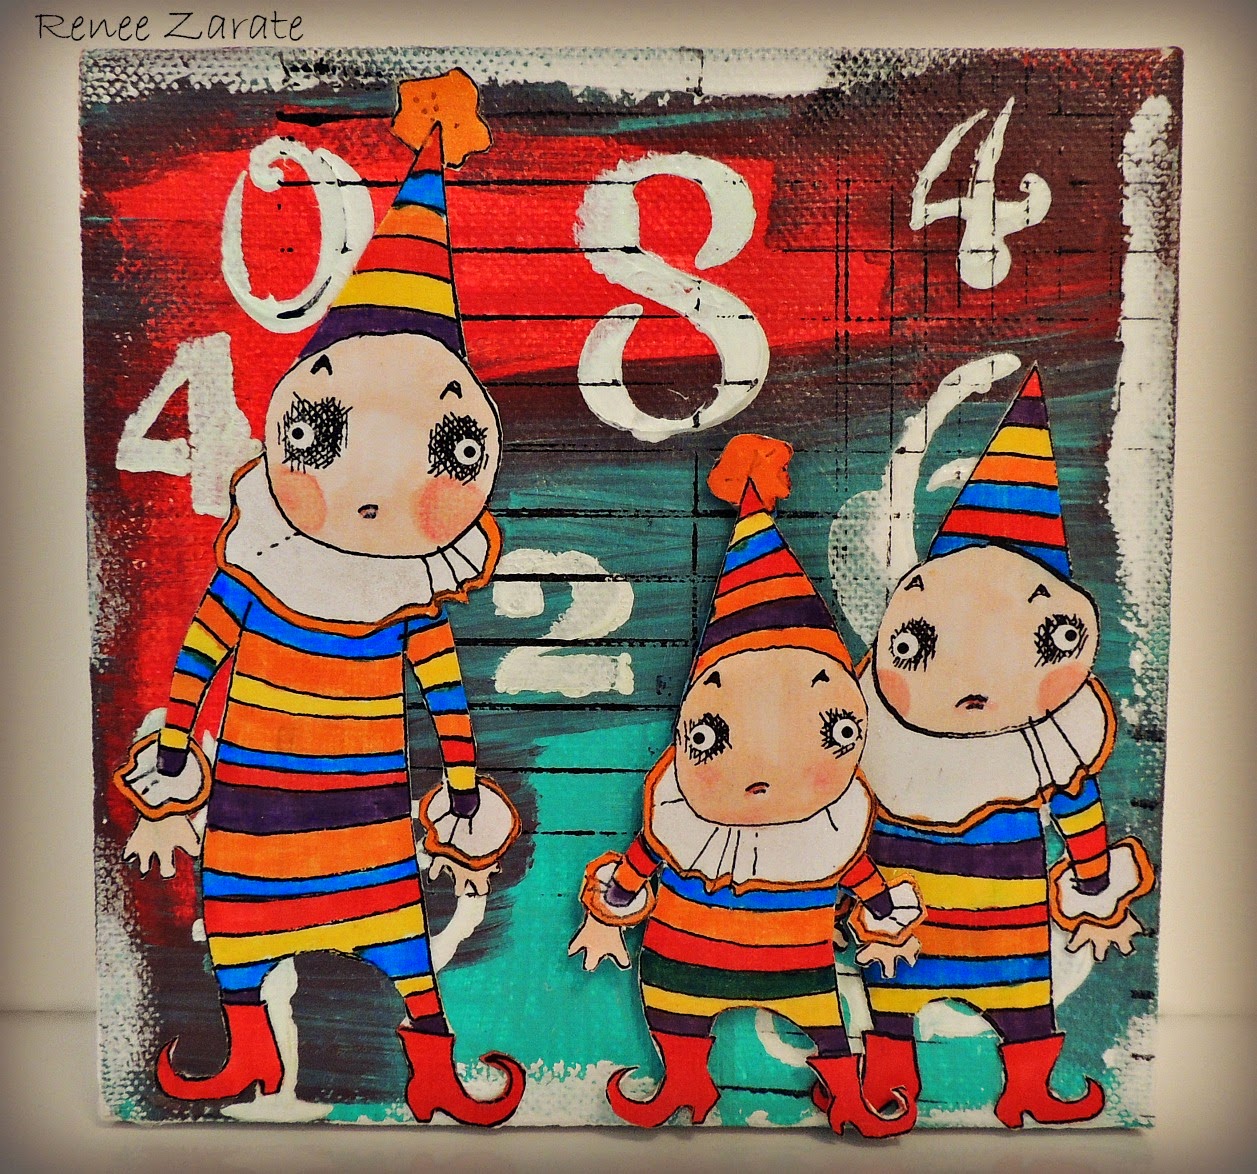
I love working on small 6" by 6" canvases!  The project I'm sharing today is done on a small canvas with paint, ink and gesso.  The clowns are clip art  from Rick St. Dennis.com.   I am calling it "The Usual Suspects".  These clowns definitely look guilty!

The Usual Suspects


 First I started by painting two colors of Dina Wakley's acrylic paints, Ruby and Turquoise, on my canvas.  I wasn't too careful and allowed the colors to mix a bit.


Next I used TCW's stencil called Numerals (TCW200).  I laid it on the canvas and applied some heavy gesso with a paint brush.  Lifting the stencil straight up I still managed to smear it a little, that's when I decided to add some clip art.


When the gesso was completely dry I ink up a lined stamp by Wendy Vecchi with Jet Black StazOn ink and rolled the stamp randomly here and there.   I colored in the printed clown clip art with Memento ink pens.  Then I cut out the ink colored clowns and glued them onto the canvas.


To seal in all that delicious color I painted the entire surface with  IMAGINE Craft's Creative Medium in the clear color.  Once this had completely dried I added the third clown who is popped up with pop dots.  He was also sealed with the Clear Creative Medium.


I hope you will continue to try different things with your stencils.  Small canvases like this are cute on bookcases or in children's rooms.  Thanks for stopping by, I'll see you next Tuesday with more stenciling ideas.  Take care ~ Renee xxx

Monday, June 23, 2014

I'm back!

My week with my 2 crazy grandsons is over.  Thank goodness I had my daughter here to help out.  Whew!  Lots of artwork, lots of pie and of course, running........through the house, around the house, up and down the stairs.  You get the picture.


Holly worked in her art journal.


Caden worked on his canvas.

The boys were invited to Lanie's house for a play date.

Ann La Rose and my daughter Holly had a little time to hang out.

Just wanted to give you all a head's up for this coming weekend.  I will be teaching at "Ink About It on the go".  Here is Maryellen's newsletter if you'd like to check it out.  She will have a pop up store at the hotel.  Last month she had just about everything you could want and I'm sure this time will be even better.  I'll be teaching in the afternoon.  She has a really nice write up about my class.  I'd love for you to join me if you are able to.

I will be back tomorrow with some new stenciling ideas for you.  See you then, take care ~ Renee

Tuesday, June 17, 2014

Gift Tag using Pocket Stencils

It is Tuesday so it must be STENCIL DAY!  I decided to make a tag today, they always come in handy.  I cut my own tag out of 140# water color paper, trimmed the top edges and punched a hole in the top center.  The finished tag measures 4" by 10".  A short tutorial follows.


After cutting the paper I trimmed the top, punched the hole and painted on a thin layer of gesso.


When the gesso was dry I sprayed some Dylusions in blues and purple onto the tag.

I painted on another thin layer of gesso and allowed it to dry.  I inked up a Wendy Vecchi stamp with StazOn Jet Black ink and rolled it on a few areas of the tag.  Using the TCW Circle Regiment stencil and a cosmetic sponge I applied Dina Wakley's new acrylic paint in the Blackberry Violet color.
 When the Blackberry paint was dry I applied gesso again using another TCW stencil called Corn Flowers.  I set this aside to dry.

I keep saying how much I love Artistcellar's new word stencils and they found their way onto this tag as well.  I used the words from Creative Words and Virtues Words.  This time I stenciled the words with a Memento marker in the color called Grape Jelly.

To finish off the tag I distressed the edges with StazOn Claret colored permanent ink and added a little more stamping with a Dina Wakley script stamp using the black StazOn ink.  The ribbons on the top make it look festive.


It is fun to use your stencils to get different effects.  There are no rules as to how many layers of stencils you can stack onto a project, you just end up with more depth and texture.

Thanks so much for stopping by today.  I'll be showcasing more stencils and different ways to use them next Tuesday.  Take care ~ Renee xxx

Friday, June 13, 2014

Craft Stamper Magazine Take It Make It Challenge~Bleach Blocking Technique

Have you entered your project yet at the CS Take It Make It Challenge?  You still have plenty of time.  You don't even have to use real bleach, water will do.  I did another project using the bleach blocking technique.  Here is the finished project, it'll be followed by a short tutorial showing you how simple it is!


I started out by cutting my own tag out of 140 lb water color paper.  (I ran out of tags.)  I applied three colors of Distress Ink to the tag with an applicator.  I used Shabby Shutters, Shaded Lilac and Dusty Concord.


Next I used a cosmetic sponge and the applicator to remove color by dipping them in water and then lifting off some of the ink.


Once I was satisfied with the effect I started stamping Dina Wakley's new stamps, little wonky birds and some phrases.  I used StazOn permanent ink to do this.  I cut the top corners at an angle and punched a hole in the center to make it look like a tag.


At this point I was disappointed in the way it looked so I decided I had nothing to lose.  I stamped Dyan Reaveley's leaves in black ink around the birds.  Then I decided to bring out my new Dina Wakley Acrylic paints and just play.  I stamped the leaves and painted them green.  Then I mixed other colors with a new product I bought this weekend called Whipped Spackle by Faber Castell, it is like a whipped gesso.  Very light and fun.


 You can really glob on the paint with the spackle.  It allows you to see the brush strokes too.  Next I added a little green ink around the leaves with a Memento Pear Tart pen.  A tiny bit of PICO irRESISTible on the eyes in a silver color followed by a drop of white pen for a catch light.  Then I distress the edges with StazOn Midnight Blue and tied some ribbons at the top through the punched hole and there we have it.


I hope you will enter the Challenge.  I've had more fun with this technique than I thought I would.  Be sure and link your creation so we can all see it.  Thanks for stopping by.  Talk to you soon ~ Renee xxx

Thursday, June 12, 2014

Buried Treasure~~~Jane Davenport Stencils help when drawing faces!

This post was originally shared on July 6, 2013.  I am participating in Seth Apter's Buried Treasure project today so I am sharing my favorite post from last year.  Thanks for joining me, here is the link to Seth's blog so you can check out the other participating artists.  http://thealteredpage.blogspot.com/2014/06/buried-treasure-2014.html


I'm still drawing faces but I have gotten a little help from my Jane Davenport Stencils.  This is a 3/4 face and some eyes on a page that I call "the eyes have it" or it could be titled "don't you make my brown eyes blue".

I worked in my journal on gessoed pages with spray inks and acrylic paints.  Then I did the tangles with my Fude Ball pen which will write on anything.

Just the face


The entire 2 page spread


I hope you're having a great weekend.  It is so hot here!  It feels like 100 F outside when combined with the humidity.  Whew!  Here's to a long weekend, bar-b-ques and lots of creative time.  Take care, talk to you soon~Renee

Tuesday, June 10, 2014

Pocket Stencils combined with faux bleach blocking technique

Last week I used the Craft Stamper's "bleach blocking" technique to create a background paper that had a look to it similar to an opal.  I used one part of the paper to make a card with the rabbit from an Alice in Wonderland stamp set.  I had enough left to make another card.  To mix it up a little I used the new Pocket Stencils from Artistcellar.  I love the Creative Word stencils so I added those to the background paper.


On each 5" by 7" section that I cut I added different stamps with StazOn Jet Black ink and white acrylic paint.


The circles are from lids dipped in white acrylic paint and old gift cards dipped in the same paint.  I applied StazOn Midnight Blue permanent ink with a cosmetic sponge through the word "BELIEVE" from the new mini word set.


A quick look through my stash of discarded projects found the Alice stamped hotel key fashioned a couple of years ago.  She was just waiting for the right card!  The words previously stamped on the panel fit perfectly with this theme.


I glued Alice to the center of the card with pop dots then added some circles punched from old book paper.  I used black waxed twine to wrap a couple of times on the left side and tied a bow.  The entire panel is glued to a 5" by 7" blank white card.


This is a nice way to use the same paper for a couple of cards using a similar theme.  The Creative Word stencils are a subtle way to send a positive message to the recipient.  See you next Tuesday for more stenciling ideas!
Hugs ~ Renee

Friday, June 6, 2014

Craft Stamper Take It Make It June Challenge~'Bleach' Blocking

For the month of June the Take It Make It Challenge is Bleach Blocking.  Do not fear....it does not involve real bleach.  Whew!  Personally I am a disaster any time a bottle of bleach is involved.  This is done with inks and water so no one gets hurt.  I decided to do my blocking work on a piece of watercolor paper and then make a set of cards from that paper.  This is my first finished project, if you'd like to see how it was done I've provided a tutorial.


Here is the technique for the challenge:
'Bleach' Blocking 

Technique: Simple background technique using just water and Distress ink. Create a background using Distress inks, then 'take off' blocks of the ink using a wet (and clean!) blending tool. As the water will remove the ink, it looks bleached out, hence the name of the technique. This is just a background technique, so don't forget to add in the stamping element of the challenge as well!

I started with a large sheet of 140 lb watercolor paper.  I sprayed some Dylusions in blues and greens on the paper, more water, then let the colors run together.


Per the instructions I used a cosmetic sponge to remove the ink with water.  I flicked some droplets on the sheet for added texture.


I applied a little of Rangers Distress Ink in the Wild Honey color to the paper.  Allowed it to dry.  Then I cut a piece to make a card measuring 5" by 7" and started to stamp Dyan Reaveley's leaves on it.  I stamped more of the leaves on a scrap piece of the paper and cut them out to layer them on top of the stamping.  I pulled a piece out of my stash that had the rabbit from Alice in Wonderland stamped on it and that became my focal point.


I took an old credit card and dipped it in white paint to draw the vertical and horizontal lines on the panel.  A bit of white marker on the leaves and then I glued them to the card with pop dots for dimension.  The tiny rhinestone heart gives it a tiny pop of color.  Then the panel is attached to a blank white card.

I have enough to do another card similar to this which I'll show you at the half way point of the Craft Stamper Take It Make It Challenge.  I hope you can go to the website and join in for this month's challenge.  Don't forget that there are prizes to be won.

Thanks for stopping by.  Take care, talk to you soon ~ Renee

Tuesday, June 3, 2014

Making a mini tag journal using Pocket Stencils

Tuesdays on my blog mean just one thing......Artistcellar stencils!  This week a new series of stencils were released called Pocket Stencils and they are tiny stencils that have a big impact.  Each separate stencil in a pack measures 2 1/2" by 3 1/2", ATC lovers does that measurement sound familiar?  There are four mini stencils in a pack and five different Pocket Stencil Collections.  I decided to combine 2 different word packs to create a fun mini tag journaling book.  The Pocket Stencils I'm using today are from the Creative Words and Virtuous Words packs.  There is also one of the stencils from the Mini Steampunk Collection.  I am using Dina Wakley's new acrylic paints for color and her newest stamp set called "All the Gals".  This is what my finished project looks like, if you keep reading you'll see a short tutorial explaining  how I created this.


I used regular manila packing tags measuring 4 3/4" by 2 3/8" to work on.  I started by painting different colors of acrylic paint on the tags with a paint brush.  I allowed the first color to dry before applying a second color.  I used StazOn ink to stencil the words on each tag.  I just applied the ink with a cosmetic sponge dabbing it through the stencil.


Next I stamped a different face on each tag and then applied a small amount of white gesso using another Pocket Stencil from the Mini Steampunk collection.


I decided to add small pieces of washi tape to each tag and stamp some loopy script, also from Dina Wakley.


When I'm just adding a touch of script like this I do not mount the stamp on an acrylic block.  I roll parts of the stamp in the StazOn ink and then roll it onto the tag.  That way I just get a hint of the stamp.


I did the same thing with each tag just adding the elements in different spots on each tag.  Here are all my ladies in a row.


Each tag has a blank surface on the back side which could easily be used for journaling.  The words give a positive thought for each day.  We can all use positive thoughts!  I joined them all together using a metal ring and then added some matching ribbons to the mix.


It looks nice closed or fanned out.


When you have a chance you might pop over to the Artistcellar blog to check out the blog hop going on showcasing the five new Pocket Stencils release.  Who knows maybe you will win your own set of these adorable and useful stencils.

Take care, thanks so much for stopping by.  If you have time please leave a comment, I love to hear what you think.  I'll have another stencil tutorial to share with you next Tuesday.  Until then, hugs~ Renee