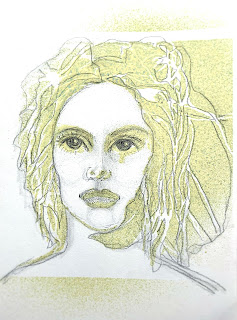
I'm still working on my 100 Days of Hair Challenge, this lady was inspired by Tamara Laporte's class on Life Book 2021 course. http://www.willowing.org/
This is Day 56/100 of the challenge.

I'm still working on my 100 Days of Hair Challenge, this lady was inspired by Tamara Laporte's class on Life Book 2021 course. http://www.willowing.org/
This is Day 56/100 of the challenge.
Beautiful Minds Inspire Others Collaboration

A few months ago I noticed on Face Book that Tina Walker was looking for participants for a StencilGirl Product collaboration. I LOVE StencilGirl Products! Of course I volunteered right off the bat. I decided to make a cover for a handmade art journal for the challenge. I have signed up for a few online classes for 2021 and I thought it would be nice to have a journal or two to put my finished projects in.
Tina asked that we mention who was our inspiration for our project and I immediately thought of a fellow online artist that I have followed and been inspired by for many years now. Linda Edkins Wyatt is my inspirational artist, I have been encouraged over the years by her drawings of unusual faces and the fact that she even has her own line of stencils that you can check out in the Stencil Girl product line.
I've included a step by step photo diary of my process. I hope this inspires you in some way to create art as a way of maintaining balance and beauty in your life. Also, I hope it will encourage you to jump at the opportunity to participate in a collaboration with other online artists even if it feels a little out of your comfort zone.
List of stencils:
Talaya Goddess of Rain by Andrea
Laugh by Pam Carriker small 6" by 6"
Unfinished by Seth Apter 9" by 12"
Art Supplies
Paper products used:
Strathmore Mixed Media paper 5.5" by 8.5" for the face drawing
Strathmore 140 lb watercolor paper measuring 11" by 15" (for book cover folded in half)
Piece of black paper for matting and another mixed colored piece of paper for another mat under the black paper
White Gesso and Liquitex Ultra Matte Gel
Ranger products: Distress Oxide Ink Spray Bundled Sage, Distress Oxide Wilted Violet ink pad
Tsukineko Inks: Jet Black StazOn ink
Pens and Pencils: Stabilo All Pencil Black, Black Fude Ball pen, Posca white pen, Memento Green markers for leaves and Gothic Purple Memento markers for flowers
Stamps: Bird by Picture Show
Purple satin ribbon and double sided adhesive tape


She made me think of Spring so a few flowers in her hair seemed appropriate. I incorporated the Wilted Violet colors in her hair and used a Fude Ball black pen to turn them into flowers.


100 Days of Hair
During the quarantine I've been focusing on drawing faces as my art project. I never seem to tire of this for some reason. To guide me with the proper placement of facial features I have found that stencils can really be a big help. I use a lot of the StencilGirl Products including their different face stencils. One that I am especially fond of is Andrea Matus deMeng's "Abigail". First I apply a thin layer of Gesso on a piece of 140 lb watercolor paper, when that is completely dry, then I pencil in the face using the Abigail stencil. Every time I use that stencil the face looks different depending of whether I collage the hair or paint it with acrylics. The stencil is just a placement guide for the features.
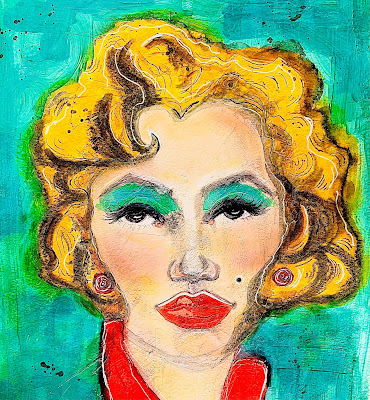 |
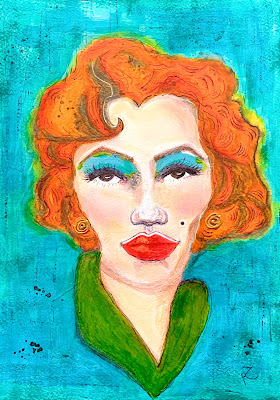
| "Bombshell" And then we must remind ourselves that "Not all Bombshells are Blondes" |
 | |


