Showing posts with label G45 paper. Show all posts

Thursday, August 3, 2017

A Steampunk Style Book Mark for Summer Books


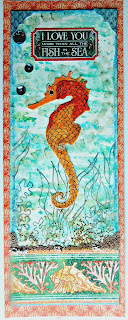
One of our challenges with Imagine for the month of August is to create something with the word “Motion”in mind. I have created a book mark for several reasons. I love the ocean and the constant motion that can be found there, not only with the movement of the water but all the creatures in the sea that seem to be always on the move. The Dog Days of August make me want to head down to the beach with a good, old fashioned paperback novel, for which I need a book mark. This book mark is made with Graphic 45 paper that is called “Voyage Beneath the Sea”; it has a distinctive Steampunk flair to it. There’s a lot of inky goodness on the front of the tag and a surprise appearance of a mermaid on the back. Enjoy your summer reading!
Time: 1 hour


Directions:

Step 1:
Create a master board on Bristol paper that will be the water like background. To make sure that the Glaze doesn’t soak into the paper, apply a thin coat of gesso to the water color paper before beginning.  Make sure the gesso is dry. This master board was created with StazOn Studio Glaze applied with a Smudgees Sponge Mitt and a little water to blend the colors, first Emerald City, then Bahama Blue and then Gold. Each color was applied through a stencil and heat dried in between to set the color.
Cut off the desired portion for the marker.  This one measures 8 ¾” by 3 ¼”. Save the rest of the master board for another project.
Step 2:
Choose a stamp that looks like something under the sea and stamp an image with StazOn Midnight Blue ink at the bottom of the marker.


Step 3:
Cut a piece of paper for backing out of sea themed paper, this one is from Graphic 45. This panel measures 3 ½” by 9 ½”. Cut another snippet of paper to glue on the bottom. The seahorse is a die cut from Sizzix that has been colored in with Memento Markers. The stickers match the paper collection.


Step 4:
Adhere the panel to the backing paper; glue some sequins to look like bubbles. Tiny glass beads mimic sand at the bottom of the ocean, On Point Glue is perfect for adhering tiny details like this.


Here is the front side of the finished tag with a tiny bit of glass glitter added to the sand area.


The back is pretty too.

Supply list
Imagine Supplies
Ink- StazOn Midnight Blue
StazOn Studio Glaze-Emerald City, Bahama Blue, Gold
Memento Markers-Tangelo, Dandelion, Tuxedo Black
Tear It! Tape
On Point Glue
Palette knife
Craft mat
Smudgees sponge mitt

Other Supplies
Bristol water color paper
Gesso
Stencil by Artistcellar
Graphic 45 “Voyage to Beneath the Sea” paper collection and stickers
Finnabair Glass Beads-White Gold, Copper, Platinum
Prima Glass Glitter
Sequins
Sizzix Die Cut-Sand and Sea (seahorse)
Spray bottle of water
Paper cutter

Thanks for stopping by!  Hugs ~ Renee


Friday, June 14, 2013

Maya Road Chipboard Box becomes a sewing kit gift!

It seems like in the summer months all of us do a few road trips here and there.  Sometimes they involve staying over with friends and relatives along the way.  I always like to bring a little hostess gift when I come to stay.  It generally involves a bottle of whatever the host/hostess likes to drink but in this case I wanted to add something special that reminds me of Cape Cod or the East Coast beach get aways.  Maya Road was very generous in sending me several things to play with this month and I decided a small box could be transformed into an emergency sewing kit for the hostess to use for herself or to leave in a guest room for the next visitor.  I bought a tiny emergency sewing kit and dropped it inside the box when it was finished but you can do whatever you like with it.  


 The box starts out as a plain chipboard sturdy little blank canvas measuring 3” by 3” with a hinged lid.

I knew I was using a red, white and blue theme based on the G45 paper that I had chosen called Place in Time.  The paper is reminiscent of the turn of the century/early 1900’s at the beach.  It has sweet images of young women frolicking at the ocean, driving cars, etc.  It is a double sided paper but I still needed another sheet of paper for matting so I used Authentique’s Friendship paper to coordinate with it.
I began by measuring and cutting four pieces of white cardstock each measuring 3”by3”.  I distressed the edges of all 4 white panels with IMAGINE Crafts®/Tsukineko®StazOn®Solvent Ink in Blazing Red using an IMAGINE Crafts®InkBlusher™ which allows me more control in fine areas like this.  All four panels were set aside as I cut out the pictures I wanted to use from the G45 paper, I trimmed all of these to approximately   1  7/8” by 2 ¼”.  All of these images were matted onto a coordinating paper cut to 2 3/8” by 2 ½”.  I glued the image to the matting and then the unit to the white panel.  I made an extra matted image to be attached to the inside of the lid. 


Inside and outside of the box I used an IMAGINE Crafts®/Tsukineko®Fantastix™ Multi-Purpose Applicator to apply IMAGINE Crafts®/Tsukineko®StazOn®Solvent Ink in Midnight Blue to make sure the edges looked finished in a matching color.  I then cut panels to fit on all of the other additional exposed surfaces inside and outside of the box. 


I wanted feet on the bottom of the box so I cut 2 of the Maya Road spools in half and painted them with IMAGINE Crafts®/Tsukineko®All-Purpose Ink in #19 Cerulean Blue.  When the feet were dry I coated them with IMAGINE Crafts®Creative Medium ™, this gave them a little shine.  Those were set aside to dry.
For a topper I used a wonderful measuring tape that was in my surprise box from John at Imagine Crafts.  I took the tape and cut it into sections to loop and staple with small staples.  I glued each looped section together with adhesive and piled them up until it turned into a nice sized bow to be glued on the top of the sewing box.
 Now that I had all of my components ready it was just a matter of putting everything together.  I used a strong adhesive to glue the top and bottom panels to the box.  I glued the side panels all the way around the outside.  I glued the inside panels to the sides and then fitted the final one on the bottom of the inside of the box.  I stood the box upside down and glued the feet to the bottom and allowed them to dry.  The bow was glued to the top of the box and I snuggled a self adhesive bee made by K&Co on to the bow.  I used Queen and Co. self adhesive pearls in a Sapphire blue color at all four corners of the panels going around the box to finish it off.  Now I have a lovely little gift box full of emergency sewing supplies perfect for a guest bathroom or bedroom. 


Here is a list of all the products and tools that I used to transform this chipboard box into a tiny sewing box.

Products
Maya Road Chipboard Box
Graphic 45 and Authentique Paper
White card stock
IMAGINE Crafts®/Tsukineko®StazOn®Solvent Ink in Blazing Red IMAGINE Crafts®/Tsukineko®StazOn®Solvent Ink in Midnight Blue
IMAGINE Crafts®InkBlusher™
IMAGINE Crafts®/Tsukineko®Fantastix™ Multi-Purpose Applicator
2 of the Maya Road spools
IMAGINE Crafts®/Tsukineko®All-Purpose Ink in #19 Cerulean Blue
 IMAGINE Crafts®Creative Medium ™Clear color
Queen and Co. self adhesive pearls in a Sapphire blue color
One Maya Road white with red markings vinyl measuring tape
Adhesives
Staples
Mini sewing kit (if desired0

Tools
Stapler
Cutting tool
Scissors


 Thanks so much for stopping by to visit my blog; I hope you enjoyed the tutorial.  Have a great weekend, leave a comment if you have time, I'd love to hear from you.  Talk to you soon, Renee

Thursday, October 25, 2012

Autumn ATC swap

Finally finished my ATCs for a swap and popped them in the mail.  I did 3 different sets of ATCs and just couldn't decide which ones to send.  Really, I think I just torment myself too much over things like this.  Any way, I decided to send the ones that I liked the best.  It always goes back to the foil covered work.  I love that product.  So here is my set of four:
I named them "Autumn in Paris 1890s".  Tim's foil, stamps and ephemera.  G45 paper.  Doesn't get any better than that for supplies.

Wednesday, October 3, 2012

Altered Paint Brushes

Have you seen Donna Downey's website featuring altered paint brushes?  It is quite amazing how many different ideas there are when it comes to altering a paint brush.  I tried my hand at two recently.  One for a swap and another for my sister in California.  Here is what I came up with.
This is the one I did for the swap.  It has a little book of watercolor paper glued to where the bristles used to be.  The pages were sprayed with Dylusions and stamped with Dina Wakley's new stamps.


This is the brush I made for my sister who has always wanted to go to Tahiti.  Both of the brushes are 4" paint brushes purchased from the hardware store.  Both were painted with acrylic paints.  A lot of glue was involved in the form of glue dots, Glossy Accents and of course, Red Line tape.  The only limits are your imagination.

Monday, February 6, 2012

Some more pages from the Sketchbook Project book

Graphic 45 "Le Cirque" paper & Stampotique stamps

Time is of the essence in Wonderland.  Stamps by Stampington.

Young Marie Antoinette in the aperture and lots of talk about cake.

Her therapy was FASHION.  One might ask, "so how's that working for you?"
This is the back of my little book.  Alors, c'est fini! 

Sunday, January 1, 2012

Simon Says Challenge/Tim Holtz Tags

This is a Tim Holtz inspired tag.  The stamps are by "My Sentiments Exactly" and also "IndigoBlu's"crackle stamp.  The flowers are Tim's Tattered Florals die cut.  I used Rusty Hinge Ranger ink, Iced Spruce ink (which I adore) and Graphic 45 Steampunk paper with a little Rock Candy stickles on the butterflies.  I colored  some of Tim's pearls with ink to match the other components and tied them to the top of the tag.  It is a tag that can be used for almost any occasion.

Friday, December 23, 2011

"Alice in Wonderland" CakePop Box


This Alice in Wonderland box is definitely an "Altered Alice".  I used Graphic 45 "Alice" paper that has lots of great colors and seems a little grungy/"goth", which I love the look of.   Then made a bow out of the same paper to put on the top.  Of course it went to California to "Popping Palate" cake pop master, Misty, and she said she loved it!  That's all that matters at the end of the day, right?