Showing posts with label Stencils. Show all posts

Thursday, September 14, 2017

Every art journal needs its own special cover

Today on the Imagine blog I'm sharing an art journal cover made using the new Delicata inks.  Check it out when you have a moment.


I used one of Frank Garcia's beautiful frames as the focal point and then just layered it with tons of decorative metal ephemera.  The complete supply list and tutorial can be found on the Imagine blog.

Thanks for stopping by ~ Hugs ~ Renee

Monday, March 28, 2016

Use your excess paints on an Art Journal page

I usually keep a large art journal book like Dyan Reaveley's close at hand when I'm using paints on a canvas.  I wipe off my brushes before really cleaning them that way I don't waste my paint and I get some interesting random pages to boot.  It's also a nice way to audition stamps and stencils.  On these pages I added some Stampotique stamps with those cute little dogs!


I hope you're staying busy and I hope you're stealing a little time here and there for art adventures.  Hugs ~  Renee

Friday, March 18, 2016

Art Journal Play Time

In my studio I have multiple art journals, some are for Zentangle, others for Dylusion sprays and of course there are the AJs that are just random elements, remnants from other projects.  Today as a warm up I decided to play in one of the random books.  I have stamped off images and extra paint slopped onto the mixed media paper, just waiting patiently for a moment to be remembered and allowed to shine.  This page had eyes stamped onto it and out came this face with a little help from Ranger's new Distress Crayons.


Have a lovely weekend!  Our weather here has been outstanding in spite of the heavy pollen that has coated everything outside.  Hugs ~ Renee

Wednesday, July 8, 2015

Stampotique Design Challenge ~ Using Attachers :: SDC 203

The Stampotique Designers Challenge for this week is hosted by Kathi.  Kathi wants us to "Use attachers, the older the better.  Thinking of eyelets, brads, staples, etc.  Bonus points if someone uses all three.  Extra super bonus points if someone attaches Stampotique images to each other.'


I decided to do a little mail art at the same time with this challenge in mind.  When I make envelopes like this they are not intended to go through the mail.  I usually fill them with projects intended for Stampington.  Sometimes they not only publish the contents but also the envelope!

Here is a brief tutorial:


I chose a 10" by 13" Kraft colored envelope to decorate.  I applied a thin layer of gesso across the bottom and allowed it to dry.  When the gesso was dry I began stamping my images with StazOn Ink in Tuxedo Black.  Next using a Micron pen 08 I started writing out the address.  The circles were made from an old lid dipped in the black ink.


I stamped the flying pigs again on a separate piece of cardstock, cut them out, colored them and then attached them with Parisienne Brads made by Recollections.  My pigs are elevated with pop dots, this way I didn't have to attempt to cut out the tails, I love that little bit of detail on them.


Add some fake postage.


I used a diamond stencil and some Creative Medium Paste in pink to finish the envelope.

Supply List

Stampotique Stamps:  Flying Pig, When Pigs Fly phrase, Hanging Hearts
Parisienne Brads made by Recollections
Ink:  StazOn Black Tuxedo ink
Memento Markers:  Angel Pink, Summer Sky
Iridescent Creative Medium Paste:  Pink
PanPastel:  Copper
Stencil:  Artistcellar Diamond 
Miscellaneous:  Micron 08 black pen, Kraft colored envelope, Gesso, old recycled postage marks, cardstock, pop dots and adhesive


Have some fun with attachers and share one with us on this week's Designer's Challenge, here is the link.

Thanks for stopping by!  Hugs ~ Renee

Wednesday, July 1, 2015

Stampotique Guest Designer for the month of July! SDC: 202


This has been a hard secret to keep but I can finally share it!  I have been asked to be a Guest Designer on the Stampotique blog for the month of July.  This has been a dream of mine for several years so I am really going to enjoy all five projects that I've created for them this month.  The first challenge for July is hosted by Corrie and it is a ribbon challenge.  Corrie says "I struggle to use ribbon on my projects but I do like it.  So I want you to show me what you do with ribbon."

My finished project is a small art journal page showcasing one of Daniel Torrente's newer characters called SKIDDY.  I used self adhesive ribbon to give Skiddy something to stand on.   I have listed all the stamps I used for this.  I hope you'll join in this challenge, there is always the chance of winning some stamps from Stampotique!


Supply List

Creative Medium Green Iridescent paste
Stamps:  Stampotique:  Skiddy, Hanging Hearts, Beauty Verse and Hare
Inks:         StazOn Jet Black ink, StazOn Studio Glaze and Memento ink pens
Ribbons:  Self adhesive ribbons from Primio
Small Strathmore Mixed Media art journal, Stencil from Artistcellar, lines and circles from household items

Tuesday, June 24, 2014

Stenciling on canvas

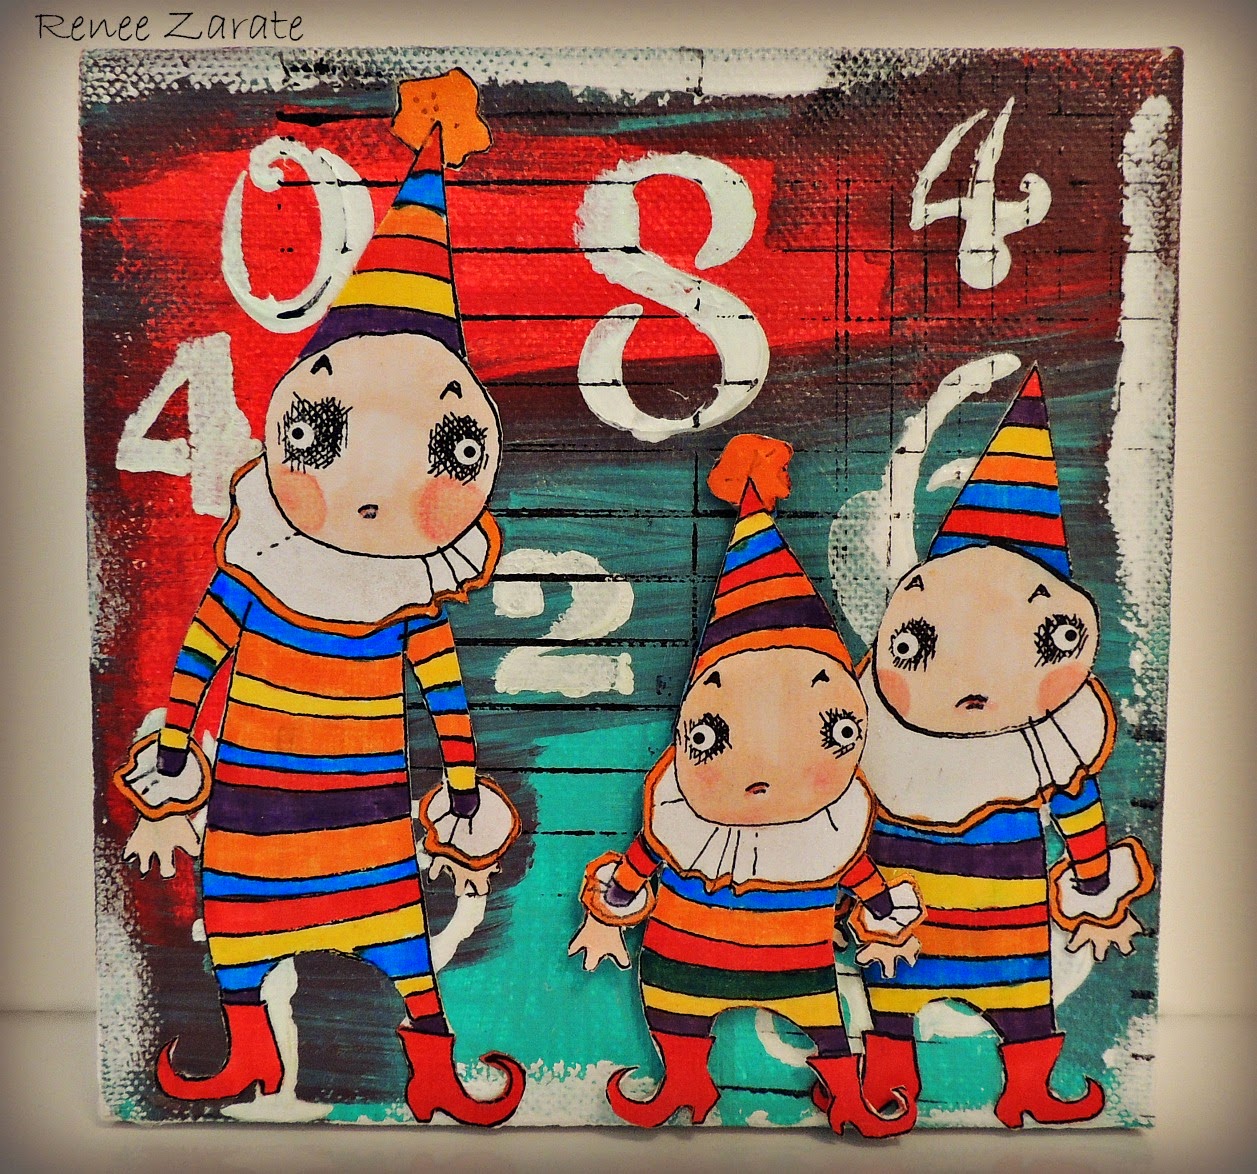
I love working on small 6" by 6" canvases!  The project I'm sharing today is done on a small canvas with paint, ink and gesso.  The clowns are clip art  from Rick St. Dennis.com.   I am calling it "The Usual Suspects".  These clowns definitely look guilty!

The Usual Suspects


 First I started by painting two colors of Dina Wakley's acrylic paints, Ruby and Turquoise, on my canvas.  I wasn't too careful and allowed the colors to mix a bit.


Next I used TCW's stencil called Numerals (TCW200).  I laid it on the canvas and applied some heavy gesso with a paint brush.  Lifting the stencil straight up I still managed to smear it a little, that's when I decided to add some clip art.


When the gesso was completely dry I ink up a lined stamp by Wendy Vecchi with Jet Black StazOn ink and rolled the stamp randomly here and there.   I colored in the printed clown clip art with Memento ink pens.  Then I cut out the ink colored clowns and glued them onto the canvas.


To seal in all that delicious color I painted the entire surface with  IMAGINE Craft's Creative Medium in the clear color.  Once this had completely dried I added the third clown who is popped up with pop dots.  He was also sealed with the Clear Creative Medium.


I hope you will continue to try different things with your stencils.  Small canvases like this are cute on bookcases or in children's rooms.  Thanks for stopping by, I'll see you next Tuesday with more stenciling ideas.  Take care ~ Renee xxx

Saturday, April 26, 2014

Paint Nite Boston


Have you seen that Groupon offer called "Paint Nite"?  A large group of my friends got together and we went to a local Paint Nite event here in the Boston area.  So much fun!  There were about 35 of us in the class, if you wanted to drink wine or order something to eat while you painted you could.  No muss no fuss, no clean up, etc.  Great concept.  The teacher had all of us paint the same thing during a two hour period.  I'm not much of a flower painter but I figured I'd try it.  This is what my painting looked like when I was finished.  Tah Dah!


My art friend Ann was there also, her painting looked pretty much like mine did.  We both decided we would work on these together at my house on another day.  When we got together this week we started by tearing up some maps and gluing them down with Mat Medium just in the areas we weren't too happy with.  After a little while the canvas looked like this.

Ann's canvas


Renee's canvas

Then we each applied gesso, acrylic paints, stencils, stamping, you get the picture.  Here is Ann's "after".

Ann's Mermaid

And here is my "after".

Beatrice picks a flower
I think Paint Nite was a huge success!  We had fun and then we had more fun later.  You can still see tiny bits of the pink flowers if you look closely.

Thanks for stopping by, please leave a comment if you have the time.  I always appreciate hearing what you think.  Take care, talk to you soon ~ Renee

Friday, March 14, 2014

Craft Stamper~Take It, Make It Challenge~Halfway Reminder


The tag created for today is for the Craft Stamper blog challenge.  The theme of the challenge is Monoprints created with acrylic blocks.  We are at the halfway point of the challenge so there's a little reminder on the blog.  For more details about the March challenge and to enter one of your amazing creations just pop over to the Craft Stamper blog.

I started this large, Ranger 5 1/8" by 10 1/2" manila tag, by creating the background.  I wanted a steampunk style tag using the colors of aqua green, deep yellow and light magenta.  Artist's Loft acrylic paints were perfect for this and I used a large acrylic block along with a few stencils to get the different patterns with the paints.  I will share a few photos showing the process.

A stencil and some scraps of paper cut to make more patterns are laid on the acrylic block before applying the paint.

Carefully lift off the stencils
Press the tag firmly into the paint on the acrylic block, you can get several pulls off of this large block.

This is the initial first layer of colors

I added more color and texture to the tag using the same acrylic block

After each color of paint was applied I allowed some drying time.  I wanted the colors to maintain their integrity and not blend all together.  It is messy but really fun!  When the paint dries it is time to add the details like outline the figure with a Fude Ball 1.5 black pen, some stamping with StazOn Jet Black ink and Tim Holtz's Remnant Rubs, metal gears and tickets.


For the ribbons at the top of the tag I used Dylusions spray inks to get colors that coordinated with the tag.  A little white gesso pushed through a stencil to tone it all down a notch and pull the colors together.  The edges were distressed with Ranger's Vintage Photo ink as a finishing touch.


Thanks for stopping by today.  I hope that you feel inspired to try this technique and link your creation for all of us to see at the Craft Stamper's blog.  Have a great day, talk to you soon ~ Renee


Thursday, March 13, 2014

Butterfly Girl ~ Monoprinting an Art Journal Page


Happy Thursday.  It has been snowing lightly all day until now....the sun just came out!  I'm still playing around with the acrylic block printing idea.  I have another tutorial on this to show tomorrow but for today I thought I'd share a journaling page that I did using the same technique.  I did this on watercolor paper and cut off the edge to make the butterflies with Tim Holtz's Butterfly Frenzy Sizzlit die.  Then I covered the butterflies with Distress Stickles to make them sparkle.


The main quote is a poem by M.F. Moonzajer taken from his book A Moment with God.  It says "Butterflies better understand than you, the meaning of love and sacrifices one must make for their beloved."


I hope you're having a wonderful day.  If you have a chance stop by tomorrow and check out my mono printed steam punk style tag.  Take care, talk to you soon ~ Renee

Friday, February 7, 2014

Special requests for artwork

My studio has been full of color this week!  That's a good thing since it has been as white as SNOW outside.  Oh yeah, that is snow and there is more coming our way soon.  We've been nice and warm inside, great weather to do some artwork.  Oddly enough I had three requests this week.  One person wanted a special card, another a purple art journal type page and the third requested something made out of one of my masterboard pages.  I'm still working on the third request but this is what I came up with for the other two.

A special card for a very special friend who has been suffering with illness.  I thought a pretty card would be nice to look at if you're in bed for a week or so.  Marie Antoinette came to mind.


Now to come up with a purple background with an archery theme.  This is what I did for another friend using Dylusions spray inks, stencils and gesso.


Can't miss that target!  I hope you've all had a wonderful week and have great weekend plans.  Take care, stay warm and thanks for stopping by. ~ Renee

Wednesday, November 13, 2013

SDC125: One Layer::Stampotique Challenge

Samantha Read is our hostess this week at Stampotique's Designer's Challenge.  Can't wait to see what everyone creates this week!

"Hi Stampotiquers! I'm so excited to be your host this week and I'm inviting you to make a creation using just one layer. It doesn't necessarily have to be clean and simple, that's the challenge! I love lots and lots of layers but to achieve a sense of depth to a creation using no embellishments etc can really get you scratching your head and rubbing your chin! 
Most importantly have fun ;)"

Sounds like fun doesn't it?  I decided to make a card with TCW Dina Wakley stencils, gesso, spray inks, acrylic paints, Derivan Liquid Pencil, Black StazOn Ink, Stampotique stamps and a black micron pen.  Whew!  That sounds like a lot of product but I sure was happy with the results.  My card looks like a mini painting.


We all know at least one Diva, don't we?  Perfect card for that special someone.  Have a great day, it is really cold here and I'm sure it is only going to get colder.  Brrrrrrrrr!  Good time to make cards.  Take care, thanks so much for stopping by, it wouldn't be as much fun without YOU!  ~ Renee


Monday, October 14, 2013

AIRs Artists Choice::Kaleidacolor and Stencils!


Stencils seem to be everywhere in the crafting/art world right now.  There are so many styles and choices to choose from.  The Crafters Workshop (TCW) has always been one of my go to companies for stencils.  Good sturdy quality and a lot of designs, something for everyone.  Before it seemed like I could only find the tiny brass ones or the big goofy ones that go on the wall in a kid's room, now stencils seem very sophisticated!

For this all occasion card I decided to use one from TCW called "Climbing Vine", it measures 6" by 6".  I incorporated some wooden pieces and a laser cut word to complete it.  "Believe" is a powerful word that fits most any occasion or event.  I have included a supply list and a short tutorial if you're interested in making something like this for yourself.


SUPPLIES
From IMAGINE Crafts and Tsukineko
IMAGINE Crafts®/Tsukineko ®Memento Luxe™Inks Olive Grove, Pistachio, Peanut Brittle, Gray Flannel & Rhubarb Stalk colors| IMAGINE Crafts®/Tuskineko®Delicata™Pigment Ink full size pad  |IMAGINE Crafts® Embossing Powder ™Clear & Iridescent | IMAGINE Crafts®InkBlushers™| IMAGINE Crafts®GooseBumps™Shimmer Texture Spray
Other Supplies
The Crafters Workshop.com Stencil TCW391 Climbing Vine 6” by 6” size | pre-cut word “Believe” | one blank card 6 ½” by 5”| black card stock | one piece of glossy card stock measuring 5 ½” by 4 ½”|Wooden Pieces | a stenciling paint brush


DIRECTIONS
Cut glossy card stock to measure 5 ½” by 4 ½”.  Tape stencil with removable tape onto the card stock.


Using InkBlushers™ and a stenciling brush, pounce different colors on top of the stencil making sure to blend the colors onto the glossy card stock.

Remove stencil, apply IMAGINE Crafts® Embossing Powder ™Clear color and heat set it.


 Color the wooden pieces with IMAGINE Crafts®/Tsukineko ®Memento Luxe™Inks.  Use Peanut Brittle and Pistachio on the snowflakes and Gray Flannel on the word.  Apply IMAGINE Crafts® Embossing Powder ™in the Iridescent color to the word and melt it with a heat gun.  When it is dry apply IMAGINE Crafts®/Tuskineko®Delicata™Pigment Ink randomly on the word.

Mat the Vine stenciled card stock to black card stock and adhere the panel to the card.


Using a strong adhesive adhere the word and the snowflakes to the card.  Apply IMAGINE Crafts®GooseBumps™Shimmer Texture Spray to the snowflakes.  Allow to dry thoroughly.


Thanks so much for stopping by, I always appreciate the visit.  Take care ~ Renee
Wednesday, September 4, 2013

100 Faces in 100 Days

Just to let you know I have been sticking with my commitment but didn't want to bore everyone with my attempt at drawing/sketching a face every day.  My promise to myself, to do a face every day for 100 days, is fulfilled at the end of this week.  I have managed to draw a face every day, some days more than one.  I must admit it does help to perform an exercise like this each day.  Not only do you create art every day but the faces get easier and better with practice.  Not to mention the fact that I've really enjoyed it.

Any way, I received some new stencils in the mail this week from The Crafters Workshop and of course I had to dive right into them.  Guess what?!  I received the new Julie Fei-Fan Balzer face stencils.  WooHoo!  I used the 3/4 face (12" by 12" stencil) and this is the end result.


The background colors came from blotting off IMAGINE Crafts/Tsukineko VersaColor inks that I used on another project.  I create a master board just by blotting off the stencils onto watercolor paper as I work on other projects.  That way nothing goes to waste and I get some really pretty background papers.  I just placed the large stencil on top of the watercolor paper and used a Copic pen to trace through the stencil.  The rest of the color on her face in Faber Castell Gelatos and Smooch pearlized accent ink.  Very cool stuff!  I saw it demoed at CHA and then saw it on sale on Blitsy.  It allows you to concentrate intense color into tiny areas.  Makes her eyes sparkle.  I decided to name her "101 Wishes" instead of "Number 96".

Have a great week, thanks for stopping by.  I always appreciate the visit, take care. ~ Renee

Saturday, May 11, 2013

SDC99::Stampotique Challenge "Summertime"

Carol is the hostess this week at the Stampotique Designers Challenge and she is requiring some "sunshine".  I decided to make a postcard using one of my favorite Stampotique stamps, a little girl called Mela.  The phrase is by DeNami Design.    Mela is colored in with Memento pens and has PanPastel clouds in the background with a sun stencil of yellow ink on top of it.  StazOn greens, blue and teal on the edges and a couple of stray pieces of tissue tape to finish it off.


You still have time to submit to their challenge.  Even if you don't want to submit anything it is always fun to stop by their website and check out the amazing creations by their DT and the submissions.

Wednesday, March 27, 2013

SDC93::Stencils with Stampotique Images

This week at Stampotique Jane has challenged us to use Stencils in our projects.  I made a Master board on a sheet of watercolor paper using Imagine Crafts "Fireworks!" spray inks and stencils.  The stencils incorporated here are from Dyan Reaveley, Julie Fei Fan Balzer and Office Max.  It is just layer after layer of colors with different stencils.  After each layer of color I made sure the paper was thoroughly dry before spraying another layer of color.  The key with a Master board is to save it by making a photocopy of it, then you could cut up either the original or the copy and start working with it.  Here is my card with a couple of Stampotique images and some leaves by Dyan Reaveley.

After I finished the card I decided to do a chevron stencil with ImaineCraft's "Vintage" color just to give it a little more texture.  All of the background color ended up being done with layers and layers of stencils sticking to the pastel colored Fireworks! called Angel Pink, Lulu Lavender and Summer Sky.  The beauty of a Master board is all parts of it are different colors with different stencils showing through.  This way you can cut a piece off on any portion of the board and get whatever effect or color that you desire.

I hope you have a wonderful day.  The sun is shining here and most of the snow has melted.  The daffodils are inching their way up and out.  We should have some vibrant color here soon!  Thanks for stopping by and visiting my blog today.  I always appreciate any comments you have time to leave.  Talk to you soon!

I'm also entering this on the Simon Says Stamp and Show Challenge::Quotes (since I think this is such a great quote :-))

Sunday, November 18, 2012

Art Journal Cafe Challenge

The ladies at Art Journal Cafe have a wonderful color challenge going on this week.  This is the suggested color palette:
The colors are to be used any way you like on a journaling page.

First I used gesso to unify the background and give the paper some tooth.  After that I applied acrylic paints that fit into the palette.  I used a lot of inks and some modeling paste along with stencils, stamps, etc.  The clip art is from Hidden Vintage Studio at DeviantScrap.com.  A quick spritz of Dyan Reaveley's red spray ink, blotted with a kitchen roll and blended with a baby wipe.  It looks very urban IRL.


I hope you're having a wonderful weekend!  We are.....the sun is shining.....yay!!  I'm going out to catch a few rays.  Talk to you soon.

Saturday, November 17, 2012

Art Journaling Calendar Page::April 2013

The Art Journal Calendar 2013 Project continues.  Somehow I skipped March and moved on to April.  I'll go back later and do the March page.  All of these pages start out in my "junque" journal and then move into my Dyan Reaveley journal.  I'm not keeping it for "good" just for "good enough".  I have already ordered another DR journal since I have completed 30 pages of this one thus far.  I'll be teaching this 2 page spread in my second class at "Ink About It" next year.  That sounds weird doesn't it.....2013 is upon us!

It starts with gesso and ends with acrylic paints and Dyan Reaveley's star stencil.  I sprayed Dylusions Crushed Grape Ink Spray through the stencil.  Then I added the embellishments.

The ZIA girl is from DeviantScrap.com, it is called Tangled Up by Hidden Vintage Studios.  Lots of Zentangled goodness on those sheets!  The stamps on the days of the week are by Dyan Reaveley and Jenny Doh.  I think it's done but you never know!
Have a great weekend!  Talk to you soon.