Friday, December 29, 2017

Evergreen Steampunk Card using a Phrenology head stamp

This will be my last blog post for Imagine as a member of their design team AIRs.  It has been a delight to work with this company during 2017 and I have always felt their ink products are of superior quality.  Thank you Imagine/Tsukineko for allowing me to represent your products this past year and a huge congratulations to the new team for 2018!


For instructions and additional info please check out the Imagine Blog.

Are you looking forward to 2018?  I am.

Hugs ~ Renee

Friday, December 22, 2017

Make your own Tea Journal using small canvases


I love tea, tea parties, tea shops, formal teas, homey teas...you get the picture.  My daughter and I have had tea in different shops and hotels all over the world during her life, we started when she was around 4 or 5 years old.  My personal favorite was about a decade ago at the Peninsula Hotel in Hong Kong, it was so beautiful!

This tiny book is made from two small canvases stamped and colored using Imagine products; the canvases serve as the front and back covers.  The inside has an accordion style section that can be used as the journaling pages.  It is fun to glue empty packets of my favorite teas inside or tea packets from tea with friends that I want to remember.  You can check out the details on the Imagine blog to get ideas to make your own tea journal.  If you have any suggestions or questions please leave me a message here.

Thanks for stopping by ~ hugs ~ Renee

P.S.  The "tea/glove" book used as a prop in the background was gifted to me by my friend Ella Wilson, it appeared in one of Stampington's publications and she was kind enough to send it to me.  I really cherish that lovely journal!  Ella is such an amazing artist.

Friday, December 8, 2017

Warm Winter Thoughts card


The challenge for the Imagine AIRs design team was "snow".  We moved to South Carolina from Massachusetts to avoid snow so the only kind I like to see is on a card.  This snowman stamp reminds me of the three boys that used to live across the street from us in Bolton.  The snowmen would be in their front yard from the moment they could make one and we'd see them most of the winter.  The boys usually had a sign posted that said "North Pole".  Sometimes it was so cold I believed it!


This snowman stamp is from Stampotique and it is entitled Global Warming.  The supply list should be listed on the Imagine site here.

Thanks for stopping by, have a wonderful week.  I'm also posting this on the December Craft Stamp Take It Make It Challenge site.

Hugs ~ Renee

Thursday, December 7, 2017

Playing with Jane Davenport Paints


I'm playing with my Jane Davenport acrylic paints today and just making faces.  I love her supplies and the paints are no exception.


See you tomorrow with a cute winter snow card created with Imagine products.  Hugs ~ Renee+
-

Thursday, November 30, 2017

Paint Chip Banner

On the Imagine blog today I'm sharing an AIR's project featuring the "Kids Craft" Challenge.  this is a little banner that can be made by kids for a housewarming gift.  Just a few stamps and some old paint chips are needed, you can add even more than these chips (like die cuts) to the banner if you like.  As much or as little as you feel like doing.  Check out the Imagine blog for instructions and a supply list.


Thanks for stopping by!  Hugs ~ Renee

Friday, November 17, 2017

Love Rocks card

Another AIRs challenge is featured today, this one is called the " Heartfelt" challenge.  No one does a better job with hearts than Dina Wakley!  These are some of her stamps featured here.  The details and supply list can be found on the Imagine blog.


I always appreciate your visits, please leave a comment so I know you were here!  Thanks.

Hugs, Renee

Thursday, November 16, 2017

Cocoa Brown Challenge

This is my interpretation of the AIRs Cocoa challenge  It is made from stamps by Artistic Outpost (.com) and this card is called Vintage Hero.  For instructions and a supply list head on over to the Imagine blog linked here.


Thanks for stopping by!  Hugs ~ Renee

Sunday, November 5, 2017

An Altered Masonite Box Finnabair Style

I was a Guest Artist on the Joggles blog sharing my Masonite Box that was altered with Finnabair's Waxes, Fireworks! spray and gesso.

I photographed it in the early morning light that's what gives the box that other worldly glow.


Photographed outside makes it look like another planet.


Photographed in the house

Here is my supply list if you're interested in altering a box, a journal cover or maybe you just want to make a canvas to hang on the wall.


Supply List

Joggles.com Masonite Box measuring 6"x 6"x 4 3/8"

Black Gesso
White Gesso
Art Basics - 3D Matte Gel
Prima- Finnabair's Mechanicals
Doctor's Plague Mask metal pendant by Bead Landing
Metal Flowers by Bead Landing
Crystals, bingo number
Micro Beads by Finnabair
Lace flower trim (under the gesso on the lid)
Creative Paperclay
IOD moulds Prima Moulding 1
Rhinestone Crown by Prima for Frank Garcia

Art Alchemy Metallique Waxes-White Gold, Bronze, Brushed Iron
Art Alchemy Opal Magic Waxes-Royal Robes and Blue Velvet

Imagine Crafts
Fireworks!-Paris Dusk and Lilac Posies
StazOn Royal Purple reinker

Testors-Cement Glue for Metal and Wood (used to glue on crown)

Instructions

Glue the box together using Testors Cement Glue for wood and metal.  Paint entire box with black gesso, allow to dry.  Adhere lace flower trim to the top of the box with 3D Matte Gel.  Dry.  Attach the metal pieces with Gel Medium.  Sprinkle Micro beads in little areas where the gel is visible.  Spray the top with Lilac Posies and Paris Dusk, dry.  Paint the entire top with black gesso, dry.  Paint with white gesso, starting on one side only halfway across the panel, feather out the white gesso on the rest of the panel.  Dry.  Use waxes to highlight elements on the lid.

Make paperclay mold to make the strip across the front of the box, allow to dry overnight.  Glue onto box with Gel medium, glue a key hole onto box.  Paint with black gesso, spray with Fireworks!  Blot off excess.  With wax on a Dauber, finger or a brush, highlight areas on the key hole and the clay panel.  Wipe off excess.  Use waxes all over the sides of the box to make it look like metal.

I hope you enjoyed looking at this!  Hugs, Renee


Monday, October 30, 2017

Charity Art Auction for Puerto Rico begins today!


Art auction for pr s550

Charity Art Auction for Puerto Rico - dozens of artists from around the world have donated art to raise funds for Puerto Rico's much needed disaster relief. The auction opens today and ends Nov. 3rd. It's not too late to donate a piece of art, either, if you have one... we'd love you to participate in any way you can!


Just click on this link to check out the art that has already been donated:  Charity Art Auction for Puerto Rico

I hope you find something you love!
Hugs-
Renee

P.S.  This is the piece that I've donated (without my water mark on it), it's the original acrylic painting I did for Stampington's "The Coloring Studio Workbook" Vol. 4 and it has also appeared in Vol. 2 of "Just Mixed Media" magazine.


Saturday, October 28, 2017

Gel Plate and Stencil play

Do you have a Gel Plate? or two or three?  I have at least three different sizes and brought one out to play with today.  I forget I have them but they're very useful to make master boards which I then cut up for projects.  While pulling my prints I had too much paint on the GP so I grabbed a black canvas that was nearby to mop up the excess.  The colors were so vibrant that I placed a Prima stencil over my mess and used some white gesso to transfer a lovely face outline onto the canvas.  This is what happened.


A little Jane Davenport paint, a little Dina Wakley paint, a cute butterfly and a Washi tape eye and voila!

Thanks for allowing me to share my art with you and always thanks for stopping by!
Hugs ~ Renee

Thursday, October 26, 2017

Altered Paint Brush- AIRs Wood Challenge


On the Imagine blog today I'm sharing one of my altered paint brushes.  The challenge for the AIRs design team was "wood".  This is a small wooden paint brush, a great way to recycle a used paint brush that has messy paint etc. on it.  They are inexpensive and can be purchased by the case, I know because I "found" a whole case of them in my husband's shop area.  WooHoo!  Score!!  Ahem.... trying to maintain a little dignity here.  He actually gave me permission to use as many as I wanted after he saw what I did with it.

The instructions and the supply list are found today on the Imagine Blog, please pop on over there and take a look when you have time.  These altered brushes are so much fun to make and look really awesome in real life.  Thanks for stopping by and allowing me to share my work with you.

Hugs~ Renee

Friday, October 20, 2017

Color Challenge: Aubergine

On the Imagine blog today I'm sharing an Aubergine (eggplant) colored tag.  This is a mixed media piece that includes gesso, stenciling, rubber stamping, heat embossing and a little washi tape.


For the instructions and a supply list just check out the Imagine blog.  Thanks so much for stopping by today~  Hugs ~ Renee

Wednesday, October 11, 2017

Two Friends Favorite Blog Posts Series


I have the honor today to be featured on Marjie Kemper's blog as a part of her series called "Two Friends Favorite Blog Posts".  I'll be there alongside the very talented Kaz Hall.  Just click HERE to read the article.


Thanks so much for stopping by!
Hugs~ Renee

Tuesday, October 10, 2017

Chocolate Tag for Imagine


One of  the themes on the Imagine blog for this month is "Chocolate".  I made a chocolate tag with all types of chocolate in mind...white, dark, milk chocolate, the list goes on and on.  Check it out on the Imagine blog for instructions and a supply list.

Thanks for stopping by ~ hugs ~ Renee

Sunday, October 1, 2017

Zentangle, Mixed Media and Apple Picking in New England

I just got home from spending a glorious 2 weeks in New England.

  My husband and I moved to Bolton, Massachusetts in 2001. Neither of us had ever lived in a cold climate like that, what a change from Southern California!  After 14 years of shoveling snow my husband finally cried "uncle" and we moved to the warmer weather of South Carolina 2 years ago.

We made friends in Mass. that are more like family than anything.  One young couple has been like our own kids for many years and their daughter calls us Nene and Papa.  At nine Lanie is still trying to figure out who we are.  (lol)  They needed a babysitter for 2 weeks so off we went.  September is my favorite month in N.E., no complaints here.

The two weeks were filled with playing mommy, fixing school lunches, bus drop off and pick ups, laundry, cooking, blah blah blah.  I did manage to visit tons of old friends, go to see the Phantom of the Opera at the Boston Opera House, teach two Zentangle classes and also teach a little Mixed Media in my spare time.  Oh, and apple picking!  Apple picking just means pie baking to me, with the freshest, most delicious apples in the world.  Last year I kept moaning about the apples here not tasting as good so a friend in Mass. went out, picked apples, filled a box and shipped them to me.  You would've thought someone gave me a box of diamonds!  I made 5 pies and froze most of them for later.  That should give you an indication of the nature of the folks there, they are as sweet as their apples.

I wanted to give you a little background story before sharing these photos.  The awesomeness of Zentangle, my Mixed Media portrait technique conquered by another 12 year old newbie, and the beautiful countryside of Massachusetts showcasing the apples from my old stomping grounds.


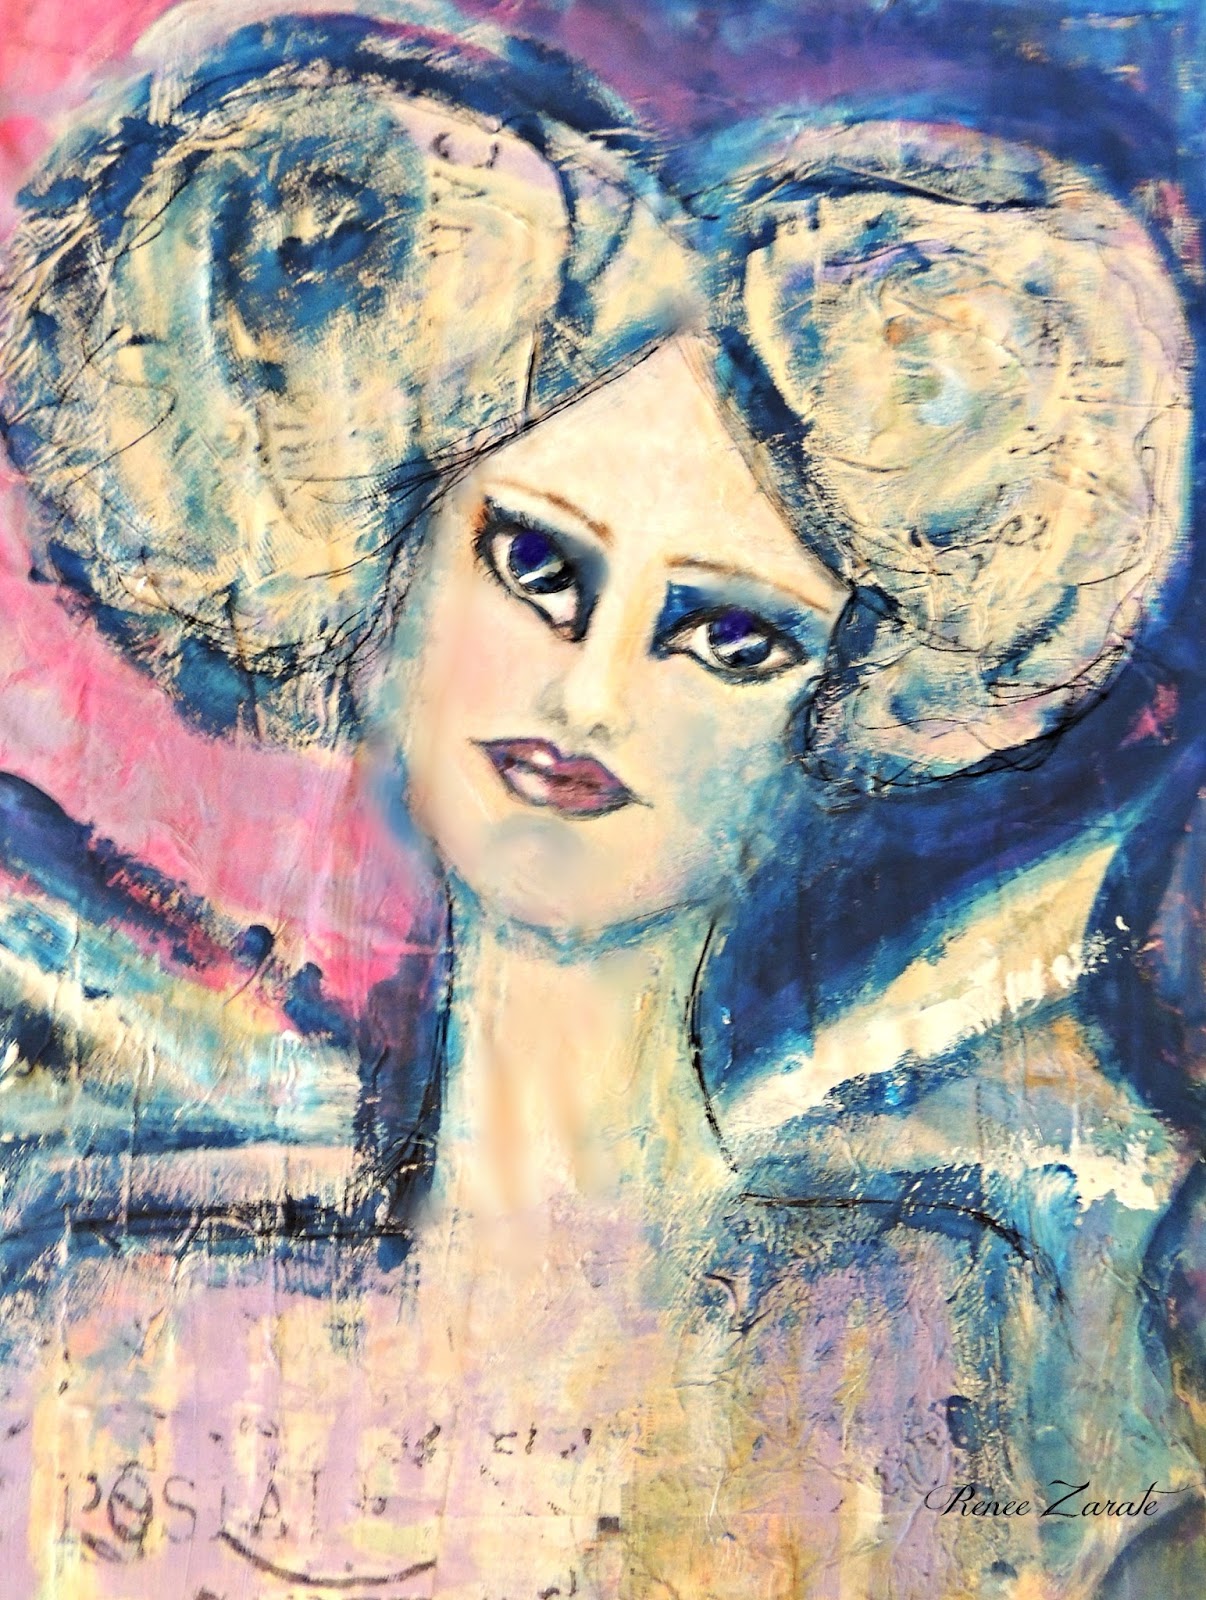
Drawing faces with a Jane Davenport stencil and Distress Crayons


With this technique I can teach anyone to draw a face they're delighted with


Taking an hour walk through the countryside, the leaves haven't changed yet


My favorite place to pick apples


When you buy your bag you get a map of the orchard telling you which apples are which, go to the flag to pick designated trees marked with ribbons


This is a nice one!


These were delicious too


A close up showing the beauty of apples!


This bag doesn't look like much but it is a 1/2 bushel bag (translation 20 or more pounds of apples) that I paid $35.00 for and then filled with a variety of apples.  My friend, Lisa, and I spent about 2 hours picking apples in 90 degree weather.  It was unusually warm in Mass. for September.  I was expecting cooler temps. It took both of us to carry the bag back to the car.  No matter, I went back to the house and baked a couple of beautiful pies.  I shipped the rest of the apples home to myself, let's hope they are not applesauce by the time they arrive.

I did manage to teach two Zentangle sessions.  One was at a Montessori type school with children ranging in ages from 5 to 15.  I didn't expect much interest but ended up with 15 students.  The teacher said in 5 years he'd never heard a silence like that
 for such a long period of time.  The second class was a mommy and me type class, here's a sample of that group's work.  I believe the 4 year old's tile is the one in the center.  Not bad for a bunch of newbies!  This was the first time for most of them to do Zentangle.  It's hard to believe that everyone is doing the same pattern at the same time and yet the results are so different.


It was a delightful visit for all of us.  I think Lanie was happy to have just mommy and daddy with her after those strict "pretend" grandparents finally left.  I must admit I forgot how hard it is to raise children.  The tight scheduling, baths, hair washing, homework, etc. keeps one so busy there is barely time for much else.  I'm happy to be home and back in my studio.  Just hoping those apples get here intact tomorrow.  

Thanks for stopping by!
hugs,
Nene

(I mean
Renee)

P.S.  Just a side note, I have an apple pie recipe on the blog a few years back if you need a recipe for pie dough and apple filling, you might want to try it, it is easy and good.

Wednesday, September 27, 2017

Using Delicata inks as water colors

Have you tried using inks for water colored projects yet?  As a project on the Imagine blog today I share a technique you can use to do just that.


This technique is not only fun but also shows different ways to use your inks to get unique results. The end product is a one of a kind gift tag or a card.


I love to encourage everyone to use up their stashed products, don't let them just sit there and dry out. I hope you'll take time to create something that's out of your comfort zone today.

Hugs, Renee


Thursday, September 14, 2017

Every art journal needs its own special cover

Today on the Imagine blog I'm sharing an art journal cover made using the new Delicata inks.  Check it out when you have a moment.


I used one of Frank Garcia's beautiful frames as the focal point and then just layered it with tons of decorative metal ephemera.  The complete supply list and tutorial can be found on the Imagine blog.

Thanks for stopping by ~ Hugs ~ Renee

Tuesday, September 12, 2017

A little artistic relief after Hurricane Irma

After all the Hurricane Irma drama during the past week and a half I needed a little TLC today.  It came in the form of the latest Art Journaling magazine, the fall issue.  Last year I posted some fun portraits I had created using Distress Crayons and stencils.  I ended up binding them together and sent them into Stampington for possible publication.  Well, guess what?  They were published in an article entitled "My Imaginary Friends" and I'm really delighted.  This is what the cover looks like, it  will be available on October 1, 2017.


The artwork of the amazing artist Pam Carriker is featured on the cover

My article is found on page 42.


Thanks for allowing me to share my joy with you even though all of us feel overwhelmed by all the sadness and despair not only in Florida but also Texas and the Caribbean right now.  My thoughts and prayers are with the thousands that have been displaced and suffered loss.

Sending big cyber hugs to you all and thank so many that checked up on me to make sure we were safe and sound here in South Carolina.  I want you to know I appreciated your concern!

xoxoxo - Renee


Saturday, September 9, 2017

Check out these Rose Gold tags!

I apologize for my long silence.  This week I had all kinds of plans to create but have been obsessed with preparing for a possible direct hit from Hurricane Irma.   We won't know the exact extent of the effects of Irma that will be felt here in Myrtle Beach, South Carolina until later this week end but at least it won't be the Category 5 earlier predicted, it might just be a tropical storm.  My heart goes out to all those who are suffering in the wake of this frightening disaster!

On a happier note, I do have some tags to share using the newly released Delicata ink in Rose Gold. They will be featured on the Imagine blog today.   I also used Dina Wakley masks and stamps with the Rose Gold, Sapphire Blue, and Emerald Green Delicata inks.  The instructions and product list can be found there, I hope you'll check them out!


Take care, be safe.  ~ hugs ~ Renee

Saturday, August 12, 2017

Combining Imagine supplies with the Amazing Teesha Moore stamp

A little nod to the amazing artist Teesha Moore today and her Zettiology stamps.


Making master boards is always fun and saves time later for fast, interesting projects. These snippets of a master board designed using StazOn Studio Glazes will make a great background paper for a giant refrigerator magnet, a focal point on a card or an art journal front cover. Now is the time to cut up those extra pieces of paper and turn them into something beautiful!

   
Directions:
1.      Cut master board remnants into desired sizes. Use a large background stamp with script and stamp onto the panel. On a separate piece of Bristol paper, stamp an image of a girl with Delicata Black Shimmer ink, sprinkle on clear embossing powder. Melt powder with a heat tool.


2.      When cool, color in the image with Memento Markers and cut out.


3.      Glue the image to the panel, add word stickers, using a black marker to outline each word. Ink edges with Midnight Blue and then Celestial Copper ink. Use gel medium to attach metal wings. Glue to a card, the front cover of an art journal or attach magnets to hang on the fridge.


Supply List
Imagine Supplies
Master board created with StazOn Studio Glazes – Blue Hawaii, Emerald City and Gold
Ink- StazOn Midnight Blue; Delicata Black Shimmer and Celestial Copper
Sponge dauber- large
Memento Markers-Blue Hawaii, Dandelion, Tuxedo Black and Love Letter
Tear it! Tape

Other Supplies
Stamps – Teesha Moore Zettiology and Stampers Anonymous
Metal wings from Idea-ology
Strathmore Bristol paper
Finnabair 3D Matte Gel
Stencils by Artistcellar
Cutting tool
Heat tool

For additional step by step photos check out the Imagine blog.  Thanks for stopping by ~ hugs ~ Renee


Paper towels

Thursday, August 3, 2017

A Steampunk Style Book Mark for Summer Books


One of our challenges with Imagine for the month of August is to create something with the word “Motion”in mind. I have created a book mark for several reasons. I love the ocean and the constant motion that can be found there, not only with the movement of the water but all the creatures in the sea that seem to be always on the move. The Dog Days of August make me want to head down to the beach with a good, old fashioned paperback novel, for which I need a book mark. This book mark is made with Graphic 45 paper that is called “Voyage Beneath the Sea”; it has a distinctive Steampunk flair to it. There’s a lot of inky goodness on the front of the tag and a surprise appearance of a mermaid on the back. Enjoy your summer reading!
Time: 1 hour


Directions:

Step 1:
Create a master board on Bristol paper that will be the water like background. To make sure that the Glaze doesn’t soak into the paper, apply a thin coat of gesso to the water color paper before beginning.  Make sure the gesso is dry. This master board was created with StazOn Studio Glaze applied with a Smudgees Sponge Mitt and a little water to blend the colors, first Emerald City, then Bahama Blue and then Gold. Each color was applied through a stencil and heat dried in between to set the color.
Cut off the desired portion for the marker.  This one measures 8 ¾” by 3 ¼”. Save the rest of the master board for another project.
Step 2:
Choose a stamp that looks like something under the sea and stamp an image with StazOn Midnight Blue ink at the bottom of the marker.


Step 3:
Cut a piece of paper for backing out of sea themed paper, this one is from Graphic 45. This panel measures 3 ½” by 9 ½”. Cut another snippet of paper to glue on the bottom. The seahorse is a die cut from Sizzix that has been colored in with Memento Markers. The stickers match the paper collection.


Step 4:
Adhere the panel to the backing paper; glue some sequins to look like bubbles. Tiny glass beads mimic sand at the bottom of the ocean, On Point Glue is perfect for adhering tiny details like this.


Here is the front side of the finished tag with a tiny bit of glass glitter added to the sand area.


The back is pretty too.

Supply list
Imagine Supplies
Ink- StazOn Midnight Blue
StazOn Studio Glaze-Emerald City, Bahama Blue, Gold
Memento Markers-Tangelo, Dandelion, Tuxedo Black
Tear It! Tape
On Point Glue
Palette knife
Craft mat
Smudgees sponge mitt

Other Supplies
Bristol water color paper
Gesso
Stencil by Artistcellar
Graphic 45 “Voyage to Beneath the Sea” paper collection and stickers
Finnabair Glass Beads-White Gold, Copper, Platinum
Prima Glass Glitter
Sequins
Sizzix Die Cut-Sand and Sea (seahorse)
Spray bottle of water
Paper cutter

Thanks for stopping by!  Hugs ~ Renee