Showing posts with label Dina Wakley Stamps. Show all posts

Saturday, February 3, 2018

Making Faces with DWM products

I've been making faces with Dina Wakley stencil, Scribble Sticks and some words from the "All the Gals" stamp collection made by Ranger.


I started by tracing the faces with a Micron 05 pen through the stencil.


Then I began adding some color with Scribble Sticks.  I used Sky,Turquoise, Lime, Magenta and Lemon Scribble Sticks.


To add some bright color I then added a little DWM Heavy Body Acrylic Paint in the Lemon color.  Highlights in the eyes, etc. was done with white gesso.


Each face seem to reflect a different word so I added words from the "All the Gals" collection with some grey ink.


So that's what is on my work table today.  I have entered this on the Craft Stamper magazine Challenge.  Follow the link if you want to participate. Thanks for stopping by.  Hugs ~ Renee

Friday, November 17, 2017

Love Rocks card

Another AIRs challenge is featured today, this one is called the " Heartfelt" challenge.  No one does a better job with hearts than Dina Wakley!  These are some of her stamps featured here.  The details and supply list can be found on the Imagine blog.


I always appreciate your visits, please leave a comment so I know you were here!  Thanks.

Hugs, Renee

Tuesday, December 22, 2015

Got your coloring book? Now what......

Once you purchase a coloring book you may wonder....now what do I do with it?  Why, color in the pages, of course!  What can you color it with?  Anything you've got on hand.  I started coloring in some of the pages in my copy of The Coloring Studio, it took longer than I expected.  Each page is unique in its representation of the artist who created it.  It is more like a workbook to me since there are so many instructions and hints throughout the entire book.  I started with one of my favorites, Mou Saha, on page 100.  I used Pan Pastels, Memento Markers, gesso, stencils, Micron pens and an irRESISTible Pico Embellisher.  It was a meditative, fun, relaxing experience.  You are not facing a blank page and have the liberty to do whatever floats your boat.  This is what my first page looks like now.


Next I thought it only fair that I color my own design on page 60.  The beauty of the book is that you can add even more doodling to the pages or add stamps, etc. to the pages.  Remember the quote that says "art is never finished, just abandoned".  Play with the pages until you feel like abandoning them.  Here's my page.


I couldn't seem to stop adding tangles, color, stamps, etc. to the page.  Finally abandoned.


Whatever coloring book you choose I hope you're having some relaxing moments with it!  Later down the road I'm sure I'll be tearing out pages and doing other projects with them but for now I'll leave them in the book.

Thanks for stopping by, I hope you're having a good one.  Hugs ~ Renee

Saturday, August 29, 2015

Girl Power Cards

 As soon as I heard one of the themes for my IMAGINE Crafts assignments as an Artist in Residence this month was "Girl Power" I knew right away what I wanted to do.  I love all the images Dyan Reaveley created called "Strength" and some of the phrases Dina Wakely has created with this same type of theme.  I decided to do a series of strong women cards the first one I'll share today.  The step by step directions can be found on the IMAGINE Crafts blog for the first one.  The rest were done pretty much the same way.  Take a look if you're interested in making your own set.


I'll share more cards like this later in the week.  Thanks for stopping by ~ hugs ~ Renee

Tuesday, March 31, 2015

Faux Gelli Plate page

This will be my last post on Artistcellar as a Design Team member.  I've really enjoyed my Tuesdays and will continue to use my wonderful stencils in my art.  Check out their blog to see the details of how this card was made.


Hugs, talk to you soon!  ~ Renee

Tuesday, December 9, 2014

Using Artistcellar Stencils in my Art Journal

It is Tuesday so it must be Artistcellar stenciling day!  Today I'm using my stencils in my art journal.


I always have my journal turned to two blank pages when I'm doing a lot of stenciling on other projects, this way I don't waste any of my inks.  These two pages were evidently test pages to see what color of Turquoise I had in the bottle and then a blast of Bubblegum Pink found its way there too.  I wiped a Balzer Silhouette Script stencil with Angel Pink irRESISTibles off on it at a later date.  At this point it doesn't look like much of anything to most people but when I look at it I see ball gowns.


After choosing my background in my journal  I went back to my Master Board stash and found a piece of paper that I worked on a couple of weeks ago.  I cut three tags out of this, smeared a glob of gesso in the center of each tag, stamped some of Dina Wakley's faces on it and a corset stamp that I got for free in the new Craft Stampers magazine and Voila! I was ready to play.


The lady tags were glued to the art journal pages and then I drew their dresses on with a black pen.


After their ball gowns were drawn on I added another lady tag to the mix.  I began just writing a little story randomly around the ladies, put crowns on them and gave one some flowers.  It didn't seem bold enough for my taste so I pulled out some more stencils, these are by Tamara Laporte and are called Tam's Inspiration. In this series of word stencils you'll find inspirational words written in Tam's lettering style.  I used Black StazOn ink with a sponge dauber to stencil these words onto my pages:  believe, stardust and you matter.


 Once the ink was dry I had my two pages done.  It is always fun to play in my art journal it gives me ideas to try on cards and mixed media canvases later.


My message on Tuesdays is always the same, get your stencils out and play with them in all sorts of different ways.  You'll be glad you did, I know I always am.  Take care, see you next Tuesday!  Hugs, Renee xx

Wednesday, November 19, 2014

Keeping a visual record of your stencils with a sample book


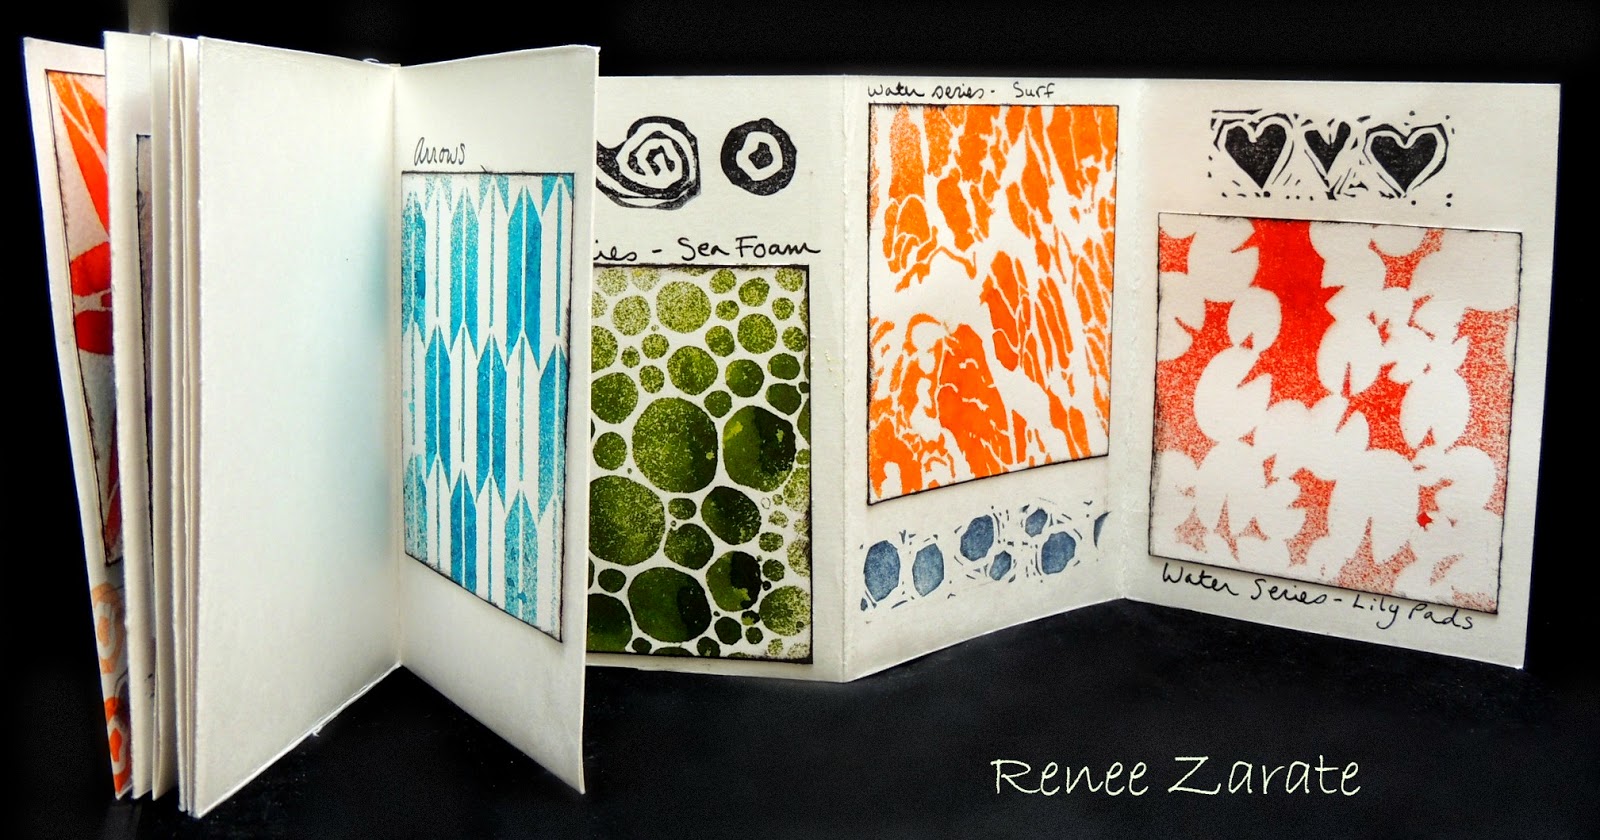
I made a mini book not long ago to remind me of what types of stencils I had and what they looked like when sprayed with ink.  Every month I receive new stencils from Artistcellar and need to keep track of what I have so I don't have to experiment too much when creating projects.  I just received a series of stencils called the WATER series so I've added their images to the book using the 4" by 4" art cards.  Here is what the book looks like.


Progressively adding more Art Cards with stencil designs


Blank book before adding Art Cards


First I placed the art cards in with the Kaleidoscope stencils designs on them.


Now I have added the Water Series of patterns to the back empty pages.


I was surprised when I sprayed each of these with ink by the patterns that came out!  The first one called Ripples almost looks like a wood grain stencil.  When there are samples like this it can really help the artist to see the possibilities quickly.

Thanks for stopping by today, I hope this has given you some stenciling ideas.  I will keep you posted each time I add art cards to my mini book.  I look forward to seeing you next week on my usual stencil day, Tuesday.  Take care, hugs~Renee xx

Tuesday, October 28, 2014

Artistcellar New Release! Kaleidoscope Stencils


Most of us feel a sense of delight when we hear the word Kaleidoscope.  If you're like me it takes you back to childhood with those tacky little paper/plastic kaleidoscopes that you could purchase at the 5 & Dime store.  The newest release from Artistcellar is called Kaleidoscope and is a series designed by mixed media artist Cecilia Swatton.  There are four stencils in the series:  Trillium, Sunflower, Black Orchid and Lily.


                product image       product image    product image     product image


 I am constantly challenged when it comes to keeping track of all my stencils so I make small books with either the stencils in the book (stashed in clever pockets) or at least samples of what they look like.  I chose to do a "sample" book project so I can have a quick visual of these tiny gems for future projects.

Samples from Kaleidoscope Stencils

Here is my process if you'd like to see it.  First I start by cutting up my Art Cards from a large piece of water color paper.  Each one measures 4" by 4".


After I have these cut I decided just to spray Dylusions Spray inks using a different stencil and colors for each card.


These could be highly decorated, just like an ATC, but I decided to keep them simple.  I only inked the edges with coordinating colors and glued them into my prepared, simply folded book.


I had intended to leave the book simply white to mimic a wall in an art gallery but then I couldn't resist adding a few stamped images from Dina Wakley's newest collection.

To finish off my practical sample book I added the names of the stencils just written with a Fude Ball pen on or around the stenciled images.  My folded book has room for many more Art Cards with stencil samples on them.  I'll keep sharing it with you as I go along filling it up.  When it is full then I will do the front and back covers.


Thanks so much for stopping by today.  There are some pretty amazing projects on the Artistcellar blog this week showing additional ways to use these stencils.  Oh!  And there is a blog hop taking place in which you can win your own set of these fun stencils.  I've posted the blog hop list for you here in the event you want to give it a try.  Here is the message from Lisa at Artistcellar:
Now the good part… join us this coming week for a blog hop with some awesome artists! Everyone will be featuring Kaleidoscope and every stop will be giving away a FREE set of stencils to a lucky winner. Read each blog for the details, for this one, just leave a comment – you can tell me what they remind you of, how you would use them, what is your favorite technique you would use with them. I will close comments Nov. 1st here. Each stop will be announced on our FB page the next 7 days.
October 25th – Lisa Cousineau, Artistcellar www.artistcellar.com/wp  <Kickoff!
October 26th – Effy Wild – http://effywild.com/
October 27th – Lisa Chin – http://somethingcleveraboutnothing.blogspot.com/
October 28th – Cheryl Sleboda – http://www.blog.muppin.com
October 29th – Paula Phillips – http://www.journalartista.com/
October 30th – Cindy Powell – http://cynthiapowell.blogspot.com/
October 31st – Cecilia Swatton – http://ceciliaswatton.blogspot.com

Until next week, take care.  Big hugs ~ Renee

Friday, September 5, 2014

CS Challenge for September::Stamping on Tissue Paper

This month's challenge from the Crafter Stamper magazine is Stamping on Tissue paper.  My project involves both tracing an image on the tissue paper and then stamping on it later.  I wanted to try the technique in my pursuit of drawing faces so I traced a photograph that I have of my daughter.  The portrait became an art journal for her.  If you'd like to see how this evolved you can read the tutorial below.


This did start out as an experiment.  I wanted to do a portrait based on a traced image from a photo.  Here is the photo I used.


I placed a piece of tissue paper on top of the photo and lightly traced it with an Aquaellable Stabilo pencil.


After the image was traced I used Pan Pastels to color it in.  Keep in mind these will be blended later.


After the colors were blended to my satisfaction I cut out the image and glued it onto a piece of what I call "junk paper".  I do most of my work on a sheet of 140# water color paper.  These papers sit in a pile when they are covered with paint, ink and stamping.  They don't look like much until I unify the colors with a stencil and some white gesso.  In this case I did additional stamping of some Dina Wakley grungy hearts and then glued the image onto the paper with Mod Podge.  I purposely scrunched the tissue paper so it wouldn't look perfectly smooth.


I sewed some additional texture onto the page with my sewing machine and let some of the threads dangle.  I also made some lines with a credit card and some black gesso.


When this was dry I folded it in half and simply sewed it together with some pages in the middle for my daughter, Holland, to draw on.  There are 6 pages inside with gesso on them, primed and ready to go.


Now I added the stamping on top of the tissue paper.

The outside of the art journal


More stamping on top of the tissue paper with StazOn Jet Black permanent ink and stamps from Dina Wakley and Stampers Anonymous.  Now the journal is finished, it just needs some artwork inside.


The back of the journal


I hope you will rise to the challenge this month at the Craft Stamper website.  It is easy to upload your projects and there are some really nice prizes to win!  I'll post another stamped tissue paper project next week in case you can stop by.  As always, thanks for the visit.  Please leave a comment if you have time I'd love to hear from you.  Hugs~ Renee xx

Tuesday, August 19, 2014

Stencils and Stamps

I love to combine my products and techniques in projects.  The more products I can use the happier I am since I feel like I am getting more for my money.  Today I combined a canvas with stencils, stamps, inks and spray inks...oh, and pens, too!  I have over the past few weeks coincidentally created what appears to be a series of Dyan Reaveley stamped ladies on canvases.  So here is another with an attitude.

I began by cutting a piece of watercolor paper to fit the 6" by 6" canvas; I will do all the work on the paper first and then glue it to the canvas.  I stamped a post card image from Stampers Anon first using Tsukineko Radiant Neon Electric Blue pigment ink.  When this was dry I placed an Artistcellar Julie Fei-Fan Balzer "Scripted Profile" stencil over the paper and sprayed Imagine Crafts irRESISTible textured spray in the Angel Pink color through the stencil.  I lifted this straight up so it wouldn't smear and then set it aside to dry.  This texture spray feels like a liquid plastic when it is dry and shines.  Now that I had my background I stamped Dina Wakley's Lonely Girl stamp using StazOn Jet Black ink and heat embossed it with clear embossing powder.


Looking for a little more character in her face, I stamped Dyan Reaveley's girls with attitude from the Dependable Dot Collection, colored it with Copics and then trimmed it out.  It fit perfectly glued onto her slender shoulders.


The phrase is also from Dyan's stamps and trimmed out.  I die cut a crown from scrap paper glued it to her head and added one word "me".  To distress the edges I used StazOn Midnight blue, direct to paper method.  Now to add it to the canvas, I glued the panel onto the canvas with Beacon 3-in-1 adhesive.


If this is all I wanted to do with the canvas I could have stopped here but I decided to add an antique crystal knob to the top with a bow.


Thanks for stopping by today.  Next Tuesday you will find me here again sharing tips on what to do with all those wonderful stencils!  I hope you're having a great summer.  Take care ~ Renee

Tuesday, July 29, 2014

Stencils Pull Everything Together

I'm sharing a card I made today using things strictly out of my stash.  I'm trying to do this more and more since I have a box (okay, boxes) full of things that I can recycle.  I use water color paper to do a lot of projects on so I always have the beginnings of a master board.  Here is the card I made using paint, stamps, an ATC and gesso with a stencil called Vine (TCW351).


I cut a piece of the water color paper with paints on it to measure 5" by 7", this will fit on the front of a basic white card stock blank card.  Then I placed the Vine stencil on top and scraped some white gesso through the stencil and carefully lifted it up so it wouldn't smear.


When the gesso was completely dry I used a Dina Wakley script stamp inked up with Jet Black StazOn ink randomly all over the paper.  I pulled an ATC out of the stash, it had some of the same colors in it so that worked out well.  I glued that to the top of one of the vines with a strong adhesive.


Then I glued the entire panel with a strong adhesive, I used Beacon 3-in-1, to adhere the panel to the blank white card.


  I applied black permanent ink all around the edges to distress the card a little and it is done.


Now I feel good about this.  I not only used my work "master board" paper but also my stencils and a discarded ATC.  When you are doing your art don't hesitate to just make what you love, enjoy the process. If it doesn't work out you can set it aside and find a use for it later.  Stencils and gesso have a way of tying things together.

Thanks for stopping by today, I'll do another short stencil tutorial next Tuesday.  I hope to see you then.
Hugs~ Renee