As an Artist in Residence with
Imagine Crafts/Tsukineko my favorite monthly challenge is the "Project of Choice". This is when I get the opportunity to use my favorite products that I've received for this month any way that I want to. I love to make Mail Art, even if pieces like this one don't actually go through the mail. Since it has so much dimension and ephemera added to it I'm sure it would get caught in the machinery. But that's OK, sometimes you do have to hand deliver items that can be placed in a large envelope like this one. This envelope is a plain craft colored one that measures 9" by 12" and can be purchased at any office supply store. When I get done stamping it, applying gesso, ink, Creative Medium, etc. this is what it looks like.
These are the products I started with for this project.
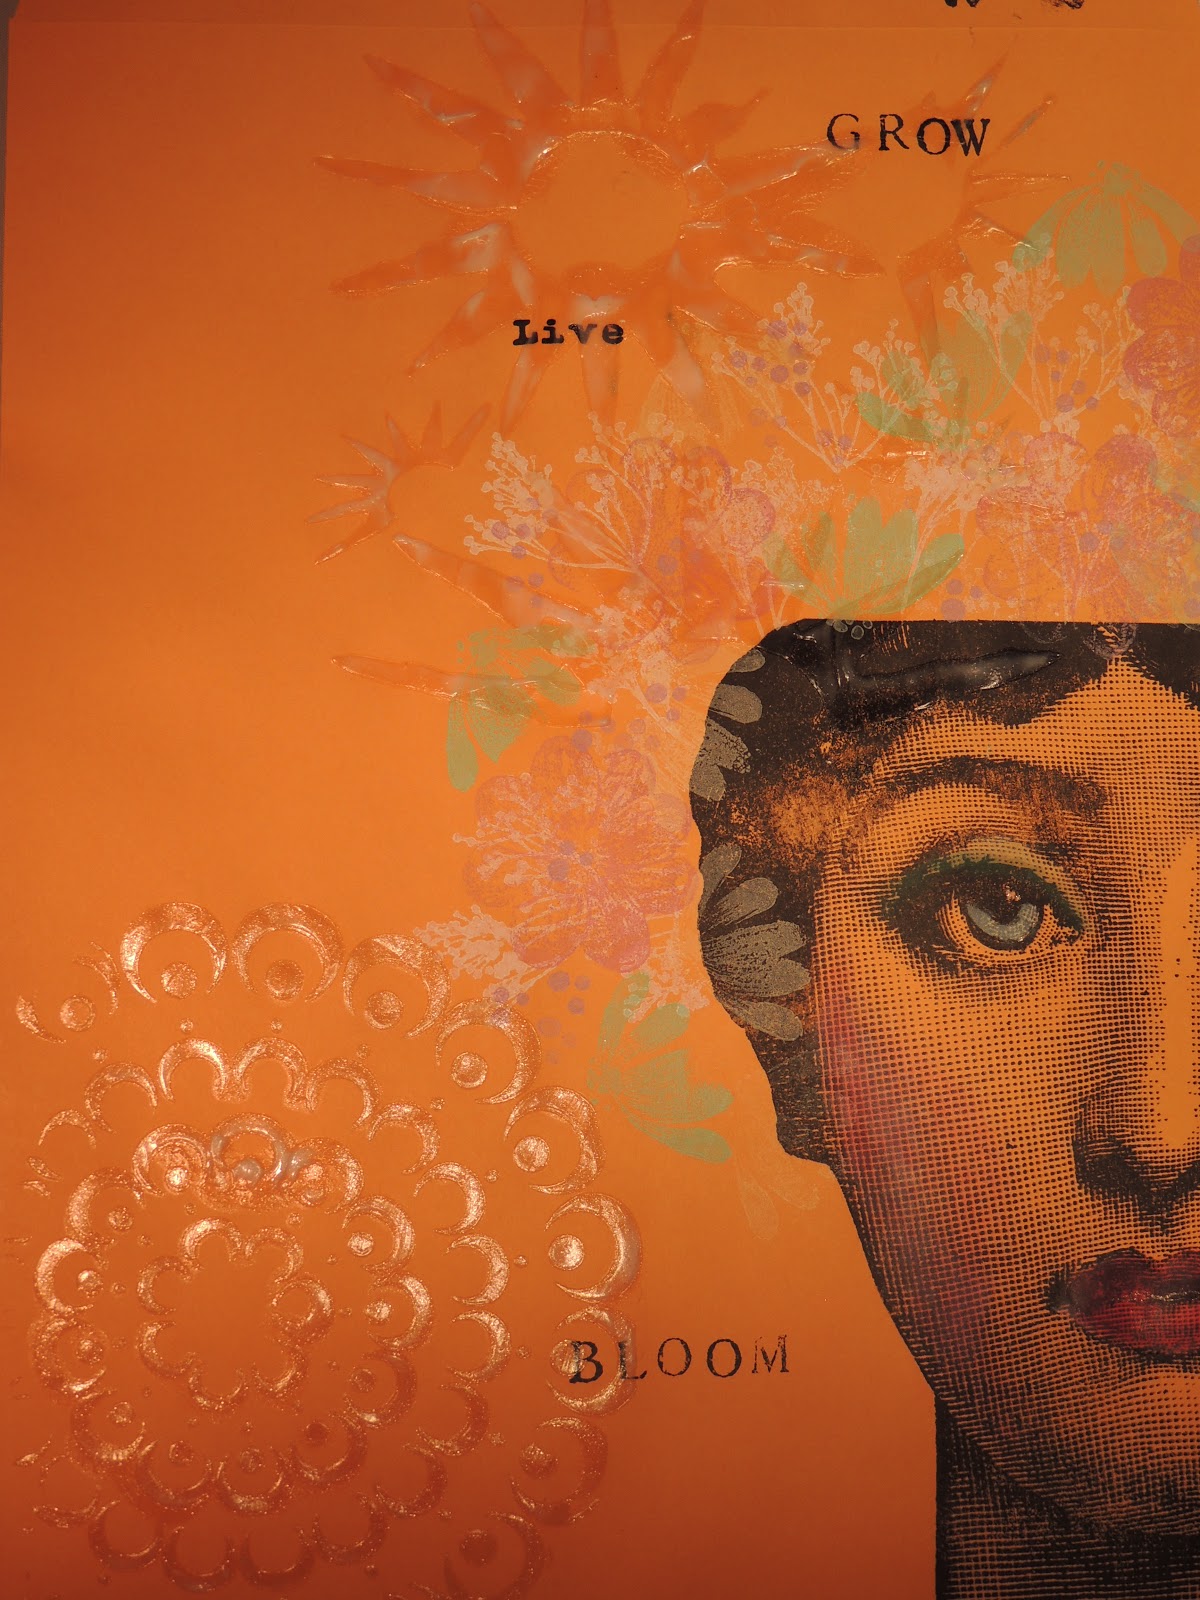
The first thing I do when designing a piece of mail art is to use a stamp that fits with the size of the envelope. Since I don't want my image to be floating around or look too small, I used my large Victorian lady stamp that I've had for years. She is inked up with
Black StazOn ink and I use a brayer on the reverse side to make sure that I get a good imprint.
Using flower stamps by Penny Black and others I stamped flowers randomly around her head. I also colored in her eyes with the
Versa Magic Aquatic Splash chalk ink and her lips and cheeks with
Versa Magic Pink Petunia. The
Brushstix made by Imagine Crafts make it simple to apply just the right amount of ink to tiny areas like this. Next I stamped some text randomly around the envelope.
I decided the title of this piece is "The Gardener" since it is Spring and I can't stop thinking about planting flowers.
I applied Imagine Crafts Creative Medium in the Shimmer and Clear using stencils by Julie Fei-Fan Balzer and Dina Wakley. You can really see the texture and lacy detail of the stencil up close.
I had some leftovers from a Master Board that I had made with these spring colors so I cut the paper into ATC size, 3 1/2" by 2 1/2" and stamped some images on the cards with Black StazOn ink. I later inked the edges of the cards with Versa Magic Spring Pansy Chalk ink. I applied pop dots to the backs of these cards and set them aside for later.
Before I add my ATCs to the envelope I wanted to apply some gesso through a stencil by Julie Fei-Fan Balzer. It leaves kind of honeycomb effect. The gesso needs to thoroughly dry before adding any ephemera to the project.
When the gesso is dry I added some flowers that had been cut with my old Sizzix dies. The paper used for the flowers is also leftover from a Masterboard made for another project using all the inks and sprays that coordinate with each other, this way all of the colors I'm using still compliment each other but not in a "matchy" way. I found a stamped bee in my stash, the stamp is by Stampotique. It was easy to color it with same chalk inks using a
Brushstix. Then I adhered the ATCs with some foam pop dots
.
The final touch was to ink or distress the edges with the
Versa Magic Spring Pansy Chalk ink using an
Imagine Crafts Ink Blusher sponge. I applied a few dabs of
Goosebumps to her lips to make them shine. Finally I raided my stash for some Queen & Co self adhesive white pearls to put in the center of a few flowers and she looks complete.
This is a great way to share your art with others by hand delivering it. It is also a good way to use or trade some of your ATCs that need to go to a new home. I invite you to give Mail Art a try, like art journaling there is no right or wrong. Here is a list of the products I used to make this.
Products
Black StazOn ink
Tsukineko Versa Magic Chalk Inks: Spring Pansy, Aquatic Splash, Pink Petunia, Thatched Straw, Aloe Vera and Mango Madness
Tsukineko StazOn Opaque Cotton White ink
Gesso
Creative Medium Clear and Shimmer Artist's Medium by Imagine Crafts
Imagine Crafts Goosebumps with a top dauber
Master Board paper scraps from project shown on April 3, 2013
One 9" by 12" craft colored envelope
Glue Pop Dots
Tools
Brayer
Imagine Crafts Ink Blushers
Imagine Crafts Brushstix
Sizzix Flower Dies
Heat Gun
Stencils
Flower Stamps
Face Stamp
StazOn All Purpose Cleaner


Renee, this envelope is fabulous! I felt exhausted through the process...so much work! SO well done! That's one lucky recipient you have!
ReplyDeleteI absolutley love this fantastic job Renee, and hope your keeping well, I wanted to get some projects done this weekend but was called into work .. so one day off then 2 in but then I get 3 off .. so will have to do a catch up then ahhhhhh lol .
ReplyDeleteTake care x
Mark
What a gorgeous piece of mail art Renee, I love it. Very interesting too to read and see your process from start to finish, thank-you so much for sharing this.
ReplyDeleteHuge hugs x
Love seeing your process, Renee. This is gorgeous! Faces, flowers, stencils..oh my. Did you get my note at Ink About It?
ReplyDeleteOoooh, I can tell you had fun playing with all these! Love the mix of stamping and dies, and of course your wonderful job with all those colorants.
ReplyDeleteOh Renne, this is so beautiful... Wonderful mail art !! Coco x
ReplyDeleteThis is lovely! The layering of techniques is amazing!
ReplyDelete