Tuesday, December 30, 2014

Stenciling in my Art Journal

I have several different art journals going on all at once.  Whenever I work on one specific process I just make myself another out of water color paper.  This one is being used to practice stenciling and writing with my new ink pen.
CollinsGroupSamplesPlay 007
I folded a large sheet of water color paper into a book.  I will continue to add to it and perhaps sew down the center of it.  In the meantime I don't feel bad if some of the pages aren't perfect.  This two page spread started with Shimmery Silver Delicata ink and the Artistcellar stencil called  Bodacious Buds.  After the ink was dry I started writing my quote "People come and go.  Some are like cigarette breaks, others are forest fires."  I'm using an old fashioned pen with an ink cartridge and a fine tip.  I enhance my words with doodles while talking on the phone.

I was cleaning out my studio and found a couple of Julie Nutting stamped images.  I colored in the ladies dresses with Memento markers and traded their heads for others in my stash.  One is a Dyan Reaveley stamp and the other a magazine photo.  To bring more texture into play I added the aura around the standing lady with one of the Sacred Heart series stencil, turned upside down.  The aura is made of gesso, when dry I colored it with ink.  I stamped a border stamp around the edges, colored it in and heat embossed it with clear powder.

Art journals don't have to cost a lot of money.  You can make simple ones yourself and just fill them with illustrated quotes.  Have fun with your art!  See you next week with more stenciling ideas.  Take care, I don't know about you but I am looking forward to 2015.  Have you chosen your one word for inspiration yet?  If so, please mention it in your comment I'd love to hear what word inspires you for the upcoming year.  Hugs ~ Renee

Tuesday, December 23, 2014

Masterboard Tag Using Artistcellar Stencils

I can't believe it is Tuesday already!  Time is flying by.  I am still making tags out of the master boards I made several weeks ago.


 Whenever I make master boards with spray inks and I always blot my stencils off on a separate piece of paper getting a reverse image of the first paper.  Kind of a two-for-one deal.  I used the Water Series stencils, more specifically Ripples and Sea foam to create a master board a few weeks ago.  First I sprayed Dylusions Spray Ink in Calypso Teal and then Dirty Martini, blotting off the excess ink along the way.  I dried the ink as I went along with my heat gun.  When the blue and green ink was dry I sprayed Dandelion irRESISTible Texture Spray over the top using Julie Fei-Fan Balzer's Silhouette Script stencil.    I ended up with two very different papers.

First master board

Second bonus sheet of blotted ink

I cut both sheets into postcards and tags.  To make the second paper even more different I smeared some gesso across the sheet with the TCW Numerals stencil.  This tag is made from the second sheet of paper and includes an alphabet stamp from Dyan Reaveley's stamps.  The main character and the cat are from Stampotique stamps.  This was made for a Poe challenge so the little quote is torn from a piece of book text from "The Black Cat".  It says "I grew, day by day, more moody."  Uh, yeah, he looks a little moody.... I tried to brighten his mood with the color coordinated bow on the top.  I don't think it's working.


I hope this finds you all well!  I'll see you next Tuesday with more stenciling ideas.  Hugs ~ Renee

Tuesday, December 16, 2014

How to make a quick card with stencils

Sometimes you just need a simple, organic, very quickly made card.  That was the inspiration behind this stenciled card today.


You could use any stencils you have on hand and make the cards any color you choose.  I happen to love this stencil from Artistcellar called Bodacious Pods.  It is one of Chris Cozen's Playful Pods Series stencils.  I just pulled a blank, white card from my stash and taped the stencil over the front of the card, lightly tracing the stencil with a permanent black pen.


It isn't necessary to trace all of the stencil images onto the card, just as many as you would like.  Next I placed the stencil again on top of the card, taped it down to my craft sheet, but this time it was a little off from the original pen work.  Then I scribbled some purple Gelatos on my craft sheet, sprayed the Gelatos with water to activate it and sponged the light purple color on to the first pattern of pods.


I like the water color effect made by the Gelatos when used this way.  When this had dried it was time to stencil a sentiment onto the card.


I chose to use Tamara Laporte's stencil in the Articellar collection called "Tam's Inspiration".  I sponged StazOn Jet Black ink through the stencil.  When the card was dry I added some touches of gold and some doodles to finish it.


As I mentioned before you could use any stencils or colors that you prefer.  Try pulling your stencils out and making a quick card the next time you need one and don't have much time to make it.

Thanks for stopping by today, I always appreciate your visits and support.  Take care ~ Hugs,  Renee xx

Thursday, December 11, 2014

Just a little reminder about the art auction!


Jessica Sporn sent me this little reminder that I'll share with all of you.

The art auction for #stopfgm ends tomorrow at noon EST. Get your bids in before it's too late. There is still amazing art to be had at great prices, and in most cases shipping is included. Not in the market for art? Make a donation of $5 or more. Every bit will help change the lives of girls and women in Samburu, Kenya. http://www.32auctions.com/organizations/14232/auctions/19721
Artists Give Back
www.32auctions.com
Silent auction 'Artists Give Back' hosted online at 32auctions.

I hope you'll check it out if you haven't already done so.
Thanks,
Renee xx

Tuesday, December 9, 2014

Using Artistcellar Stencils in my Art Journal

It is Tuesday so it must be Artistcellar stenciling day!  Today I'm using my stencils in my art journal.


I always have my journal turned to two blank pages when I'm doing a lot of stenciling on other projects, this way I don't waste any of my inks.  These two pages were evidently test pages to see what color of Turquoise I had in the bottle and then a blast of Bubblegum Pink found its way there too.  I wiped a Balzer Silhouette Script stencil with Angel Pink irRESISTibles off on it at a later date.  At this point it doesn't look like much of anything to most people but when I look at it I see ball gowns.


After choosing my background in my journal  I went back to my Master Board stash and found a piece of paper that I worked on a couple of weeks ago.  I cut three tags out of this, smeared a glob of gesso in the center of each tag, stamped some of Dina Wakley's faces on it and a corset stamp that I got for free in the new Craft Stampers magazine and Voila! I was ready to play.


The lady tags were glued to the art journal pages and then I drew their dresses on with a black pen.


After their ball gowns were drawn on I added another lady tag to the mix.  I began just writing a little story randomly around the ladies, put crowns on them and gave one some flowers.  It didn't seem bold enough for my taste so I pulled out some more stencils, these are by Tamara Laporte and are called Tam's Inspiration. In this series of word stencils you'll find inspirational words written in Tam's lettering style.  I used Black StazOn ink with a sponge dauber to stencil these words onto my pages:  believe, stardust and you matter.


 Once the ink was dry I had my two pages done.  It is always fun to play in my art journal it gives me ideas to try on cards and mixed media canvases later.


My message on Tuesdays is always the same, get your stencils out and play with them in all sorts of different ways.  You'll be glad you did, I know I always am.  Take care, see you next Tuesday!  Hugs, Renee xx

Monday, December 8, 2014

Artists Give Back Auction Starts Today

http://www.32auctions.com/artistsgiveback 


Today, Monday, December 8th at 7 AM EST is the start of Jessica Sporn's "Artists Give Back Auction", it will end on Friday, December 12, 2014.  Artists from everywhere have donated some of their artwork to assist in the education of young girls in places like Africa.  You can read more about it by going to Jessica's website. This is the piece that I have donated.  It is one of my favorites and was featured in Somerset Studio Gallery magazine in the Summer 2014 issue.  It is a mixed media piece entitled Beauty is Art.


If you want to participate and assist these girls please go to the auction and bid on some wonderful pieces of art work, some of which is done by artists who normally do not sell their work, here is the link:  http://www.32auctions.com.  All of the proceeds are going to charity.

Have a great day!  Hugs~Renee

Friday, December 5, 2014

White Stamping Craft Stamper Challenge

I can't believe it is December already!  We have a new challenge at the Craft Stamper Take It, Make It site with wonderful prizes to be won.  For December the challenge is to stamp in white on your project.  I decided gift tags are something useful and the white looks great against the kraft colored paper.  You can cut your own tags with a die or buy tags that are pre-cut.  Whatever you have on hand.  


For the first tag I stamped with Stampers Anonymous Butterfly stamp on kraft paper using Adirondack Snow Cap ink and then I used Detail White embossing powder.  After heating it with my heat gun and allowing it to cool, I did some random stamping with an IndigoBlu crackle stamp and StazOn black ink.  I also colored in the butterfly wings a little with Memento markers in yellow and red.  I tore the edges of the paper, glued it on to a black shipping tag and doodled around the edges with a Uniball White gel pen.  Even with a ribbon on the top I think this tag has a very masculine feel to it.  You can write your message on the back using the white pen.  Here are a couple more tags using the same technique.


These are both done on Ranger #8 Kraft tags using the same stamping technique.


I'll have more samples next Friday with the same technique.  I hope this inspires you to try your hand at the CS TIMI Challenge!  Take care, stay warm ~ Hugs, Renee

Tuesday, December 2, 2014

Stampotique Poe Challenge~SDC175

This week Stampotique has a challenge that was posted by the lovely Kay Wallace.  Create a project using Stampotique stamps and an Edgar Allen Poe quote.  Since I have loved the writings of Poe since I was 12 this was right up my alley, my theme is the poem called Annabelle Lee.   I am always looking for places to store my small art projects like ATCs, tags and Art Cards so this seemed like a good idea.  I turned an old plain box into this.


It began as a plain cardboard box that I'd been saving for a while.  I coated the top and sides with white heavy gesso to give myself a nice smooth surface to work on.


Next I sprayed Dylusions Spray Inks through my Water Series stencils, Surf and Sea Foam.  I used London Blue and Cut Grass green then softened the colors with White Linen.


I decided to stamp through my Blazonry stencil with an Artistic Outpost word stencil but it didn't turn out like I had hoped so I used the same stencil to draw outlines with a black permanent marker.


Still not entirely happy with the results I used the Chunky Chevron stencil and some white gesso to cover up the parts I didn't like and to join the surface all together.


I had some book text by Poe in my stash and some other relevant images so I trimmed those into manageable pieces.  I stamped by Stampotique image called "Angel" onto a separate piece of paper then tore the image out.  The edges were distressed with several colors and heat embossed with clear powder.  Then I started gluing all the components to the top of the box.


Another fun way to get more mileage out of your stencils!  You might even make a box like this to store your stencils in.  There is still time, one more day,  to enter the Stampotique Challenge if you like, I have added the link.  Stop by next Tuesday for more stenciling ideas.  See you then ~ Hugs, Renee

Monday, December 1, 2014

Published in Take Ten Magazine!


 I just wanted to share my news with you!  Take Ten Magazine Winter Issue, due out today,  published several of my postcards made from....what else....a Masterboard.  I used Radiant Neon Inks by Tsukineko and irRESISTible colored texture spray by IMAGINE Crafts to create these backgrounds.  Lots of stamps and stencils are also in the mix.

My thanks to Stampington for publishing my cards, I am always surprised and grateful when they do.  Thanks for stopping by today, it is always fun to share news like this with people who "get" me and my artwork.  :-)  Hugs, Renee

Tuesday, November 25, 2014

Stenciled Post Cards

I have an article coming out in the December issue of Take Ten magazine showing post cards that have backgrounds of just stenciling in random colors.  If you have lots of stencils, as I do, this is a great way to use your stencils and create projects that look different every time you make something similar.  This is the post card I'm sharing today and if you read further you can see how I did this and the simplicity of it.


I began the project by laying stencils from the Water Series on top of water color paper and spritzing Dylusions onto the paper.  I used Calypso Teal and Dirty Martini inks and the stencils called Ripples and Sea Foam.  After I sprayed the inks through the stencils I lifted the stencils and applied the inky side to a clean piece of paper so none of the ink went to waste.  This way I have enough stenciled paper to make 4 post cards and scraps to use in other ways later.


After the ink was dry I sprayed Dandelion irRESISTible Texture Spray through Julie Fei-Fan Balzer's Silhouette Script stencil, gently lifting and washing off the stencil when I had finished.  When this was dry I simply cut the paper into pieces that measure 4" by 6", post card size.


I stamped Dina Wakley's Lonely Girl image in black StazOn ink onto the card, when this was dry I glued a head  onto the image .  I added more interest by using my TCW Numerals stencil and a smear of white gesso, the I put up a warning sign and added some bling to the lady.


You can do multiples of these panels at one time turning them into cards or tags, if you please.  They are fun and fast!  Take care, thanks for stopping by and I hope to see you here again next Tuesday for more stenciling techniques.  Hugs ~ Renee xx

Wednesday, November 19, 2014

Keeping a visual record of your stencils with a sample book


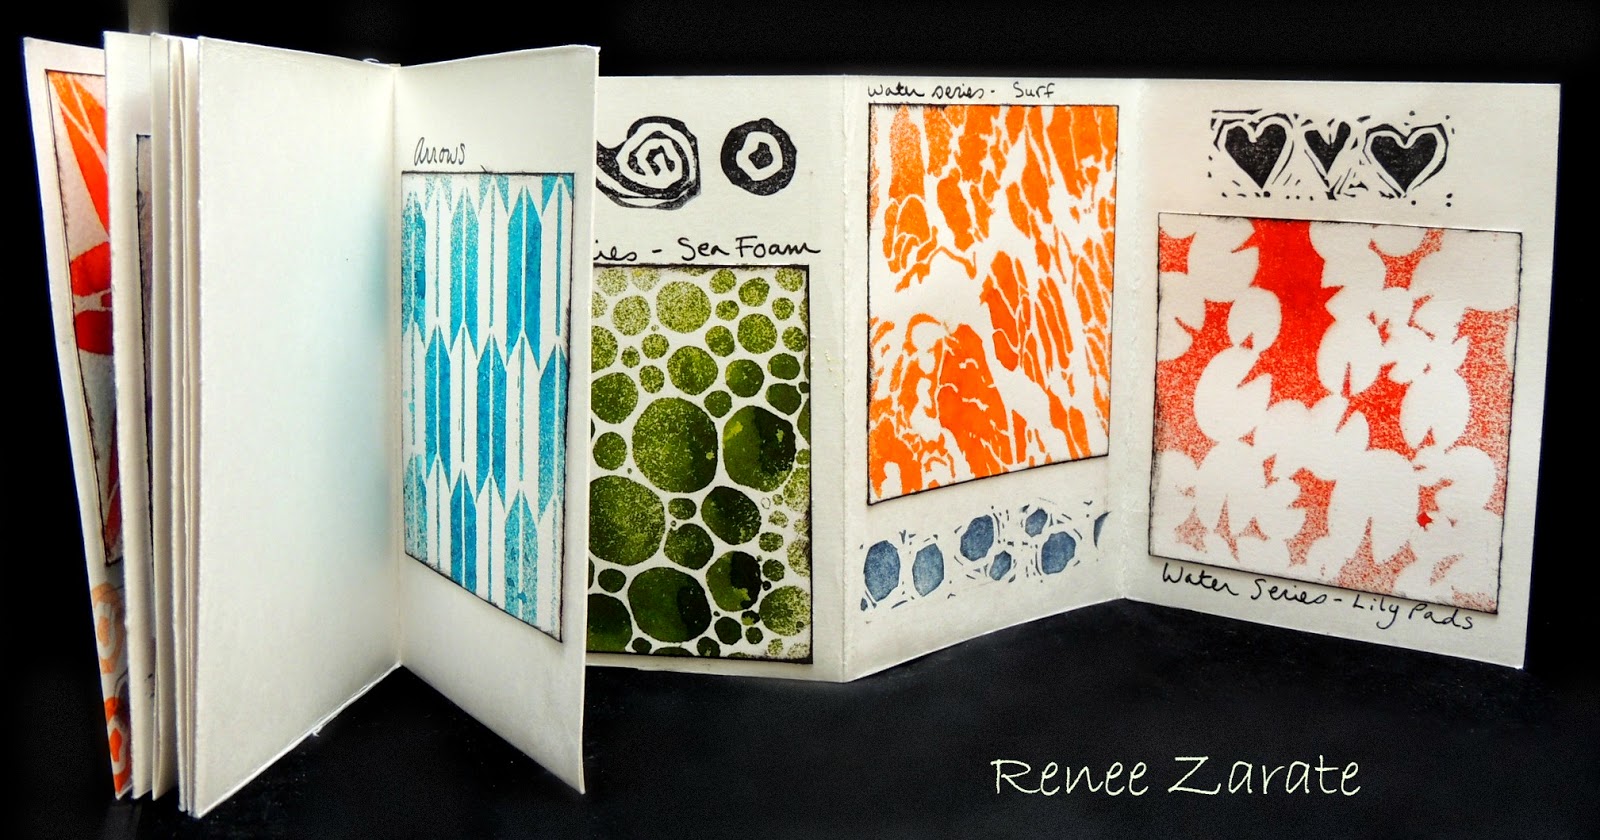
I made a mini book not long ago to remind me of what types of stencils I had and what they looked like when sprayed with ink.  Every month I receive new stencils from Artistcellar and need to keep track of what I have so I don't have to experiment too much when creating projects.  I just received a series of stencils called the WATER series so I've added their images to the book using the 4" by 4" art cards.  Here is what the book looks like.


Progressively adding more Art Cards with stencil designs


Blank book before adding Art Cards


First I placed the art cards in with the Kaleidoscope stencils designs on them.


Now I have added the Water Series of patterns to the back empty pages.


I was surprised when I sprayed each of these with ink by the patterns that came out!  The first one called Ripples almost looks like a wood grain stencil.  When there are samples like this it can really help the artist to see the possibilities quickly.

Thanks for stopping by today, I hope this has given you some stenciling ideas.  I will keep you posted each time I add art cards to my mini book.  I look forward to seeing you next week on my usual stencil day, Tuesday.  Take care, hugs~Renee xx

Tuesday, November 18, 2014

2015 Artist in Residence Imagine Crafts Design Team Announcement

 I am happy to announce that after two rounds of stiff competition I made the 2015 Artist in Residence Imagine Crafts Design Team!


I will be joining this group of very talented artists for the next year producing projects to showcase the wonderful products made by Tsukineko/Imagine Crafts.  If you have an opportunity to visit any of the following blogs you'll get a peek at the quality of art that will be shared over the course of the next year.

2015 AIRs Project Team
Heike Linnek (Germany)   http://www.stempelkatzen.de
Isha Gupta (Switzerland)   http://hobbyandideas.blogspot.com
Jowilna Nolte (South Africa)   http://www.jowilnanolte.co.za
Maureen Cronin (WA, US)   http://cronincompanystore.com
Penny Ward (FL, US)   http://www.pennywardink.com
Renee Zarate (MA, US)   http://renee-boltonhouse.blogspot.com
Roni Johnson  (US)   http://inkstainswithroni.blogspot.com
Sylvia Blum (Germany)   http://sylviastamps.blogspot.com
Taylor Usry (VA, US)   http://taylorusry.blogspot.com

2015 AIRs Video Team
Baerbel Born (Germany)   http://www.baerbelborn.com
Carisa Zglobicki (CO, US)   http://www.inkyfairydesigns.com
Gini Cagle Williams (NC, US)   http://www.ginicagle.blogspot.com
Savannah O’Gwynn (FL, US)   http://www.savannahland2.blogspot.com
Tina McDonald (NB, Canada)   http://www.tinamcd-mysanity.blogspot.com

Congrats to everyone who made the team!  I recognize a few names from the last time I was an AIRs member but there are many that I'll be getting to know over the course of the year.
Hugs~Renee xx

Friday, November 14, 2014

A Gratitude Mandala for Craft Stamper November Challenge

This is the half way point for the Take It, Make It Challenge.  You still have plenty of time to enter your artistic creations for a chance to win prizes and be published in the Craft Stamper magazine.  This week I made a gratitude mandala using a few winter and spring stamps in a different way than their original purpose.  I have a snowflake stamp around the edges, an acorn stamp, a butterfly stamp and my wonderful feather stamp.  I am still surrounded by the colors of Fall since we are having a very mild season and the leaves haven't completely fallen yet.  Great for Leaf Peeking tourists.  So my color choices have reflected that.


For the mandala circle I can use pre-cut circles out of card stock or in this case I cut my own out of water color paper using a compass.  I drew a circle around each of the areas I wanted to stamp on with a pencil that could be erased later.


After I have achieved a look that I'm happy with using my stamps then I start to color in the images.  On this mandala I used Inktense pencils and Dylusions in a water pen.


When I was finished with the coloring I used a Micron pencil to write on the side of each leaf the different qualities I want to show in my life such as love, joy, peace, gratitude, etc.  Then using the same pen I wrote my feelings about the things I am grateful for each day.


Next I used a Delicata Golden Glitz ink pad and re-stamped the snowflake images and the acorn images again to highlight them.  I have a bottle of Liquid Pearls in the Bisque color that I brought in at the end to highlight the butterflies and add some sparkly interest.


We have so much to be grateful for each day.  Just the sun and the air we breathe are things we can be thankful for every day.

Thanks so much for stopping by today, I always appreciate your visits and the comments left here.  I noticed several new followers and I want to say thank you to them for taking time out of their busy lives to follow along on my artful journey!  Big hugs to all of you, I am grateful for you!  Sincerely ~ Renee