IMAGINE Crafts® and Tsukineko®
Supplies
Staz-On Jet Black Ink, Memento LUXE Teal Zeal Mixed Media
Pigment Ink, Memento Pen in Teal Zeal and Tangelo colors, Clear Embossing
Powder, GooseBumps
Rubber Stamps
Hero Arts, sentiment by Darcie’s Heart & Home stamps
Other Supplies
Turquoise colored baker’s twine, oval shaped Monterey Pine Wooden
Embellishment piece, one sheet of white card stock, black card stock, heat gun,
adhesive,
DIRECTIONS
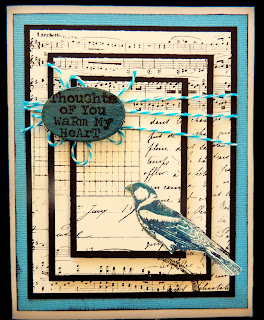
Cut white card stock to measure: 1 piece 10” by 6 ½” (to make blank white card when folded in half), 4” by 5 ¼”, 3” by 4 ¼”, 2” by 3 ¼”. Cut black card stock to measure: 4 ¼” by 5 ½”, 3 ¼” by 4 ½”, 2 ¼” by 3 ½”.
Stack the white card stock pieces by starting
with the smallest panel and apply a small amount of temporary adhesive in the
center of the piece, layer that piece on to the medium sized piece of white cardstock. Place this piece in the center of the larger
piece, apply temporary adhesive to the back of the medium sized panel and
adhere it to the center of the largest white panel.
Choose your largest stamp, turn the stamp upside
down and ink it up with StazOn Jet Black ink.
Lay the cut and glued white panel on top of the ink and use a brayer to
insure the best inking. Dry the ink with
a heat gun.
When the ink is dry, pull the three stamped panels apart. Mat each piece of the stamped image on a piece of black card stock that measures a quarter of an inch larger than the white panels (you have already pre-cut the black card stock panels).
Now you are going to reassemble the stamped image, making sure that you line up the stamped image. When the three panels are reassembled wrap a piece of turquoise baker’s twine around the left side, attach a couple of extra tied bows to the knot.
Stamp the bird with Memento Luxe Teal Zeal ink, heat emboss with clear powder, cut out the image when cooled. Dip the wooden embellishment piece in the Memento Luxe Teal Zeal ink, stamp phrase on it using StazOn black ink, dry. Coat the phrase with GooseBumps and allow to dry thoroughly. Use adhesive to attach the blue bird. Use a strong adhesive to attach the blue wooden embellishment. Distress edges of the card using a Memento Ink Pen in Teal Zeal blue.
Thanks so much for stopping by today. I hope you enjoyed the mini tutorial, have a great day. Talk to you soon ~ Renee


Renee, I like the 3D-ness of this card and I LOVE the use of the wooden piece and the fact that the words go right to the edges of it.
ReplyDeleteThe layering is so eye catching, a wonderful idea Renee and one I never would have considered.
ReplyDeleteLike that wooden element you added.
Wishes
Lynne
I just love those elegant matted layers of music with those sharp, chic black frames, and the bird works beautifully perched just so on the central panel. Beautiful, elegant card-making!
ReplyDeleteAlison x
This is just absolutely amazing, Renee! I love all the layering, but it is actually the vintage color palette that catches my eye today! Brilliant work!
ReplyDeleteI love the layers, how unique n' pretty! This is a great medium..thanks for sharing!
ReplyDelete:D
A very elegant and beautiful card !! Love your way of doing it... and showing us how yo do ! I've never tried to use my brayer directly to reverse an inked image so far... must try ! Thank you for this simple and very pleasant tute Renee. Hugs Coco
ReplyDeleteWood makes me so happy!!! Love love this! The layers of it and the stamping are excellent!
ReplyDeleteFabulous! Love those stacked panels and what a great idea to include the twine. Would love to see this one IRL!
ReplyDelete